Maker Pro
Maker Pro

HP motherboard repair

So I have an hp motherboard that had a small chip of some sort break off of it, and I could use some help identifying what exactly it is, and if a replacement can be purchased. Here is the schematic for the board where the piece went missing.
AiqsecM.png

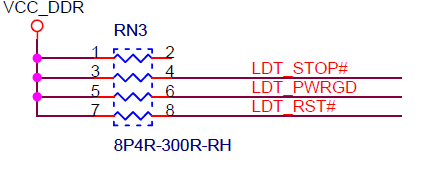
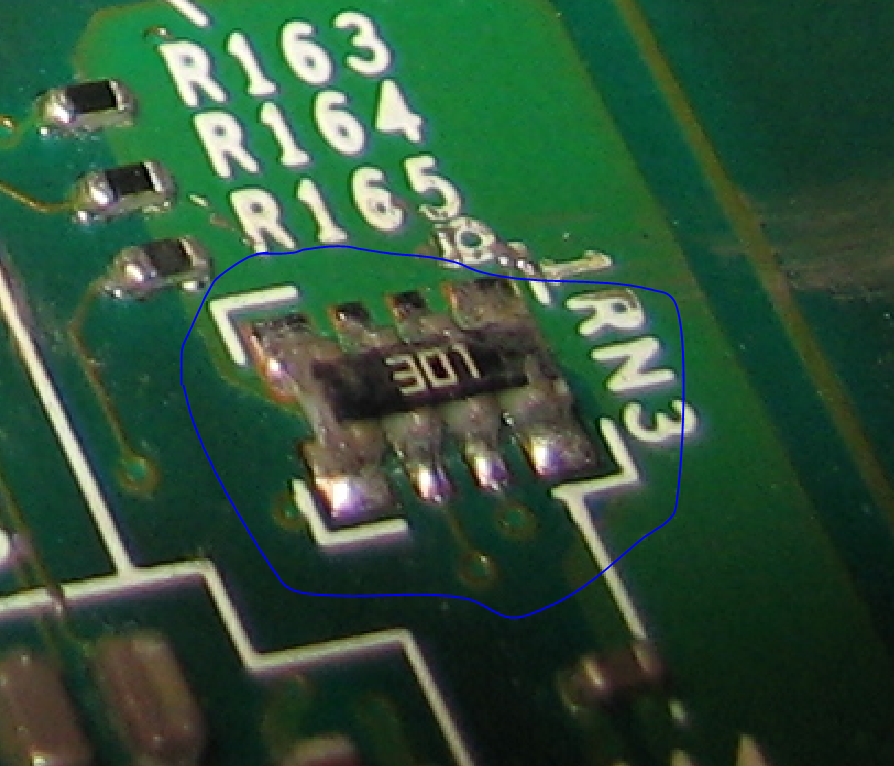
I also have a picture of what the component should look like.
m4XJhAZ.png
]

The motherboard is an HP MS-7548.
 
Looks like a resistor network, basically multiple resistors in a common chassis, or body.

Many will just be individual isolated resistors, though I know of a few applications where there are connections of varying resistance between pins.

If the schematic is accurate, then I would say that it is simply 4 resistors in the chip.
 
That schematic is right out of HP's service manual for the motherboard. Can I just replace it with 4 resistors? Is there a way to tell what values the resistors should have?
 

(*steve*)

¡sǝpodᴉʇuɐ ǝɥʇ ɹɐǝɥd
Moderator
they are 300 ohm resistors.

The single device has 4 resistors connected from one side to the other in the obvious arrangement.

Yes, you can replace them with individual resistors, but you may go mad trying.

The part you require is not that hard to source.
 

(*steve*)

¡sǝpodᴉʇuɐ ǝɥʇ ɹɐǝɥd
Moderator
Here is one of the many.

Beware that these come in several sizes. You need to ensure you get the right size!
 

(*steve*)

¡sǝpodᴉʇuɐ ǝɥʇ ɹɐǝɥd
Moderator
Do they have a larger version of that?

They come in a few sizes. 0805 and 1206 are the most common ones.

0805 means 8 hundredths of an inch by 5 hundredths of an inch.
1206 means 12 hundredths of an inch by 6 hundredths of an inch.

Getting the right size means it will solder correctly onto the pads.

If in doubt, get one in each size. Freight will probably be the largest part of your order in any case.

Also how do I know what the "Power Per Element" should be?

It's pretty much determined by size. 0.0625W is common. (That's 1/16W per element)

Soldering these is generally done with specialised equipment, however you can do it with a normal soldering iron if you're reasonably skilled.

I would advise getting some practice first though (and getting the finest tip you can get for your soldering iron). Having three or more hands can be very useful too.
 
Well I got the part installed, and the board posts and boots into windows just fine. I will use it more tomorrow, but as far as I can tell it works. Thank you for the help with this. A new board would cost over $100, so fixing it for $10 is a good thing.
 
If a new motherboard didn't cost $115 I would not have bothered with it, but for that price I figured it was worth a try
 

(*steve*)

¡sǝpodᴉʇuɐ ǝɥʇ ɹɐǝɥd
Moderator
Link, it would be interesting to hear how you soldered this, what equipment you used, and how easy (or otherwise) you found it. Oh, and how experienced are you soldering, and with surface mount in particular?

This is always interesting to me because these days almost everything is surface mount and the component you had to replace is certainly on the small side of anything I'd suggest someone with limited experience should attempt.
 
I borrowed a nice soldering iron with a small tip from a friend. I can't remember what brand it is but I will check. I had my friend hold down the chip with a small pair of tweezers while I soldered it on. I used a magnifying glass on a stand to help see. I have experience with soldering, but usually I just replace blown electrolytic capacitors. This is the first surface mounted component I have replaced.
 
Top