Maker Pro
Maker Pro

Wiring common ground for 7 components on enclosure lid

My Arduino project has 7 buttons and 2 LEDs mounted on the lid of my 3 1/4" by 4 1/2" aluminum box. I'd like to minimize the number of connections to the box mounted circuit board. Each of these components requires its own 5v connection, but I would like to wire all 7 grounds to a single wire leading to a header on the circuit board. One way I've been playing with is connecting all the component grounds to a single bare wire that follows a serpentine path and terminates with a male connector to a circuit board female header.This worked, but soldering was tedious and I managed to damage 2 on the buttons in the process. Worse, replacing 1 bad button requires starting all over again!

Plan B is to use buttons with pre-soldered leads and connect all the black leads to some kind of a "hanging header" with 8 positions: 7 for the incoming grounds and 1 to be connected to the circuit board. I tried searching at Mouser, but wasn't able to find anything like this probably because I don't know what would be called. Is there such a thing?

Or, what is Plan C?

Any suggestions welcome.
 
Sometimes the GND should be in a star/triangle configuration for various reasons. Could be current or losses involved.
But I doubt an Arduino and LEDs would suffer at all.
You could look for a 'bus bar', either solder type or screw terminal type.

Martin
 

Harald Kapp

Moderator
Moderator
I'd go for your original plan. If you solder the wire to the LEDs' and buttons' pins. Use flexible (stranded) insulated wire, not the solid bare type. Do not feed the wire through any holes the buttons may have, this way you can easily de-solder a wire from a single component should the need arise without having to de-solder every other component.
Hone your soldering skills so you don't destroy components by soldering in the first place.

Thanks. I can testify that solid is not good and neither is through the hole. Been there, done that! Regarding insulation, I don't know if I can strip segments at each negative contact. I'll try cutting with a wire stripper at each end of a segment then slicing lengthwise with an Exacto. But, does it really need to be insulated if the routing is well separated from positive contacts?
 
Here's a Plan C:

Suppose I used one of these: https://vetco.net/products/12-pin-stacking-headers-for-arduino-etc
I could bridge 8 of the contacts with a short length of bare solid wire. The 7 ground leads of the components would be fitted with one of these https://vetco.net/products/press-fit-header-pins-for-pc-boards-100-pack and plugged into 7 of the positions. The 8th would be a standard male-to-male black ELEGOO lead going to a GRD point header on the project circuit board in the enclosure.

Thoughts?
 
8 points of problem areas.
Solder them together and be done with it.
Ok, we have a Plan D. I thought about that early on but it seemed inelegant. Not that it would matter, since my project is a one -off and no one else will ever see the inside of the box;) Maybe I'll do it.

Thanks.
 
Here's my "bus" fashioned from a 12-position header:
poormansbusMediumQ.jpg
Not proud of the soldering, but my DVM shows that all positions are connected.
 

Attachments

  • poormansbusMediumQ.jpg
    poormansbusMediumQ.jpg
    136.2 KB · Views: 8
Now that I've done all that soldering making my bus I've discovered that the male connectors on Arduino kit jumpers and the ones from ELEgoo.com fit rather loosely in the header that I got from Vetco. My DVM measured resistance doesn't waver as I jiggle a connection, but I'm a little worried. OTOH, this box will not be on a SpaceX mission so I'll probably go ahead with it. I'm curious, though, if anyone else has noticed this.

BTW, I can already hear Bluejets chuckling
 
The jumpers that came with the Arduino are round (or seem to be) with 0.020" diameter, while the ones from ELEgoo are square 0.020" on a side. I've sent a note to Vetco regarding their header. I'll do the same for ELEgoo .

The glue would be if I wanted to change one component connected to the bus I'd have to redo the wiring to all the other connected components.
 

Harald Kapp

Moderator
Moderator
The round ones in my experience fit better to prototyping boards where te square ones often are hard to get in - depending in the diameter, of course.
 
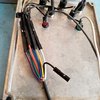
Decided to work with ELegoo jumpers, i.e., pitching the header and building a bus with female ELegoo connectors. You will see I'm use BlueJet's "solder all together" idea, but with the ability to disconnect things easily:
anotherBusrReducedSizeTo6By10.667AndResolution30.jpg
The bus for the grounds is at the left. The black female lead that's bent downwards will be connected to a mating ELegoo male lead that will be soldered to GRD on the PCB.
The individual wires for the positive connections are at the right, each to be connected to a corresponding female ELegoo lead soldered to the PCB.
 
You might be lucky but my idea did not include all of those prospective fault joints.
Thanks for the alert, Blue. There's a a trade-off between reliability and ease of repair. If I left out the disconnect points a single button failure requires re-wiring the whole thing.

BTW, a ELegoo male pin fits tightly into a ELegoo female.
 
Thanks, Harold. Someone, perhaps you. suggested this before. The problem with it is its size. The enclosure I selected early on is too small. In addition to the quarter-size proto board PCB there is a relay module occupying the bottom, and 5 buttons project down from the lid.
 
Top