Maker Pro
Maker Pro

sniffing with a sniffer

Hey guys,

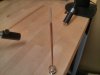
So in my particular line of work we sometimes need to send out equipment for emissions (RF emissions, not exhaust) testing. We borrowed a spectrum analyser but do not have the appropriate loop antennas so we decided to make our own. One of the engineers gave me a little back theory and some links and I'm going to build these sniffers myself. Anything I post is not to promote anything, I'm just copying what he sent me.

I thought it might be of interest for people to follow along and see how I do!

Here are the links he gave me:

http://www.millertechinc.com/pdf_files/MTI TN101 Simplest EMC Magnetic Field Probe.htm

http://www.compliance-club.com/archive/old_archive/030718.htm

http://www.eevblog.com/forum/reviews/near-field-probes/?action=dlattach;attach=23634;image

http://www.eevblog.com/forum/projec...ge;PHPSESSID=f0431bfecef6fda46828eb7c908316eb
 

Harald Kapp

Moderator
Moderator
I do know what a sniffer aka field probe is. Some will not. These pictures are useless without background information. You want your post to be helpful to others? Then add some background information:
  • what are sniffers for?
  • how wre you going to use them?
  • Which implications are your test results going to have?
Hope to see mre on this,

Harald
 
Oh this sounds interesting. The last picture you show is from the great Keith Armstrong. I have had the great pleasure to have been taught by him one of the most respected consultants in EMC. One thing I will say about near field probes is that they certainly have their place in EMC but unfortunately not for pre-compliance peace of mind. Where they are used most is for finding possible causes of emissions level failure. The reason is because they don't give a true level of the reflected RF levels. Here is an example.

H-filed Probe
You have a clock pulse switching say a CMOS chip, this switching will cause small dips in your supply voltage which will be radiated in the PCB trace as a magnetic field. As the pulse dies this magnetic field will collapse and induce a voltage in the trace and try and appose the next pulse. Not all the magnetic field will decay before the next pulse and it is this magnetic field that will radiate out into space using an impedance of 377Ohms to do so. So if you are too close you might be reading a higher value than is actually the case. You could spend ages trying to fix something that is not needed.

E-Field Probe.
The minimum distance for emission testing to EN55022 is 3m. This puts the lowest frequency measurement of 30Mhz in the far field. Now your small probe might pickup a small signal at 100Mhz and give you the impression that all is well. Now imagine you have a cable connected to the equipment. The impedance of free space is 377Ohms and if you try and push a frequency of greater that down a 3m length of wire it will choose the air to radiate. If it's less than this it will take the wire, so you then need to do conducted emissions testing down to 9KHz. But if you don't have any cables you won't need to bother.
Just thought I would mention that.
Adam
 
Field probes or "sniffers" are used to detect H-fields (magnetic) and E-fields (electric). We have been having issues with failing the 100MHz-150MHz radiated emissions (I maybe wrong with the exact frequencies, I'm just remembering what the engineer told me, I wasn't present for the actual test).

I'm sorry but I can't be too descriptive of how exactly we're using them since this is a unreleased product, all I can say is that we will be using these probes to find the source of these unwanted emissions.

We have narrowed it down to H-field, this is due to the fact that we shielded the entire system with aluminium foil (go 21st century!) and the noise is still present. I asked the engineer how you fix that and he basically said "You don't, you just contain it."

So far the plan is to unplug different components in sequence until the emissions stop, then narrow down the search from there.

This post was mostly about the construction of the probes and any sort of pitfalls first time DIY's like me will encounter

edit: although I agree that a little knowledge and theory will help people understand. One of the links I provided give a brief explanation
 
You didn't say your product was failing. You gave the impression you were doing precompliance testing. Hence my reply.
 
You didn't say your product was failing. You gave the impression you were doing precompliance testing. Hence my reply.
Any input you have is highly welcome. I actually do have a question about the construction of these probes. How sensitive is the dielectric inside the semi rigid coax? Just wondering if I need to be very quick with my work. I'm of course referring to the amount of time I'm applying heat from the soldering iron
 
I wouldn't worry too much about that the only problem you will have is the smell of burning plastic in the office. I often insist on at least 10 seconds just to piss everyone off. Solder it quickly and you will be fine.
 
So the semi rigid coax and ferrite beads came in, attached are some pictures
 

Attachments

  • 1.jpg
    1.jpg
    61.7 KB · Views: 379
  • 2.jpg
    2.jpg
    92.9 KB · Views: 397
  • 3.jpg
    3.jpg
    148.9 KB · Views: 456
Looking good. Ferrite beads? Why?

The website I was following suggested the beads to reduce shield current, I'm not sure the impact of what reducing shield current does. If I had to guess I would say something with the frequency response?

Anywho, here is the final product. The first picture is the ferrite beads I used (I used 2), the second is after I stripped a bit off of the end, and the last is the finished probe.

It was suggested I use plasti-dip as my insulator but I found just using some heatshrink tubing was okay. The only difficult things that I noticed from the construction of this was bending the end of the sniffer into a smooth circle and cutting the semi-rigid coax itself. There isn't to many metal forming tools here in my lab so I made due with a vise, needle nose pliers, and a 1/4" drill bit as a guide. This method caused the loop to have some small kinks in it which I hope doesn't affect the induced voltage. Make sure you have really sharp/slim cutting shears, I used bulky ones that squished the ends of the coax but a little counter-squishing with flat (no teeth) needle nose pliers fixed that. Make sure to use tools with no teeth, the outer shield is not that thick and you can puncture it if not careful.

When tinning the outer conductor I noticed it took a minute to heat up, so make sure you have a sufficiently sized head on your iron and be quick with your work, the heat tends to make the dielectric ooze out the end like toothpaste which can be messy.

I am going to make other probes next so I will keep updating with any hints or pointers to DIY'ers.
 

Attachments

  • 1.jpg
    1.jpg
    98.2 KB · Views: 379
  • 2.jpg
    2.jpg
    89 KB · Views: 392
  • 3.jpg
    3.jpg
    82.1 KB · Views: 413
So the next probe I made was an electric field probe. The engineer that I work with called it a "V-probe". I am assuming that the V stands for voltage but I am unsure, I tried googling it but didn't find any hard evidence. From what he explained, this type of probe has very small gain but it more directional, guess he wanted it to narrow down his search to either a trace or component. I started off with a 5" length of semi rigid coax as shown in image 1.

Next was to trim 10mm off of the end, I used a dremel in a vise for stability (image 2). The outer shielding was thicker than I assumed, the images from my first post played tricks on me. After you grind away the shielding you should be left with something that resembles image 3. If anyone has a more accurate way to do this with limited tools I'm all ears.
 

Attachments

  • 1.jpg
    1.jpg
    118.3 KB · Views: 354
  • 2.jpg
    2.jpg
    122.3 KB · Views: 419
  • 3.jpg
    3.jpg
    82.1 KB · Views: 353
Once you have the shielding cut away it gets easier. I just used an exacto knife to cut into the dielectric, once I hit the centre conductor I just rolled the cable on the bench so cut all the way around (image 4). Once you make it all the way around it should just slide off with a little effort (image 5). You should be left with something that looks like image 6, careful though because that centre conductor is VERY delicate.
 

Attachments

  • 4.jpg
    4.jpg
    110.1 KB · Views: 342
  • 5.jpg
    5.jpg
    100.1 KB · Views: 364
  • 6.jpg
    6.jpg
    61.7 KB · Views: 332

davenn

Moderator
Hi fotonics

that cable looks to be either UT141 or UT181 style. it has a Teflon dielectric and is quite resistant to heat
us microwave guys use that style of cable in mass for interconnects between modules

cheers
Dave
 
To protect the inner conductor I tried to cut some strips of heatshrink tubing, fold them around the tip, then slide another strip of heatshrink around them. This ended up being a terrible idea as once I started heating everything up to shrink it it made a huge mess, became horribly disfigured, and started bending. This led me to just use a single piece of heatshrink around the whole assembly. Over all the probe came out pretty good but the fact that it lacked any sort of amplifier it didn't have much of a response unless we physically touched the board with the end of the probe.
 

Attachments

  • 9.jpg
    9.jpg
    65.1 KB · Views: 346
  • 10.jpg
    10.jpg
    74.3 KB · Views: 355
Hi fotonics

that cable looks to be either UT141 or UT181 style. it has a Teflon dielectric and is quite resistant to heat
us microwave guys use that style of cable in mass for interconnects between modules

cheers
Dave

My schooling only dealt with a little microwave stuff but none the less it was very interesting. We did a little wave guide stuff but I think our teacher just shoved the lab material down our throats and most of it was lost in the confusion of everything
 

davenn

Moderator
if you need an insulated tip, strip off the outer shield by ring barking as you have
BUT DONT cut into the Teflon dielectric. Keep the dielectric over the inner conductor as an insulation :)

Dave
 

davenn

Moderator
My schooling only dealt with a little microwave stuff but none the less it was very interesting. We did a little wave guide stuff but I think our teacher just shoved the lab material down our throats and most of it was lost in the confusion of everything


ahhh waveguides ... that's where the real fun starts and you merge electronics with plumbing ;)

waveguide is very practical for 5GHz and up
Below 5GHz it gets too bulky to use and there's plenty of good low loss coax that can be used and is easier to work with
But above 5GHz WG comes into its own where the transmission line losses are substantially less than for coax and WG becomes smaller and much easier to use

My 2 bands of interest above 5GHz are the 10 and 24GHz bands. On 10GHz I will use short lengths of the UT141 etc for module interconnects but WG for anything over ~ 1 ft of length.
On 24GHz I will only use WG

a little off topic ... just for your interest :)

Dave
 

davenn

Moderator


hahha ;) I have been around the block a few times over the years :)

also following on from the Teflon insulation over the end of the wire. If you gently stretch the Teflon a little so that the inner conductor doesn't poke out the end, then its not going to accidentally touch something it shouldnt and bring a nasty voltage into the test unit that the probe is connected to

D
 
Top