Maker Pro
Maker Pro

ribbon cable connection repair

I have a touch button stove that transmits all of the buttons into one 15 pin cable. This plugs into a circuit board connector.

I was having issues with some buttons not working, some had to be touched just below where the button showed, and a few where I would push one button and get another response. I saw to clean the ribbon contacts, with alcohol, by removing from plug-in. This seemed to be working for awhile.

Another issue, when I tried to remove cable, it had locking tabs on each side of connector. One broke off and then the other. The stove is 11 years old, but these might have been brittle due to age.

It was suggested to push cable in, slide locking piece into position, and hot glue around edge. This also worked for awhile.

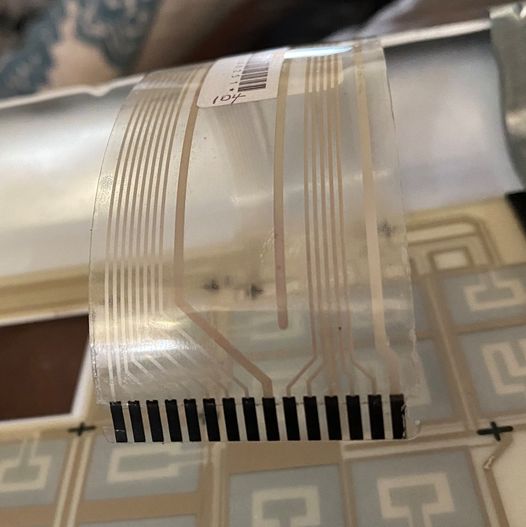
Now comes the part that is hard to explain. This ribbon is a clear plastic and the circuits can be seen. There seems to be a small gap of conductive material before another piece of plastic is wrapped from one to the other holding these in line. These uncovered areas to not even seem to touch the connectors. They seem to have something on the outside of the plastic and one of these has been almost completely rubbed off. I was wondering if these could be magnetic.

At this point I don't care what it takes to repair, even if that means soldering wires from ribbon connectors to socket one by one.

Can someone tell me how the conductive parts on ribbon could lay on top of plastic? And How I should go about fixing?
photo
 
Be aware stoves radiate a lot of heat and any cabling/connectors may well be high temperature rated.
Any form of repair must take this into consideration, as it may well be the source of the problem as well as locking tabs breaking off due to deterioration over the ages.
 
I have it on facebook for public viewing.
Be aware stoves radiate a lot of heat and any cabling/connectors may well be high temperature rated.
Any form of repair must take this into consideration, as it may well be the source of the problem as well as locking tabs breaking off due to deterioration over the ages.

Thanks, it has a heat shield and is located behind all of the burners. So if heat rises, they should be ok. Pics to follow soon I hope.
 
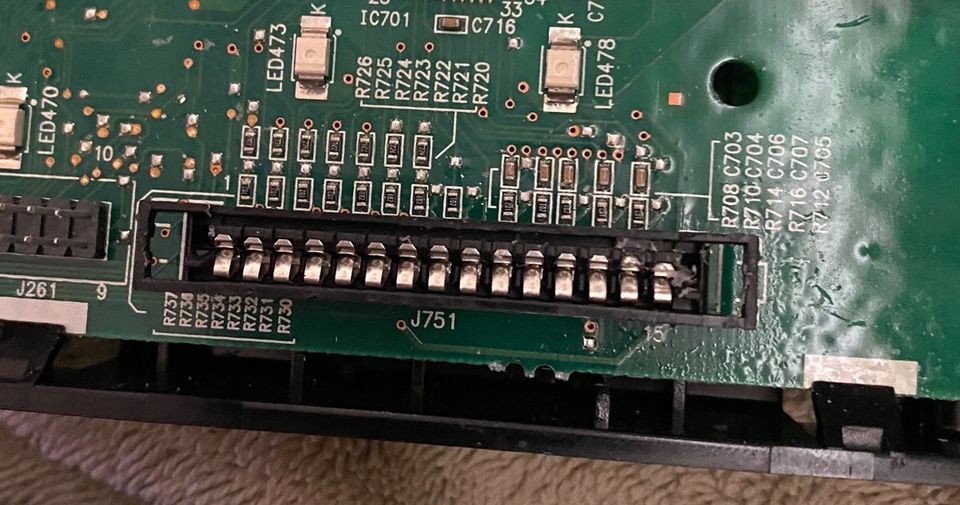
GE PB920TP1WW is the stove model number. You will see some hot glue in the right end of socket I tried. I have cleaned this up.

157304562_4576232729069815_5104872146895600501_o.jpg
157033883_4576234505736304_5825849701288608419_o.jpg
 
Last edited:

Harald Kapp

Moderator
Moderator
Can someone tell me how the conductive parts on ribbon could lay on top of plastic?
This is not a classic ribbon cable, it is called FFC cable. The conductors are bonded to a flexible film of plastic.

Are those ribbon end contacts black or just a bad photo??
These look black as in oxidized to me. Very careful cleaning with a cloth and some alcohol or contact cleaner fluid may improve the contact.
 
Looks like glue invaded the contacts on the right side.
Are those ribbon end contacts black or just a bad photo??
I tried hot glue to hold ribbon in place. I cleaned it out after picture as stated above. The contacts are a graphite color. They are all equal in color, so I assumed this is natural color.
 
I had already cleaned the contacts with alcohol and this is when the clips broke off trying to remove cable to clean them.
The stove works now when I can hold contacts in place. If I could find the lockable piece with tabs, I would be done. I tried hot glue, but that did not hold.

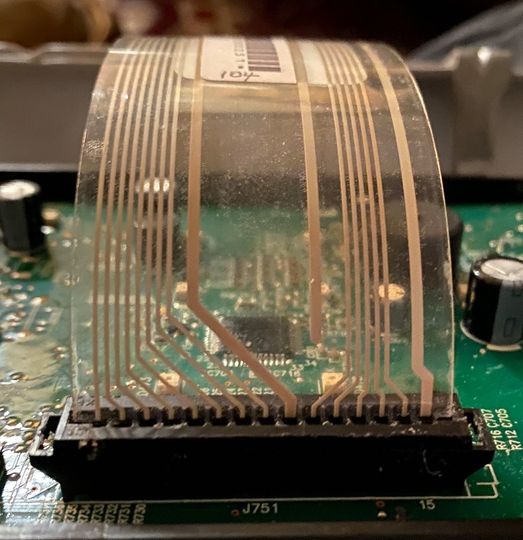
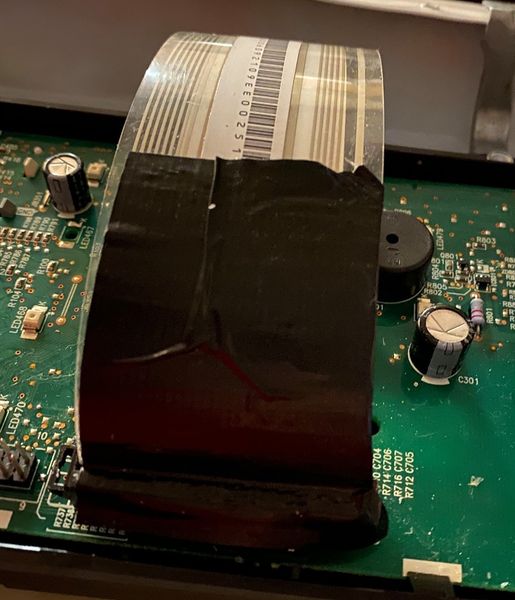
In the pic, you will see the lockable piece above the socket. As long as I hold this in place, the cable does not move. I woke up this morning wondering if duct tape would hold ribbon and the lock piece to the socket. I hooked everything back up and so far my stove is working.


157258037_4577501575609597_1236320511793874790_o.jpg
157884104_4577504115609343_5843561127211399193_o.jpg
 
I'm not clear on what these lockable tabs are, do you feel that you can harvest this off a new connector and transplant onto the old existing one, or are you planning on desoldering and removing the old connector and soldering a new one on?

Look on the sides of the connector to see if you can find a manufacturer name or symbol. Electronics supply houses like Digikey may have something compatible, if you measure the pin spacing, size, count, etc, and select same ribbon contact type and suitable temp rating.

The conductor count isn't extreme, if you absolutely had to, you could get some silicone insulated wire, and mating connectors for both ends to replace the existing connectors (or direct solder the wire but I hate to permanently marry things together in case it later needs replaced or a different repair), keeping in mind the same as above, pin size/spacing/count/temp/etc, and again digikey probably has something that should work.

Yes the contact ends have some sort of carbon film deposited to prevent corrosion. Cheaper than gold plating.
 
Last edited:
I'm not clear on what these lockable tabs are, do you feel that you can harvest this off a new connector and transplant onto the old existing one, or are you planning on desoldering and removing the old connector and soldering a new one on?

Look on the sides of the connector to see if you can find a manufacturer name or symbol. Electronics supply houses like Digikey may have something compatible, if you measure the pin spacing, size, count, etc, and select same ribbon contact type and suitable temp rating.

The conductor count isn't extreme, if you absolutely had to, you could get some silicone insulated wire, and mating connectors for both ends to replace the existing connectors (or direct solder the wire but I hate to permanently marry things together in case it later needs replaced or a different repair), keeping in mind the same as above, pin size/spacing/count/temp/etc, and again digikey probably has something that should work.

Yes, the contact ends have some sort of carbon film deposited to prevent corrosion. Cheaper than gold plating.

Thanks..
Lockable tabs may not be the correct term, but they clip in square ends you see in socket. They had the tabs that you squeeze in to release from socket. The socket had 2 parts. The piece soldered to board, and a piece that gripped the ribbon to hold the contacts against the socket terminals. Once unclipped, this could slide up the ribbon to release the "pinch" and let the cable be removed.

I thought of soldering the contacts on the ribbon to their corresponding points on socket with coated 22 gauge wire. I am not sure I have that expertise, but would pay someone to do that.

On the other side of ribbon not shown, I noticed the last (edge) contact had this grey flaking off. I think if I could add a drop of solder to each contact point on ribbon, that that would help make better contacts. Could I use conductive paint or pen to do this?

I tested continuity and noticed one side of ribbon did not make continuity with the other side for all. The contacts on the socket did from side to side.

The sliding piece has like bumps at each socket location to push the cable contacts against the proper contacts on socket.

I will look at digikey. I called a few others, and not using the proper terminology, they said they could not help. Right now, my stove is working 90%, one touch button does not do anything, but I can live that. I don't plan to touch until I have a problem.
 
I do not think you (or anyone else) can solder to that plastic ribbon cable, would probably destroy it. Conductive epoxy "might" work, or might just fall off as the carbon coating could be a bit slippery. I have not tried using conductive paint or pens for something like this, have no idea but again it seems to me that you may have a hard time keeping adhesion on a carbon coating.

If the contacts are all on one side, what if you just slipped an additional piece of heat resistant material into the connector slot behind the ribbon edge as a shim to keep tension on it higher? It is hard to make suggestions without having it in front of me.

Can the sliding piece be replicated with a 3D printer? I don't have one but perhaps someone who does, could help there if you can find a dimensional drawing of the socket and yet if you can, you probably can use the lead to find that, to buy a new socket instead.
 
I woke up this morning wondering if duct tape would hold ribbon and the lock piece to the socket.
I hate those locking tabs. They love to get brittle and break on at least one side. I usually do like Dave9 suggests with a shim but I reckon the tape is fine. The only thing I would worry about with the tape is if you tried to remove it later on, those types of ribbon cables damage very easily other then that I think it should hold it in place just fine. It doesn't have much force trying to pull it out and its not something that is going to move around.
 
I hate those locking tabs. They love to get brittle and break on at least one side. I usually do like Dave9 suggests with a shim but I reckon the tape is fine. The only thing I would worry about with the tape is if you tried to remove it later on, those types of ribbon cables damage very easily other then that I think it should hold it in place just fine. It doesn't have much force trying to pull it out and its not something that is going to move around.

The cable is actually a pretty solid piece of plastic. All contacts are inside the lockable part, so tape is not in contact with any part of circuitry.

Also I got to thinking, there are 28 touch buttons which means both sides may be different contacts or total of 30. Only 2 buttons are getting no response, so I can live with that for now.

I called one parts company and they called it a card edge socket. But card look more like a credit card thickness. I have been able to find anything like what I have.
 
I hate those locking tabs. They love to get brittle and break on at least one side. I usually do like Dave9 suggests with a shim but I reckon the tape is fine. The only thing I would worry about with the tape is if you tried to remove it later on, those types of ribbon cables damage very easily other then that I think it should hold it in place just fine. It doesn't have much force trying to pull it out and its not something that is going to move around.

I tried a piece of cardboard for a shim, but I didn't like the outcome. The cable can still pull out easy. I was also told to make the ribbon thicker with tape.

I know the contact area looks big with the grey areas, but in reality, there is only about 2mm of contact area. It is the plastic strip with circuit inside, then about 2mm of contact, but then plastic wraps from one side, under the end, and back to the other contact area, to keep the contacts straight

There is no tape touching the contacts on cable and cable plastic is pretty thick. It will not roll from left to right and would make at least a 3" circle if tried to roll up. It is not that flexible. I don't think the tape would be to hard to remove.
 
What has worked for me is drilling tiny holes on the outer edges of the FFC and then using small twist wire to loop it through the base to secure it.
See yellow dots.
Screenshot_20210306-080557_Chrome.jpg

Another trick that sometimes works to fix a loose contact is to insert a tiny piece of aluminum foil in the shape of a "V" into the socket. If the foil is too thick, it will loosen the neighboring contact.
 
Thanks for all the help.
So far, all but 2 features are working. I may have to try paint or pen to get the other contacts working. Any ideas? I like te drilling hole idea and will try that when I attempt to fix contacts.
 
Top