Maker Pro
Maker Pro

LED strobe circuit needs more current

LedFlasher.gif


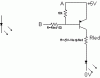
I have this circuit working on my breadboard. This circuit does exactly what I need in terms of effect but so far I have not been able to find a way to get more current to the LED output.

I tried using a couple of different Darlington transistors (the one on the breadboard now is a Fairchild Transistors Darlington PNP Epitaxial Sil US HTS:8541408000 ECCN:EAR99

No luck so far. When the BC557 PNP is replaced by the Darlington the circuit powers the LED up slowly (too slow) then it fails to shut off.. Q1 does not turn off.. Apparently for some reason the discharge of the electrolytic does not drop the voltage low enough to turn off Q1 let alone keep it off for any length of time.. I tried a few changes of resistors but no luck.. Apparently I have not fully grasped the dynamics at work in how/why Q1 shuts off and why the Darlington has changed this.

I am still new to this stuff though I have been studying up...

I need to get this circuit or a very similar one to FULLY power optionally a 1/2 watt LED or 2 half watt LEDs, so from ~120ma to ~240ma, depending on circuit config, power input is ~5vdc not 6.

Thanks,

Jim
 
Last edited:

Harald Kapp

Moderator
Moderator
Replace the LED by this circuit:
attachment.php

Hereby the LED driver is independent from the flasher circuit. In your original circuit the LED current is limited by the 22 Ohm resistor. You cannot change the 22Ohm resistor arbitrarily because it serves as a second purpose for feedback to make the flasher blink.
 

Attachments

  • LED_Amplifier.gif
    LED_Amplifier.gif
    2 KB · Views: 1,411
Replace the LED by this circuit:
attachment.php

Hereby the LED driver is independent from the flasher circuit. In your original circuit the LED current is limited by the 22 Ohm resistor. You cannot change the 22Ohm resistor arbitrarily because it serves as a second purpose for feedback to make the flasher blink.

Okay I think I get this.. A and B are the LED outputs.. 5 volts is +5 ... 0 volts is ground?

But, will this allow for the same strobe effect and copy the waveform of the signal or simply turn on the LED for as long as there is a signal?

Thanks,

Jim
 
Last edited:

Harald Kapp

Moderator
Moderator
The new LED will light in the same way as the old LED.
Note that this circuit replaces the old LEd, do not leave the old LED in the circuit as this will reduce the current available for driving this simple amplifier.

Before ruining a pricy High Power LEd breadboard the circuit using a cheap standard LED and tune (if necessary) the resistors as required to get the desired effect.

I will give it a shot.. Thanks Harald!

Any idea what R2 (B) value might be?

I will update when I have a chance to do this right.

Jim
 
Okay well I have this working sort of..

I used:

R1 10K
R2 33
R3 28

It works with a BC557 PNP but not enough current.

I have a couple of different Darlingtons but suddenly they are not working as expected.

I tested the resistance between collector and emitter pins on the PNP darlingtons and much like the 557 it shows about ~9 Mega Ohms -- OFF.. However even when I remove the base connection and simply apply power from the collector to the emitter (in the circuit) the darlingtons are almost wide open sending lots of current and the LED is always ON... The 557 with the same test is closed--OFF.. In other words the darlingtons seem to be on and won't turn off even with no beta. I am utterly baffled as to what this means.

Any suggestions as to what transistor might be most suited to this might help but I really need to understand what is going on with the Darlingtons.

Jim
 
Last edited:

Harald Kapp

Moderator
Moderator
Which resistor is which (R1, R2, R3)?

It works with a BC557 PNP but not enough current.
You mention 120mA ... 240mA. The BC557 is definitely the wrong transistor for this because it is rated for 100mA max. Use BCX51 for example.

Do you have the 10k resistor from the base to point A (Vcc) in place?
Without this resistor even a very small base current will suffice to open the darlington.

What do you mean by "no beta"? The beta of a darlington is approx. beta1*beta2 where beta1,2 are the betas of the individual transistors. The purpose of a darlington is not primarily to drive high currents but to provide a large current gain.
 
Which resistor is which (R1, R2, R3)?

You mention 120mA ... 240mA. The BC557 is definitely the wrong transistor for this because it is rated for 100mA max. Use BCX51 for example.

Do you have the 10k resistor from the base to point A (Vcc) in place?
Without this resistor even a very small base current will suffice to open the darlington.

What do you mean by "no beta"? The beta of a darlington is approx. beta1*beta2 where beta1,2 are the betas of the individual transistors. The purpose of a darlington is not primarily to drive high currents but to provide a large current gain.

I wired it just as shown.. It works with the 547.. Also works with/without the 10K.

What I don't get is how the darlingtons are open.. I simply connected the + to the collector and the emitter to the + LED and the - LED to ground R3 and it lights up (no base connection).. Yet measuring collector to emitter resistance shows the same as the 547.

Makes zero sense to me the 547 does not do this-- it's off.. and ALL the darlingtons are doing this.. I don't get it..

I will try to find the transistor you mention...

Thanks,

Jim
 
Last edited:

Harald Kapp

Moderator
Moderator
Also works with/without the 10K.
Obviously not with a darlington. At a current gain of ~10000 and a minimum LED current of 5mA a small base current of only 5mA/10000=50nA suffices to turn the LED on. That small current is easily generated by simply touching the base of the transistor or even by particles of dirt. That is where the 10 k resostor from the base to Vcc comes into play. It will set the base at defined potential, thus keeping the transistor off without additional base drive from the flash circuit.

And by the way: R2 (base?) =33Ohm is way too small. The base current required is Ibase=Ic/gain. The BCX51, for example, has a current gain of at least 40 at 150mA Ice. At Ice=240mA therefore a base current of 240mA/40= 6mA is sufficient. This can be achieved by a 1kOhm resistor (or a bit less).

One more note: I've simulated the circuit and noted that it will flash only if you do not replace the LED by my circuit. Instead, leave the LED in place and connect my circuit in parallel. The problem arises because my circuit doesn't allow the high current that flows throughthe original LED. Therefore the charging/dischargig cycle of the electrolytic capacitor doesn't work as expected. The "old" LED allows this current to flow while the voltage drop across the "old" LED will trigger my circuit to drive a stronger LED with more current.
 
Last edited:
Obviously not with a darlington. At a current gain of ~10000 and a minimum LED current of 5mA a small base current of only 5mA/10000=50nA suffices to turn the LED on. That small current is easily generated by simply touching the base of the transistor or even by particles of dirt. That is where the 10 k resostor from the base to Vcc comes into play. It will set the base at defined potential, thus keeping the transistor off without additional base drive from the flash circuit.

Hmmm.. I'll need to think about that.

I realized my error on the darlingtons.. I had the polarity reversed..(sorry I'm a noob) :eek: Apparently it allows current to pass in one direction but not the other when off..

It is now working with the darlington... Still not too bright though I need to study what you wrote above.. The timing changes with any change of LED and transistor.. Faster now with the darlington.

The 10K is connected from the + LED output of the original circuit to the base of the transistor. The 33 is connected from the - LED output to the base.

Thanks very much for your help..

I will report back as hopefully I get closer to my objective.

EDIT

It does still turn on the darl without the 10K... Not sure what that means.

Jim
 
Last edited:
One more note: I've simulated the circuit and noted that it will flash only if you do not replace the LED by my circuit. Instead, leave the LED in place and connect my circuit in parallel. The problem arises because my circuit doesn't allow the high current that flows throughthe original LED. Therefore the charging/dischargig cycle of the electrolytic capacitor doesn't work as expected. The "old" LED allows this current to flow while the voltage drop across the "old" LED will trigger my circuit to drive a stronger LED with more current.

I noticed this as well but I got it to work w/o the original LED, (i think red to white LED did it) perhaps I need to go back and start over as the results are not what I need yet. I also noticed that with the old LED in the second LED lights first, which I thought interesting.

How bright of a flash/ma are you getting on the second LED?

Will be working again on this tonight.. Thanks again.

Jim
 
Last edited:
I am going to get some different transistors as I think the ones I have are less than ideal..

I have to re-check but so far the current is too low, have to check again when new transistors arrive, and adjust vales..

Since the LED will only light periodically I think some of the values can be outside the normal range and assist in getting a brighter peak strobe effect, I will test..

Will update..

Thanks again Harald,

Jim
 
Last edited:

CDRIVE

Hauling 10' pipe on a Trek Shift3
Since you want to drive a high current LED I'm wondering if this type of flip flop is your best choice., It wasn't designed for this. I would think that a common 2 NPN flip flop with a logic level FET or Darlington driver would be a much better design. It would make the timing of the flip flop totally independent of the LED and driver.

Chris

Would that type of design allow for a similar wave form? This circuit does a nice impression of a strobe.

I may want to redesign with certain additional specs, but for now I can get the PCB for this circuit which is handy.

There are a total of three or four LED drivers I am trying to get ready in various stages while I am learning as much as possible about these circuits which is still new to me.

Thanks for the ideas.

Jim
 
Last edited:

CDRIVE

Hauling 10' pipe on a Trek Shift3
Would that type of design allow for a similar wave form? This circuit does a nice impression of a strobe.
Jim

To easily fill this bill my recommendation would be an LM555. It can source or sink a 200mA load directly. Adjusting the pulse width to produce a strobe effect is also easy and adjustable.

Chris
 
To easily fill this bill my recommendation would be an LM555. It can source or sink a 200mA load directly. Adjusting the pulse width to produce a strobe effect is also easy and adjustable.

Chris

I may do that.

Is there some place where folks will design a schematic to fill a requirement..? After studying this stuff I am less than confident I will be ready to design circuits any time soon, especially the slightly more complex ones..

Jim
 

CDRIVE

Hauling 10' pipe on a Trek Shift3
As long as this is not homework or a school project we can do it for you right here.

Chris
 
As long as this is not homework or a school project we can do it for you right here.

Chris

I wish it was for school... :)

Should I start a new thread or just continue here?

For this circuit here is what I need:
1. Produces a realistic strobe effect.
2. Lowest possible cost of components to build.
3. Small size but not so small that a person would have trouble assembling by hand.
4. Consistent performance.
5. Adjustable timing via Pot / ((optional) adjustable flash via pot)
6. Two channels/outputs for driving up to two LEDs
7. Capable of driving either red or white 1/2 watt LEDs by changing resistor or jumper.
8. Low noise/RFI
9. Operate on 5-6vdc

That's pretty much it for Strobe Circuit 1

How difficult?

Thanks very much for the help.

Jim
 
Last edited:
Top