Maker Pro
Maker Pro

LED strips help required

Dear Sir,
I am hoping you can help me with a circuit, not being a professional and only an amateur.
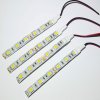
I have a 00 gauge model train layout. On it is a lighthouse that I have attached a couple of LED strips.
I have a few 555 timers and carriers and was wondering what it would take to make a slow flash, similar to what a lighthouse
would be. The strips, as can be seen via the photograph enclosed, do contain components to allow to work via
directional 12 DC or DCC omnidirectional voltage. Hope to get a reply. Anything appreciated.
Best Wishes,
Lee
 

Attachments

  • $_57.JPG
    $_57.JPG
    97.5 KB · Views: 86
It would not give you that bright flash in the middle, but you could use a 555 astable just with a capacitor between 0V and the output. This would smooth the action. Either you could do an RC time constant calculation or you could just experiment, I recommend the latter.

Alternatively, you can do a little more work on the aforementioned circuit. You can take the output of your capacitored astable, feed it into a comparator and use the comparator output to fully turn on a bipolar or MOSFET to make your LED fully turn on. This should have the same effect as the video.

But PWM would be more efficient.
 
The video would be absolutely what I'm after. Brilliant. As I am a complete novice but have done a fair bit of soldering
what would I need in the way of components and what would be the circuit diagram? I have never heard of some of the terminology used such as bipolar or MOSFET or PWM so I apologise but I can 'Google' the terms. I would like to say I appreciate the input from some very helpful chaps. Many thanks as I will have a fantastic model of a lighthouse on the train layout with your help.
Best Wishes.
 
And your name is? :) Let me think about this a bit. My initial thoughts are a micro, but I may be able to come up with something else. It might take a while as I have a few things to do this weekend.
Adam
 
Ok so I thinking to get you going I would write some software for you and base it on an Arduino board. the reason is that you can then make some changes of your own with some guidance and all you will need is a little Arduino PCB and PC. The development environment is free and you program it via USB. How do you feel about that? I will need to order a little board but that's fine I could do with a few more, all mine are being used at the moment.
Adam
That sounds alright. Not being an expert I 'googled' 'Arduino' and saw many different types and prices. The PC part I'm OK and have a very good understanding. Hopefully with your guidance should be OK. Many thanks for your expertise.
Best Wishes,
Lee
 
Hi Lee. I ordered a little Arduino Nano PCB today, should arrive in a couple of days. I'll let you know when I get it and if you still haven't found anything I'll see if I can write some code.
Adam
 
Hi Lee. Board arrived this morning and I managed to put something together that might work. See link to video below and the code which runs on an Arduino Nano. It's in black and white because the LED I had was blue. Hopefully it gives you a rough idea. Part of the code is in the example code called fading. You access the examples by using the Arduino IDE and once installed and running you go to File, Examples, Analog, fading. You can then modify the code or just copy and paste the code below.

The code basically has two loops, the up and down loop. These gradually increase and decrease the PWM. The +=1 and the -=1 adjust the magnitude of steps from min to max timings, i.e. how big a jump in brightness you will get. the lower the number the smoother the fade in and out will be. The delay(10); is how quickly it cycles through the PWM up and down. Both can be changed separately.

The delay(100) is the delay that the high output flash is on for. All delays are in ms by the way.

At the bottom is the basic circuit I used just to quickly get something working. You will have to use a different circuit in the final design because of the extra current needed for the brighter LEDs and also to add a bit more drive to make the flash at the end a bit more noticeable.

Hope this helps

Adam


Code:
int ledPin = 9;    // LED connected to digital pin 9
 
int ledPin_high_pulse = 10;    // LED connected to digital pin 10
 
  
void setup() {
 
  // nothing happens in setup
 
  pinMode(ledPin_high_pulse,OUTPUT);
 
}
 
 void loop() {
 
  // fade in from min to max in increments of 1 points:
 
  for (int fadeValue = 0 ; fadeValue <= 255; fadeValue += 1) {
 
    // sets the value (range from 0 to 255):
 
    analogWrite(ledPin, fadeValue);
 
    // wait for 10 milliseconds to see the dimming effect
 
    delay(10);
 
  }
 
 
  digitalWrite(ledPin_high_pulse,HIGH);
 
  delay(100);
 
  digitalWrite(ledPin_high_pulse,LOW);


  // fade out from max to min in increments of 1 points:
 
  for (int fadeValue = 255 ; fadeValue >= 0; fadeValue -= 1) {
 
    // sets the value (range from 0 to 255):
 
    analogWrite(ledPin, fadeValue);
 
    // wait for 10 milliseconds to see the dimming effect
 
    delay(10);
  
  }
    
    delay(1000);
 
}

PWM LED.PNG
 
Many thanks Adam. I am in awe, seriously. I have never had the ability to do this sort of thing.
Just what I required. I cannot express how grateful I am. Will load a video of finished lighthouse when completed.
Very much appreciated.
Very Best Wishes,
Lee
 
Top