Maker Pro
Maker Pro

Kawasaki Sax-a-Boom Toy Repair

Hello, I’m seeking advice from anyone with experience repairing electronic toys. I have a toy saxophone that uses four AA batteries, has a three-position slider switch, a volume knob (potentiometer, I assume), circuit board, and speaker. There are also several buttons (saxophone keys) that trigger different sounds. There appears to be continuity throughout the battery compartment. The volume knob showed a change in resistance value when I measured it with a meter. The switch I’m not sure about. I’m not versed in using a meter much beyond checking for continuity. I’m hoping someone will offer a concise procedure for tracking down the faulty part in this circuit.
 
The problem is that there is no audio output. There is no master on/off switch. The three-position switch selects between different output configurations (normal, loop, etc). When you press one of the seven buttons, a preset pattern of notes plays. But no sound is coming out.
 
Sir Bricago . . . . .

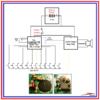
With no forthcoming photos from you, as of yet, I'm just gonna draw up an elementary block diagram to show my suspicioned perception of that unit.
FIRST . . . a toy selling for $20 decades ago had to be made c h e e e e e p and simple excepting for the ungodly complex music and timing and synthesized voicing and memory and looping circuitry, which was on a custom chip . . .possibly a black epoxy Chip On Board integrated circuit, as per my bottom illustration.
Then the other components shown.
You should be able to ascertain if there is being a timed music sequence produced, after punching a key, by using a DVM in its AC mode and set to its lowest or lower range and meter probe negative goes to the battery negative ground or to the assigned Z terminal of the volume control.
THE UNITS VOLUME CONTROL . . . .
Is a rotary control with a round resistive disc inside that has a rotary contact . . .Y . . . that touches and swings a 270 degree arc around that discs resistive element. Each extreme end on that disc has a connection . . . .X and Z
Get your brain fully in gear and go inside of that unit with your imagination and perceive that as the volume knob is rotated full CW, that the Y rotor contact will be resting at the end of its travel against X end, and instrument volume will be at max volume..
Alternatively, if rotated in the opposite direction, CCW the rotor will be receiving less signal / less volume produced from X and eventually be grounded out when MAX CCW and grounded out with Y against Z and . . . no sound then.
Back to your having neg meter probe at battery neg or closer . . . . on your newly discovered term Z of the volume control.
Now the meter positive goes to the terminal X of the volume control.
Play a note and during its limited note playing sequences, you should be able to see bobbling DVM digits for the duration of playtime. then, no reading after that musical ditty ends.

Now for testing the audio amp, initially run the volume control max CW to its highest volume position.
Power on.

Now a NEANDERTHAL test for the audio amplifier is to find yourself, anywhere from a 1000 ohm up to 10,000 ohm resistor and use a wire extension on one lead to permit your being able to touch either, the battery + or switch + or board + 6 v supply connection, with one lead of that resistor and the other end of the resistor touches X terminal of the volume control abruptly, for just about as long as it takes to strike a match.
If you heard a pop / or / burst of static . . . . . your amp is amping and should be able to . . . . .if only weakly . . . . make that sax sound be heard, if tried again .
I would go on to the speaker next, but lets let you read the amplifier IC numbering and pass it back to us, to see what design we are dealing with.
The bottom photo gives an expected pic of that power audio IC.

PHOTO REFERENCING . . . . .
upload_2021-11-12_12-49-20.png


Thaaaaaaassit . . . . . .

73's de Edd . . . . .

I've had such a day so far, that I think I'll just stick an "Out of Order " sticker on my forehead and call it a day.


.
 
Thank you! This is above and beyond what I expected in a reply. I will post pics of the components as soon as I have a chance. I’ll follow this advice and report back the results. I really appreciate it!
 
2417C7EB-5FBF-4EC2-8A15-F7773336D67E.jpeg C03744F8-3E73-42B1-8CE0-08BEB2389B1E.jpeg 2BEB6BAB-7983-4ABD-BA43-C8D22633CE69.jpeg 961043A6-3EE4-404B-80A0-76C76B6EE9F0.jpeg DB89BF35-EED6-4DAC-ACA7-7E473622DBAF.jpeg 61D31E4C-0A39-4A33-9175-C892862DBF67.jpeg 9426A278-73A5-475A-A5AB-770EFF27017F.jpeg ED12E849-38E0-40E9-B4F8-ED78A986B746.jpeg 0A135E13-2981-451E-AF6A-45AE50D2E557.jpeg 6AE23245-EE08-4435-9E4B-CA415FFC6147.jpeg

I worked on this sax today and wanted to follow up with pics and notes on 73’s advice. First, here’s a description of the components:
  1. Battery case for 4 AA batts (6V)
  2. “Button Board” - each of the 8 buttons on this board plays a unique, short riff. The board has printed traces and the buttons have little black discs that, when pressed, connect the traces to make contact. This board connects via a ribbon cable to the…
  3. Circuit Board - resistors, capacitors, etc. One component, in the upper right corner in the last pic, resembles a button battery glued into a holder. I know vintage synths sometimes have these. Could replacing this be the key??
  4. Three-position switch - This switch lets you choose to play riffs as a continuous loop, no loop, or auto stop.
  5. Volume knob - no click to turn off, just Min to Max
  6. Stop button - if you want to stop the sound mid-riff, press this.
  7. Speaker
Following 73’s advice as well as I could, here are some measurements I took (with batteries in, circuit energized):
  • Battery compartment shows continuity and 6V.
  • Placing meter leads on each of the solder pads on the speaker shows continuity and 8 ohms.
  • The three-position switch was showing continuity on pins 2 and 3 (viewed left to right) in all three positions. I desoldered and resoldered and now it shows cont in these positions: Auto Stop: red and orange; No Loop: orange and yellow; Continuous Loop yellow and open pin 4.
  • Finally, when set to Max, the volume knob showed continuity on blue and green and showed 11.2K ohms on brown and green. At the Min setting it showed continuity on brown and green and 11.2K ohms on blue and green.
Any advice for further testing components or tracking down the reason for no sound would be greatly appreciated!
 
Thank you, Bertus and Bluejets! I think you’re exactly right. I’ll post more pics from other angles to confirm.

Assuming it is a trimpot, do you think the brown goop is sealing wax to keep it in position? (This was mentioned in the Wiki link)

I’d be interested to hear advice for next steps in trouble-shooting.
 
Last edited:
Sir Bricago. . . . . . . . . . . . .( I'se done never mets myselfs a Bricago, before )('less'n that's Brian from Chicago )

[ Key up the eeeeeeeeeeerie organ music, and let the SEANCE continue ]
While I now "read the board" . . . . .
Keep up with my thought flow in the . . .
PHOTO REFERENCES . . . . . below
Your COMPLEX mean music machine function is being accomplished all within the "Le Chip ! " that is black epoxy ? mounted and covered up on the front side of that phenolic blank.
Its pin # 8 output is the music audio that connects at the BLUE oval , to the BLUE wire that is at the top end of the volume control.
In accordance to how loud you want to play, the movable pot wiper at the GREEN wire, feeds back to the board at my GREEN circle and routes down to an audio input pin of the audio amp chip. That nearest blue E-cap . . .possibly ? . . . . looks like it might be an in line coupler.
NOW . . . . .your task . . .Captain Kirk . . . . .should accept it . . . . . .is to surreptitiously get the identity of that RED X chip back to us ,as well as to use your ultra sub mini Minox spy camera and use the diagrams to ascertain which is being its pin #1. ( I put both possibilities down. )

Where I have the "Dig Here" RED X should be the 8 pin power audio amp for the speaker audio feed.

Worry . . .worry . . .WORRY . . . .all of it, being about that cheeeeep phenolic trim pot.
My . . . . VERY HIGHLY Edd-u-cated guestimation is that is being used in the final operational testing of the unit. You DON'T want to be sending out a mistuned SAX-a-ma-phone . . .DO YOU !
Look at the schematic redraw of that extreme corner circuitry. Its components are being color coded / for association.
Hypothetically . . .I'm randomly assigning 100k for that total resistive trios values.
Should I use the extreme 47 K values the 5 K should fall in the CENTER of that 100K value and then one should be able to s..l..o..w..l..y VERNIER adjust within its limited adjustment range.
AND that will be a very VERNIER adjustment . . . . . not a ZIP - - - - - - -ZIP . . . .BAMMMM, like the touchy adjustment wiper of using a sole 100K pot would be.
Then, I also gave two other resistor sets values to let you see that that "sweet spot" adjustment / resistive point can be skewed around, up and down the 100K spread resistive spectrum / sector, just by those R1 and R3 resistor values, inter ratios being chosen..

Sooooooooooo what is happening here, is that there is being a master oscillator within the chip and that frequency gets divided down in digital stages to get all of the musical scale frequencies. With all of them being spot on, by virtue of the digital division resolving capability.
And then . . . . .AND THEN . . . . .AND THEN ***** . . . . . the production line test person uses that trim pot to set that master oscillator frequency SPOT ON and then applies a dab of a fractable sealant to its rotor, to dry.

THE SPEAKER . . . . .
Looks like it uses two YELLOW wires going to the PCB and logically, end up at the RED X IC.
Can you now confirm if there is either of them making direct wired connection into an IC pin, or is a series E-cap in circuit ? . . . .but I don't see any on that immediate side of the board.

Gimme some feedback . . . . . . or more ?'s

ADDENDA . . . . .
Ach himmel ! I am 'chust now seeink , dat I dun bin havink lefted out dis final para-ma-graf

At dead center photo, seems to be the momentary contact TACT switch, I'm expecting to be its on off switch.
With consideration of it working with the boards two discrete transistors to make a power latching circuit, to initially power up the unit until the higher value resistor seen and its charge / timing capacitor companion, bleeds down and shuts the system power down.


BOARD REFERENCING . . . . .

Sax-o-Boom-PCB-Wiring.png


73's de Edd . . . . .
F.I.O.
What does 73's mean in ham radio?
What does de mean in ham radio?
https://www.google.com/search?q=73's+de++.+.+.+.explanation&sxsrf=AOaemvLUVukJvuRZ-bKszZEYB9O1Mhg56Q:1637875152816&source=hp&ei=0P2fYaXxLu-iqtsP4oO6oAQ&iflsig=ALs-wAMAAAAAYaAL4G-90odFBgv6LjIH6uunuNTGSLwZ&ved=0ahUKEwilmau1uLT0AhVvkWoFHeKBDkQQ4dUDCA4&oq=73's+de++.+.+.+.explanation&gs_lcp=Cgdnd3Mtd2l6EAw6BwgjEOoCECc6BAgjECc6DgguELEDEIMBEMcBEKMCOgsILhCABBCxAxCDAToICAAQgAQQsQM6BQguEIAEOgUIABCABDoICC4QsQMQgwE6AggmOgQIABAeOgYIABAWEB46BQgAEIYDOgUIABDNAlDvDVj9sQFg4MoBaAFwAHgAgAGjAYgBphKSAQQyNC4zmAEAoAEBsAEK&sclient=gws-wiz

Edd


AND now . . . . . . .

TODAY’S STOCK MARKET REPORT


Helium is up.
Feathers are down.
Paper is stationary.
Fluorescent tubing was dimmed by light trading.
Knives were up . . . . sharply.
Cows steered into a bull market.
Pencils lost a few points.
Hiking equipment was trailing.
Elevators rose, while escalators continued their slow decline.
Weights were up in heavy trading.
Light switches were off.
Mining equipment hit rock bottom.
Diapers remained unchanged.
Shipping lines stayed at an even keel.
The market for raisins dried up.
Coca Cola fizzled.
Caterpillar stock inched up a bit.
SUN peaked at midday.
Balloon prices were inflated.
Scott Tissue touched a new bottom.
Huggy Diapers . . .also touched bottoms
And batteries exploded, in an attempt to recharge the market.


.
 
Last edited:
“Diapers remained unchanged”.
You kill me Edd. I sometimes wish the brain wasn’t so powerful at generating images from text!

Martin
 
I made a little progress today. Hopes were high, then quickly dashed. Here’s what happened: I was starting to hunt for the info that Edd requested. I thought I’d try spraying the back off the circuit board with Deoxit just to see if contact cleaner would spark it to life, and….IT DID! It would play for a few seconds, then stop. I noticed that jiggling the speaker wires and/or the capacitor(?) stamped “104” near them seemed to affect the sound’s cutting in and out. Things spiraled downward from there. Here’s the sequence of events:

  1. Thinking it could be a speaker wire connection problem, I de-soldered and re-soldered them to the board.
  2. I also de- and re-soldered the black and white wires on the ground pad, near the speaker wire connections. (There appeared to be three holes for the ground pad. One was empty when I removed the solder from the original connection.)
  3. I removed the capacitor(?) and tested it with my meter. It read 122 nF. It’s stamped 104. I don’t know what this means. I re-soldered it (blue circles and arrows)
  4. In the process of doing 1-3, and at separate times, I wound up accidentally detaching all three wires connecting to the volume potentiometer (brown, green, and blue). From here on, I didn’t get any more sound output. I resoldered the wires, and I noticed that no continuity showed between any two combinations of these wires. I don’t know if they would have shown continuity before, when it was working intermittently.
Edd, I know I drifted off course after an unexpected ray of hope, but I will endeavor to get you the info you requested.

I’ve attached another photo of the “mystery component” from before, which appears to be a trim pot stamped 200K.

I’ve also attached pics of the three-position switch which is very sticky, despite lots of Deoxit. I think it will need to be replaced. If you can offer specs to search for, I’d appreciate it.

Thanks for reading and for your help.

8B4F4199-C1A6-4356-8879-8B734BC1453B.jpeg A6D757A4-6B82-4C27-B1A0-C2817A1C0CC7.jpeg 2DF84C02-DF52-4F61-A5A1-9C077956B9C8.jpeg 4D365F77-AC85-4323-BF6C-05C7755A12B6.jpeg CF2CE161-B8B4-4FFB-BD77-59FD7A1D06BA.jpeg C5F04529-723A-4E51-A6E3-FE5F1E8120C3.jpeg 139053C9-82DC-49C8-BFB2-B28E757A62ED.jpeg 7F914C14-34D0-4D28-AD3C-C593D9BD119D.jpeg
 
It’s FIXED!! Here’s what happened today:

I re-read Edd’s posts to see what info he needed. I did manage to try the (4.7K ohm) resistor test between the + batt terminal and the X and Z terminals on the pot, but the results were negative. I took a picture of the amplifier chip(?) and posted it below.

Today, I had the bright idea of removing all the components from the casing to both prevent damaging the plastic parts and allow easier access to the components. Wish I’d thought of this sooner.

One problem I kept running into was accidentally detaching the wires while moving the whole shebang around. I ended up resoldering (to the board) both speaker wires, the black and white ground wires, the red wire from the battery, the green and brown wires from the pot, all three wires on the pot itself, the three wires on the three-position switch, and both white wires on the “stop” switch. Plus another battery wire or two on the battery assembly.

I replaced two capacitors for no good reason (stamped 104 and 103), but the change that got it working was resoldering the brown wire to the board after it too came loose.

I think the key to this repair was “refreshing” the solder connections for the wires on the circuit board.

So to summarize lessons learned:
1. Remove the wiring harness from the enclosure.
2. Check battery terminals for correct voltage.
3. Deoxit PCB and test for signs of life.
4. Expect brittle wire connections.
5. Reheat solder connections to refresh.

2C2F62F2-C63D-412F-A528-640B4EBFB322.jpeg


Attachments

  • 2D4E4A94-7FC6-4A57-9247-221779E295D9.jpeg
    2D4E4A94-7FC6-4A57-9247-221779E295D9.jpeg
    101.1 KB · Views: 0
Sir Bricago . . . . .

Congranulations ! . . . .
clap.gif


One problem I kept running into was accidentally detaching the wires while moving the whole shebang around. I ended up resoldering (to the board) both speaker wires, the black and white ground wires, the red wire from the battery, the green and brown wires from the pot, all three wires on the pot itself, the three wires on the three-position switch, and both white wires on the “stop” switch. Plus another battery wire or two on the battery assembly.

THANK GOODNESS . . . .
phew.gif
. . . . . that you had no wire come loose and not know . . .FOR CERTAIN . . .where / (to which? SMALL solder blob) that wire was previously connected.

Here is that units AUDIO AMP info, in case it is ever needed in the future.
AND when I look at all of its pins, 7 are being BRIGHT AND SHINY EXCEPT pin 4, its ground pin
Could that pin be BLACK and oxidized . . . . thus the loss of your ground access within the chip ?.
BUT, your "puttering" around and re soldering that pins solder blob, may have broken thru the oxide and touched into the clean conductive metal of the pin ?

TDA2822M . . . . . DA DA Sheet . . . . .

https://www.st.com/resource/en/datasheet/cd00000134.pdf

BTW
. . . . poor choice of probability of failure of those two disc ceramic capacitors . . .
they should still be perfectly functional, till long after the future upcoming return of the dinosaurs.

Thaa a a a a a a a a a a ssit . . . . .


73's de Edd . . . . .

A pipe gives a wise man time to think . . . and for a fool . . . . . something to put in his mouth, to buy time, while trying to think up an answer for an uber posing question .


.
 
Last edited:
Thank you, Edd. Good to know about that ground pin on the chip and the capacitors.

You nailed it. I was lucky that only one wire at a time and loose! The giveaway on where it went was the TINY strands of wire protruding from the top side of the board.
Thank you for your help!
 
Top