Maker Pro
Maker Pro

Filter Capacitor - Identify pins

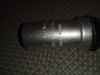
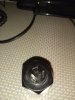
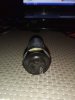
Hi all!!! I have this filter capacitor. It's a "BIANCHI" 50uF capacitor. As you can see on the photos, it has 3 outputs and one pin. I want to ask you: Which is the positive and which the negative output (pin) of the capacitor? It has 3 outputs and it's strange.It should have 2 outputs. I have only seen that a filter capacitor with 2 capacitors inside has 3 outputs.
 

Attachments

  • 22546678_10212473940937771_1425907656_o.jpg
    22546678_10212473940937771_1425907656_o.jpg
    172.8 KB · Views: 111
  • 22546862_10212473940777767_584080173_o.jpg
    22546862_10212473940777767_584080173_o.jpg
    162.8 KB · Views: 130
  • 22550785_10212473940817768_1590296330_o (1).jpg
    22550785_10212473940817768_1590296330_o (1).jpg
    167.1 KB · Views: 105
ac cap , perhaps paper , no positive/negative...

Need to see more clearly the markings.

what happened to the other pins?
or is it 1 pin and 2 sockets?
 
ac cap , perhaps paper , no positive/negative...

Need to see more clearly the markings.

what happened to the other pins?
The seller has given it to me like this. It's from the manufacturer like this (with one pin).

Yes it's one pin and two sockets. but how it works?
 
What is it supposed to be? (You bought it)
I had a dual filter capacitor that was faulty. Then I went to an electronics store and the seller told me that I can change the faulty filter capacitor with TWO single filter capacitors of the same Farads. And he gave me two of these "BIANCHI" capacitors. The problem is that the previous dual capacitor had marked clearly for each capacitor and its pin it had. But this one, it's supposed to be ONE capacitor but it has 3 outputs (pins). I want to ask how to connect it? Which is the positive and which the negative?
 
Sir DeejayPnS . . . . .

Looks to be reading as a 50 ufd / 450V screw can mount electrolytic capacitor.
It is to be screw mounted to a hole in a metal chassis.
As you tighten the large mounting nut it grounds the metal aluminum casing to the chassis, and makes your negative connection..
That then leaves the sole terminal to be soldered to for the positive connection.
With the units age you will assuredly have to reform its insides . . . if not gone too far .
REFERENCING:
http://www.qsl.net/g3oou/reform.html

Add ons occurred during my poking up.
If relatively new stock, you may be OK, if on the shelf for year(s) a reforming would be in order. You can tell by monitoring and seeing how quickly stepped voltage is settling after being risen by 25V stabilizing increments.


73's de Edd
 
Last edited:
Sir DeejayPnS . . . . .

Looks to be reading as a 50 ufd / 450V screw can mount electrolytic capacitor.
It is to be screw mounted to a hole in a metal chassis.
As you tighten the large mounting nut it grounds the metal aluminum casing to the chassis, and makes your negative connection..
That then leaves the sole terminal to be soldered to for the positive connection.
With the units age you will assuredly have to reform its insides . . . if not gone too far .
REFERENCING:
http://www.qsl.net/g3oou/reform.html


73's de Edd
Thank you for your reply!!! Can you please help me a little more? I didn't get some of your info. You mean that the only pin is the "positive" and the metal chassis the "negative"? Sorry for my bad english.
 
Black nut and backing look like an insulator to me.

As I said previously, better pic of the markings would help.

Anything Google throws up says " old " so maybe not so good
 
Last edited:
Sir DeejayPnS . . . . .

Hmmmmmmmmmmmmmm . . . . . you must be involved with an old tube based radio or audio amplifier and trying to take care of eliminating some serious HUUUUUUUUmmmmmmmmmmmm . . . . . coming from its speaker.

You mean that the only pin is the "positive" and the metal chassis the "negative"?

The metal shell of the capacitor that will be hard pressed into the metal chassis is the (negative) contact area of the capacitor..
That one pin of the capacitor will have the (positive) wire lead soldered to it.


So . . . . . here is your install procedure.
You pull off the rubber washer and clean the aluminum flange area on the capacitor that will be pressing into the chassis when installed. You also clean the area on the chassis that will be mating to the capacitor flange.
My preferred cleaning media is a Scotch Brite pad. Follow it up with a degreaser to clean off all cleaning debris.

If you have it, a light coating of clear silicone grease on the mating surfaces will give yeeeeeaaaaaarrrrrrssssss of anti oxidizing protection to the contacting dissimilar metal areas. Laymen, not involved with the science trades, can get silicone grease at a plumbing supply house.

THEN . . . you insert the cap thru the chassis hole and put on the rubber washer and then the large plastic nut.
The nut gets tightened up to the point where the rubber is compressed into the rubber and snugly seated.
This holds tension on the nut to keep it seated and on the other side, the tensioned pulling on the cap shell makes for constant good contact for no loosening and potential arcing between the contact surfaces, as might be experienced with sole use of a plastic nut and it loosening up.after a time.

73's de Edd
Wow! Thank you SO much!!! You're perfect!
 
Errata . . . being translated to GREEK as :

The nut gets tightened up to the point where the * rubber * is compressed into the rubber and snugly seated..
. . . . . . . . . . . . . . . . . . . . . . . . . . . . . . . . . . . . . . . .. . .. .. * (nut) *


"BIANCHI" . . . . . . . . . OH MAMMA MIA ! itsa bein' a "BIANCHI"
 
Last edited:
Top