Maker Pro
Maker Pro

555 astable circuit help

Hi I am trying to make a 9v flashing led using a 555 time chip (like the diagram attached).

I need the led to be on for 0.5 seconds and off for 2 seconds.

I have basic electronics knowledge and have been trying to research the correct values of the resistors and capacitor but am struggling to get the correct output.

Can someone please help?

Thanks
 

Attachments

  • 555circuit-flashing-led-schematic.gif
    555circuit-flashing-led-schematic.gif
    9 KB · Views: 1,002
I have tried the 555 calculators but it is a bit above my knowledge when it comes to entering the values of the resistors and capacitors to get the desired results. :(
 

(*steve*)

¡sǝpodᴉʇuɐ ǝɥʇ ɹɐǝɥd
Moderator
OK, firstly, in the circuit you have shown, the LED will always be on for longer than it is off.

To change that, connect the LED and the resistor between the output and +9V.

Remember that the LED is a polarised component, so the opposite end must now be closest to pin 3. It doesn't matter if thee resistor goes before or after the LED, as long as you have it.

Now you want the output to be high for 2 sec and low for 0.5.

then try R1 = 470k, R2 = 150k, C1 = 4.7uF

This will give you 2.02 seconds and 0.49 seconds
 
I have amended the diagram to represent the recommended changes.

(I haven't changed the resistor values only the wiring to make sure it is correct).
 

Attachments

  • 555circuit-flashing-led-schematic2.gif
    555circuit-flashing-led-schematic2.gif
    17 KB · Views: 193
I just use falstads for 555 timing :)

www.falstad.com/circuit/e-555square.html‎

Or here is a link to your updated circuit.

I think the time frame in Steve's calculation is out by a bit though. I got R1-470k R2 154k and 4.7µf cap, to use that circuit variant. You would be very lucky to find a 154k resistor, or any exact values. I'd be inclined to go for a 470 and 5-10k pot in series, and a 150k with 5k pot in series, for fine tuning. If its really critical. Depends on application, within a few micro seconds might be good enough for you. Looks like this in the sim :) I have the time dividers set to 1 second in the scope at bottom. :)


Google "555 calculator".

There are a bazillion on the internet.

I've tried about 30 over the last few weeks, cant find any that let you use the low duty cycle diode, or put in a time, and get component values. So all the calcs I have tried are pretty much useless. I'f I'm going to sit there throwing random values at a calc, I might as well do it on the breadboard with the scope. Also I cant find two that agree with each other... some are out by quite a bit.... If anyone knows a good one, please share... All I'm finding is rubbish....


While the above circuit performs the desired task very well, I would be inclined to use my 555 like this.

attachment.php


By adding that extra diode, I can now get less than 50% duty cycle. I can also use variable resistors, to make the whole value of each resistor (wide range of adjustment, low accuracy of adjustment), or just part of the value (for fine tuning, low range but high accuracy), to get adjustable output. Changing R1 will change on time, and changing R2 will change off time. So it becomes fully adjustable, just by adding that one diode.


Note that the resistor I put on the Led is the wrong value. It would put 77.77ma through the 1.8v red LED. Which would likely result in a smoke show. As you haven't specified the voltage and current requirements, I cant work that out for you.
 

Attachments

  • 555 ss.JPG
    555 ss.JPG
    44.5 KB · Views: 257
Wow mongrel shark that,is fantastic.

Really appreciate that.

The missing info is 9v in and the led is white 4v 100mA.

I'm building the circuit for a star trek model and need to get,the flashes for the navigation lights.
 

CDRIVE

Hauling 10' pipe on a Trek Shift3
I think the time frame in Steve's calculation is out by a bit though. I got R1-470k R2 154k and 4.7µf cap, to use that circuit variant. .

I didn't run the numbers but it's far more likely that Steve posted 150K because it's the nearest standard value, There's nothing in this application that needs absolute values.

Chris
 
I'm building the circuit for a star trek model and need to get,the flashes for the navigation lights.

So if its out by a fraction of a second, no one is going to notice.:) You could put some trimpots in there if you want to be able to adjust the flash rate a small amount. But just going for the closest values in solid resistors will probably be close enough.

To work out your resistor value. Take the 9v rail to rail voltage, and subtract 4v for your LED. you now have a 5v difference, between one side of the led and a rail (Doesn't matter which way you do this, I like to put current limit resistors on neg side). Which you want to current limit to 100ma. amps x resistance= voltage drop across the resistor. So 5v / 0.1a =50 ohm resistor.

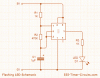
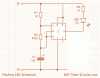
So lets check that in the sim and we can see its pretty close. there are a few things to address though. There are no 50 ohm resistors in my catalog. 51 and 47 are both common. We want the 51. except thats for exactly 9v, and is actually right on the limit of what the LED can take. As it only on 20% of the time, it may take a bit of punishment, or it may not. At $3 each, lets not find out. 56 ohm is the next value on my list. so 5v/56ohm=a fraction under 90ma. Much safer, you can now put a battery with 9.2v in before the led is in blow out territory... Except a fully charged 9v battery can show as much as 9.8v.... so we still need to get bigger resistor. lets try working it out for 10v battery, just to be safe. 10v - 4v led leaves 6v to current limit. 6v / 100ma is 60 ohms. I have a 62 ohm resistor in my cat, so lets use that. Your led will now survive a full battery being put in, but what happens as the battery goes flat? Try changing the input voltage to 7v and see how much current is still flowing.. 7v -4v = 3v/62ohms= 48ma. so at 7v your led is half as bright..... With the load you are putting on the 9v battery. You can expect to have it down to 7v after a few hours running. This may be ok for you. those leds at half power are still pretty bright. If its not, you have options. First and worst, overdrive the led at higher voltages, wit the lower value resistors. This may work as it has cool off time between pulses, but the pulses are fairly long, and its likely to smoke around the 100ma mark. The other option is voltage regulator. a cheap 9v regulator, that can take input over a range from 5 or 7v up to 10 or 12v. and put out a steady 9v. or 8v. an 8v regulator will be easy to find if your salvaging for parts.


I have actually been on the hunt for a good 9v regulator, for use with 9v batterys and 555. I'd like something that can go from 5 or 7v up to 10v and put out a flat 9v. I figure it would be a common need, so there is likely cheap regulator to do the job. I'm not finding it though, so if any other members now a good one, I'm open to suggestions :)

Try working out some of the maths yourself, then check in the sim, then check it in real life (Sims are almost always a little bit wrong). Hopefully by the time you finish the project, you will be better with ohms law, and 555 timers. As well as having tools to check your own work :)
 
I didn't run the numbers but it's far more likely that Steve posted 150K because it's the nearest standard value, There's nothing in this application that needs absolute values.
True, no specification for absolute accuracy. I just like to be accurate. Close enough is not always good enough.

150k is indeed the nearest value. and had the duty cycle very close. Turns out with more info, that will be fine for the op. It would be a waste of time to put a 5k trimmer in there, for a fraction of a second flash adjustment. For a simple light show. If it had of been some kind of optical sensor, acuracy may have been important. Best to provide accurate info and let the op decide :)


Ok. I just re read steve's post. Seems the mistake is mine. I though it said 1uf cap, but I look back and it clearly says 4.7µf. Which is pretty much the same as what I simmed the second time round. How I got a 1µf in there the first time, I am not sure. I was wrong though. Mystery solved. Turns out I need reading lessons :D
 

CDRIVE

Hauling 10' pipe on a Trek Shift3
Wow mongrel shark that,is fantastic.

Really appreciate that.

The missing info is 9v in and the led is white 4v 100mA.

I'm building the circuit for a star trek model and need to get,the flashes for the navigation lights.

Oops! I just noticed this. Sucking 100mA off a feeble 9V stack is really milking the cow dry! On the other hand your duty cycle is short so that's a saving grace. ;)

Chris
 

(*steve*)

¡sǝpodᴉʇuɐ ǝɥʇ ɹɐǝɥd
Moderator
From experience of other people building lights into their models, mathos may find that 100mA is way more than he wants.

Unless, of course his scale is around 12 inches to the foot.
 
From experience of other people building lights into their models, mathos may find that 100mA is way more than he wants.


I was thinking much the same. Those 100ma LED's are very bright. 50% might be more than bright enough. If I was doing a model I'd be reaching for lower power LEDs. Or if I already had bright ones, go for a bigger resistor.
 
Hi guys.

I know 5v 100mA is a bit overkill even though the model is 36 inches long.

I was thinking of using a 470 ohm resistor on the leds to help extend life.

I have tweaked the project a bit to get the desired flash rate and I am picking up the components tonight.
 
Top