Learn dynamic time warping by setting up Wekinator and Processing with gestures created from your computer's mouse!
In this post, learn about how to get started with dynamic time warping by using the dynamic time warping (DTW) mouse explorer.
DTW mouse explorer is an application made in Processing where we can draw different gestures. It will give two inputs to Wekinator and can accept 1 DTW output with up to 9 classes. In today’s example, we are going to use 1 DTW output with 3 classes. The inputs we are sending are the x and y values.
We will record three gestures in the mouse explorer and Wekinator will get trained according to these gestures. Then, we will set the mouse explorer in the run mode and, upon drawing the gestures again, Wekinator will tell us which gesture is drawn.
What is Dynamic Time Warping?
Dynamic time warping (DTW) is a time series alignment algorithm developed originally for speech recognition. It aims at aligning two sequences of feature vectors by warping the time axis iteratively until an optimal match (according to a suitable metrics) between the two sequences is found.
DTW allows a system to compare two signals and look for similarities even if one is time-shifted from the other. Its applicability to speech recognition is in the ability to look for known artifacts of speech no matter what the speaking speed of the speaker.
Processing Side
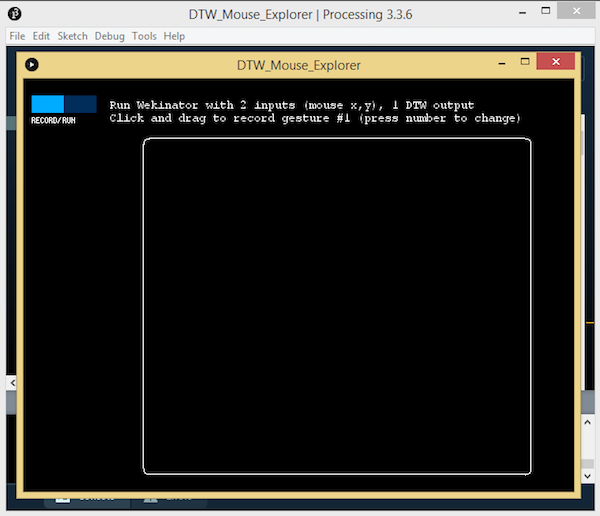
The DTW mouse explorer is made in Processing and it is available from the examples page of Wekinator. It will give 2 inputs to Wekinator and will accept 1 DTW output from Wekinator.
Download ‘DTW mouse explorer’ from there. Unzip it and run the sketch in Processing. The Processing window will look similar to the window illustrated below.
Downloading the DTW mouse explorer example from Wekinator into Processing.
Setting up the Wekinator Side
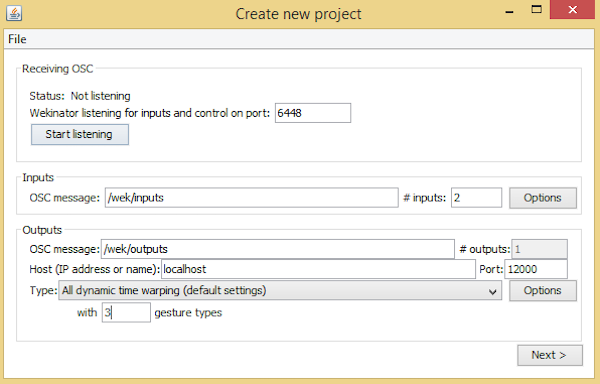
The DTW mouse explorer is going to send 2 inputs to Wekinator and will accept 1 DTW output.
Open Wekinator, set the inputs to 2 and outputs to 1, then select the output type to ‘All dynamic time warping’ with 3 classes. Again, we can set up to 9 classes, but will only use 3 in this project.
Set up Wekinator according to the settings in the screenshot above.
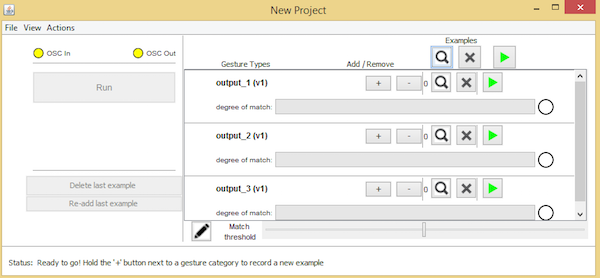
Now press the next button and a new window will open up:
The window in Wekinator to record the project's outputs.
Recording Gestures in Processing
Now, we need to draw 3 gestures in the Processing window.
Open the Processing window and press ‘1’ on your keyboard. It will select the first class and draw the vertical line. This will be output 1.
Press ‘2’ from your keyboard to select class ‘2’ and draw a horizontal line. This will be output 2.
Press ‘3’ from your keyboard to select class ‘3’ and draw a circle. This will be output 3.
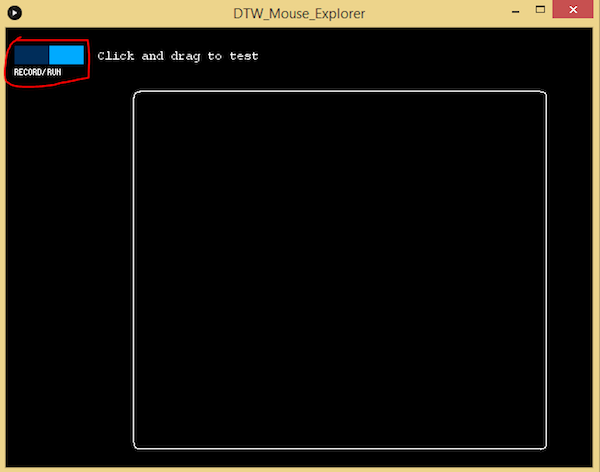
We have recorded the three gestures, and now it’s time to train Wekinator and run the program. Click on the run button and it will begin to look for the gesture that you just recorded.
Click the record/run button in the top lefthand corner of the screen to record the outputs.
Now, when you will draw the gestures in the Processing window, Wekinator will match these to the recorded gestures and will tell us which gesture we have drawn.