Use openFrameworks and Wekinator to control the movements of a servo motor connected to an Arduino UNO!
In this tutorial, you will learn how to create a slider application in openFrameworks to control a servo motor connected to Arduino using the Wekinator machine learning software.
The openFrameworks application will send the X and Y values to Wekinator at a specific port—6448—and it will use the OSC communication to send the data.
Wekinator will become trained according to the X and Y values and will send an OCS message back to openFrameworks at port 12000.
openFrameworks will then send this message to the Arduino through the serial communication where the servo motor will be controlled.
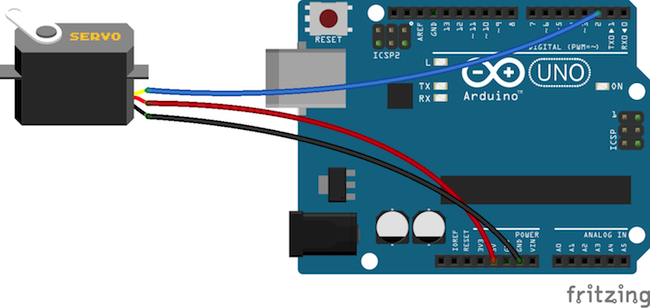
Circuit Diagram
Make the following connections between your servo motor and Arduino:
- The yellow wire is the signal wire. Connect it to digital pin 2 on the Arduino.
- The brown wire is the ground wire. Connect it to GND on the Arduino.
- The red wire is the power wire. Connect it to the 5V pin on the Arduino.
Make your connections between the servo motor and Arduino UNO according to the circuit diagram above.
Programming the Arduino
In the Arduino code, we have first included the servo library and initialized some variables for the servo.
Then in the setup function, we attached the servo at pin 2 of Arduino and started the serial communication.
In the loop function, we looked for the incoming data and if any data will be available, we will read it and according to this value the servo motor will move.
// Code to control servo motor from openframeworks using wekinator
#include <Servo.h>   //including the servo library
Servo sg90;          //including a variable for servo named sg90
int servo_pin = 2;

void setup() {
  sg90.attach(servo_pin);  //Giving the command to arduino to control pin 2 for servo
  // Start the serial communication
  Serial.begin(9600);
}

void loop() {
  if (Serial.available()) { // If there is any data available
    int inByte = Serial.read(); // Get the incoming data
    sg90.write(inByte);
  }
}
Programming openFrameworks
On the openFrameworks side, we have three files that will be used to send and receive the data from Wekinator and will also help us in sending the data to the Arduino.
Main.cpp
Main.cpp runs the app and opens up the output window.
The following code is for Main.cpp:
#include "ofMain.h"
#include "ofApp.h"

//========================================================================
int main( ){
	ofSetupOpenGL(600, 480, OF_WINDOW);			// <-------- setup the GL context

	// this kicks off the running of my app
	// can be OF_WINDOW or OF_FULLSCREEN
	// pass in width and height too:
	ofRunApp(new ofApp());
}
OfApp.cpp
The OfApp.cpp code is where the serial communication exists between the Arduino and openFrameworks. It is also the OSC communication between openFrameworks and Wekinator.
#include "ofApp.h"
#include "ofxOsc.h"


//--------------------------------------------------------------
void ofApp::setup(){
    sender.setup(HOST, SENDPORT);
	receiver.setup(RECEIVEPORT);
	ofSetFrameRate(60);
	serial.listDevices();
	vector <ofSerialDeviceInfo> deviceList = serial.getDeviceList();

	// this should be set to whatever com port your serial device is connected to.
	// (ie, COM4 on a pc, /dev/tty.... on linux, /dev/tty... on a mac)
	// arduino users check in arduino app....
	int baud = 9600;
	serial.setup(0, baud);
	//open the first device
	// windows example
	//serial.setup("COM10", baud);
	// mac osx example
	//serial.setup("/dev/tty.usbserial-A4001JEC", baud);
	//linux example
	//serial.setup("/dev/ttyUSB0", baud);
}

//--------------------------------------------------------------
void ofApp::update(){
	// Sending data to the wekinator
	ofxOscMessage m;
	m.setAddress(string(SENDMESSAGE));
	m.addFloatArg((float)mouseX);
	m.addFloatArg((float)mouseY);
	sender.sendMessage(m, false);

	// looking for incoming messages from wekinator
	while (receiver.hasWaitingMessages()) {
		ofxOscMessage msg;
		receiver.getNextMessage(&msg);  // Get Message
		if (msg.getAddress() == RECEIVEMESSAGE) {
			outputData = msg.getArgAsFloat(0);	// Stored it
		}
	}

	serial.writeByte(outputData); // sending the data to arduino
}

//--------------------------------------------------------------
void ofApp::draw(){
	ofSetColor(255, 0, 0);
    string buf = "Sending message " + string(SENDMESSAGE) + " to " + string(HOST) + " on port " + ofToString(SENDPORT);
    ofDrawBitmapString(buf, 10, 20);

	buf = "X=" + ofToString(mouseX) + ", Y=" + ofToString(mouseY);
    ofDrawBitmapString(buf, 10, 50);

	ofSetColor(0, 255, 0);
	ofDrawRectangle(mouseX, mouseY, boxSize, boxSize);
}

//--------------------------------------------------------------
void ofApp::mouseDragged(int x, int y, int button){
	mouseX = x;
	mouseY = y;
}
In the setup function, we first setup up the sender and receiver and then we look for the serial port. Once one is found, it will automatically connect.
In the update function, we first send the X and Y values of the slider to Wekinator. Then, we look for an incoming message from the receiver. When any data is available, it will store it and send it to the Arduino.
In the draw function, we made a slider that will move when we drag it.
OfApp.h
The OfApp.h file is the header file.
#pragma once

#include "ofMain.h"
#include "ofxOsc.h"

//Defaults for OSC:
#define HOST "127.0.0.1"
#define SENDPORT 6448
#define RECEIVEPORT 12000
#define SENDMESSAGE "/wek/inputs"
#define RECEIVEMESSAGE "/wek/outputs"

class ofApp : public ofBaseApp{

public:
    void setup();
    void update();
    void draw();

    void mouseDragged(int x, int y, int button);

    ofxOscSender sender;
	ofxOscReceiver receiver;
	ofSerial	serial;

    int mouseX = 0;
    int mouseY = 0;
	int boxSize = 30;
	char outputData;
};
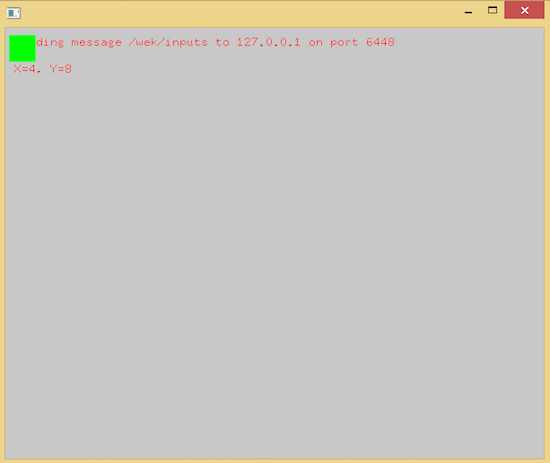
How to Run the openFrameworks Sketch
Create a new project using the project generator in openFrameworks. The ‘Ofxosc’ addon is required for this project.
Copy the codes given in the previous section to the respective files and build the project. After building the project, you will see the output window like the one shown below.
The output window in openFrameworks.
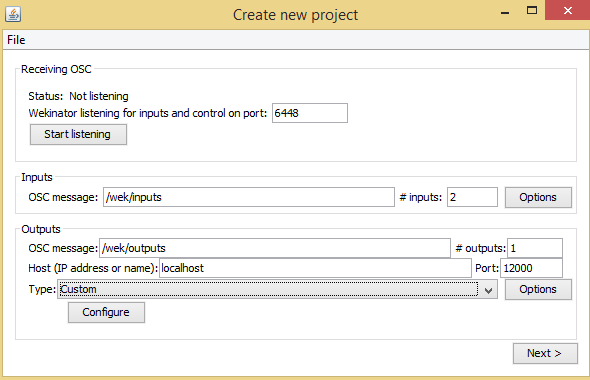
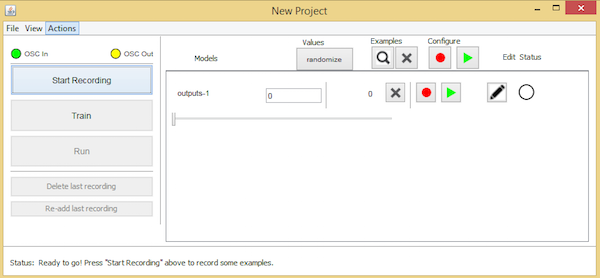
Setting up the Project in Wekinator
Once openFrameworks is set up, open Wekinator and adjust the settings to match the ones shown in the figure below.
Set the inputs to the 2 and the outputs to 1. Select the output type to “custom” and click "configure".
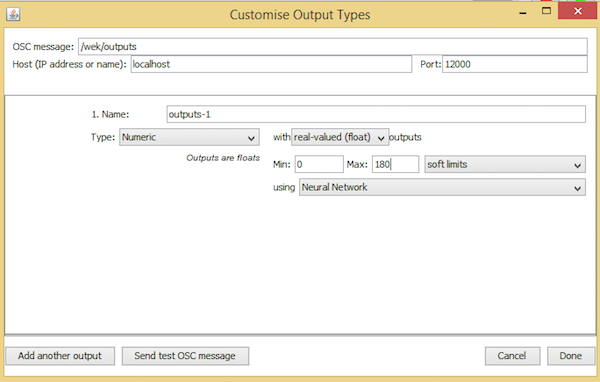
Set the input, output, and type fields in Wekinator to match the ones shown above.
Next, set the minimum value to 0 and maximum value to 180 and click "done".
Customize your output types to be a minimum of 0 and a maximum of 180.
Click "next" and the New Project window will appear.
After following the steps listed above and clicking next, you will be brought to the New Project window in Wekinator.
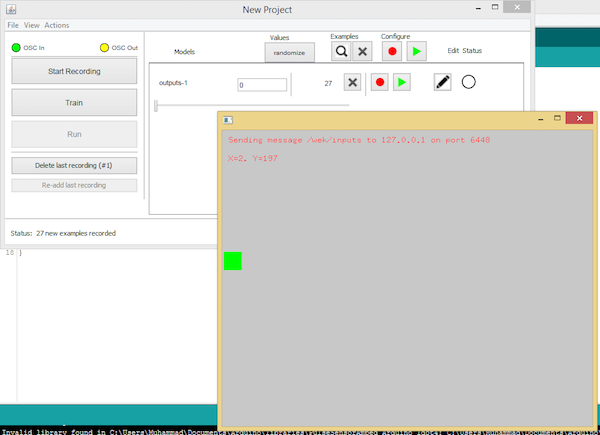
Drag the green box in the processing window to the center of the left-hand side of the screen and click "randomize". Start the recording for a second and allow Wekinator to record some samples.
Drag the green box to the left-hand side of the screen to record your first output.
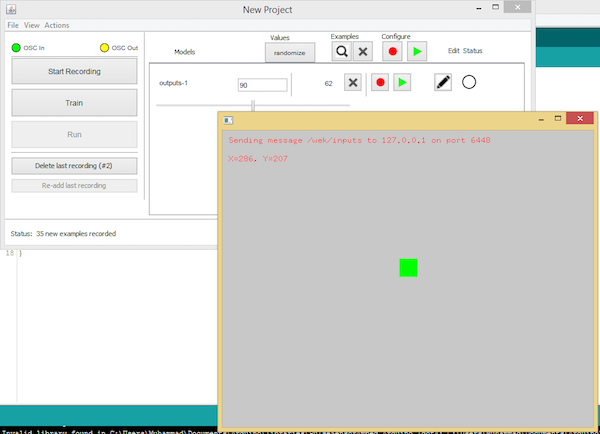
Now drag the green box in the processing window to the center of the window and click "randomize". Start the recording for half a second.
Move the green box to the center to allow Wekinator to record more samples.
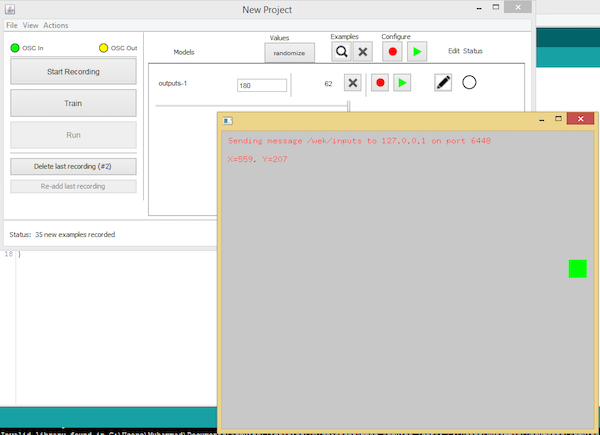
Finally, drag the green box in the processing window to center right-hand side and click on randomize. Start the recording for half a second.
Move the green box to the right-hand side of the window to allow Wekinator to make a third set of samples.
Once you've made three sets of samples for Wekinator, click "train" and then click "run".
Now, when you drag the slider in the openFrameworks window, it will control and move the servo connected to the Arduino.