Learn how to power-up your Raspberry Pi projects with the use of secondary Lithium-ion and Lithium-polymer batteries!
Lithium batteries can be observed in a wide range of portable consumer electronic devices and toys. In lithium batteries, lithium metal is used as anode and these batteries do have advantages over other battery types. One of the advantages is their high charge density which in non-technical terms we can refer to long battery life.
Note that here in this article, we are talking about secondary lithium-ion and lithium-polymer batteries which must be distinguished from primary lithium batteries like the popular CR2032 lithium coin cell battery which is non-rechargeable.
The Benefits of Lithium Batteries in Projects
Lithium batteries can be used in place of normal alkaline batteries for longer life, therefore minimizing battery replacements. Apart from this, there are various other advantages of this type of battery including:
- They are lightweight and compact which makes them a convenient option for portable devices and that's one of the reasons we are using it with our Raspberry pi projects.
- Lithium batteries don't suffer from the memory effect which is observed in other batteries. In this effect, if we repeatedly discharge batteries partially before being recharged completely, the battery would only deliver only the energy that was used during the last discharges.
- Quality lithium-ion batteries have more charge cycles, typically 1000 full charge cycles.
- They have a lower self-discharge rate and so longer shelf life.
- Li-ion batteries are less toxic than other lead-acid batteries which make them eco-friendly up to some extent.
Due to all these advantages, lithium batteries are used in a wide range of applications from portable consumer electronic devices to electric vehicles.
Rapid Discharging in Lithium Batteries
So far we discussed how lithium batteries are a piece of cake to add to many applications but they have one very serious problem: rapid discharging. When lithium batteries are short-circuited, and because they provide high currents, they discharge very quickly.
We use these batteries for high current applications and a rapid discharge can result in overheating and even an explosion of the battery. That's why a protection circuit is always needed to avoid this situation and that is exactly what we are going to make to power our Raspberry pi.
The Lithium Battery Protection Circuit
For portable Raspberry Pi and Arduino projects, finding a power outlet is a major problem and in applications at remote places like weather stations, we have to rely on batteries and/or solar cells. So, for maximum portability, lithium-ion/lithium-polymer batteries should be preferred which means we need a protection circuit for our load.
We will design an over-discharge protection circuit that disconnects the load in the event of a rapid discharge.
For deep discharge protection, we need to identify the cut-off voltage of the battery. After that, we need to design a circuit in which, when the battery reaches the cut-off voltage level, a switch disconnects the load from the battery.
For cut-off voltage identification, we need to use a Zener diode. A Zener diode in reverse bias condition acts as an open circuit when its cathode is applied with voltage below the breakdown voltage. When the cathode voltage is above breakdown voltage, it starts conduction.
We will use a Zener diode with a Zener voltage equal to the cut-off voltage of the battery. When the battery voltage drops below the cut-off voltage, the Zener diode cuts off the conduction and obstructs the flow of the base current of NPN transistor, thus disconnecting the battery from the load.
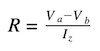
We use this equation to select the value of the Zener diode series resistor:
Where:
- Va=Source Voltage
- Vb=Zener Voltage
- Iz=PzVz
- Pz=Max.power dissipation of Zener diode
- Vz=Zener voltage
We can observe here that at point A, when transistor T1 is ON, we get LOW output and when the battery voltage drops below the Zener voltage — which means rapid discharge is detected — we get a HIGH output. So, our load gets disconnected whenever point A is HIGH.
It is recommended to use a 5V relay for up to 6V applications because a 9V relay will not activate at such low voltages. D3 is used to protect against the back current when the relay gets de-energized.
For a regulated 5V output, a 7805 voltage regulator IC must be kept because while powering through GPIO pins of Raspberry Pi, there is not any kind of protection available over there and supplying more than 5V can damage your board.
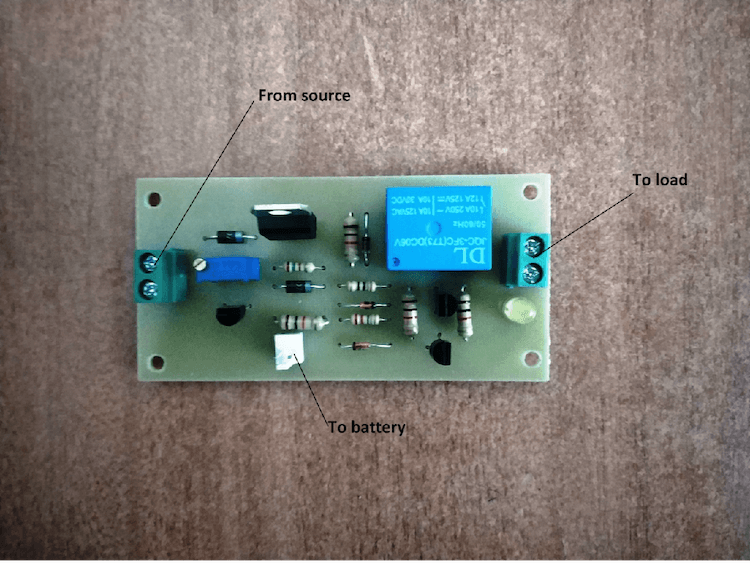
I have made the above-presented Li-ion battery-based UPS for Raspberry Pi. I used an LM317 for charging the battery and as the over-discharge protection circuit for load. However it is not recommended to use a LM317 circuit for this application.
You can use a TP4056 Li-ion battery charging module. Aside from being a more efficient way of charging, it also provides some protection to the battery including over-current protection, over-discharge protection, and overcharging protection.
More Ways to Make Raspberry Pi Projects Portable
One of the easiest ways to make your Pi projects portable is to power them using your smartphone power bank. Portable set-up can also be powered from 5V micro-USB mains adapter, it should be around 1.2A or more. However, for most of the Raspberry pi projects, 1000mA is enough.
You can select lithium expansion boards available in the market like the one pictured below.
Source: sparkfun.com
This is Pi Juice-HAT which works as a UPS for Pi and its 1820 mAh battery can power your projects for 4-6 hours. Also, the board is compatible with larger batteries.
You can use a boost converter to power your projects with simple AA batteries. A 0.9V – 5V boost converter is perfect for this application. Also, another option is to use 18650 batteries which are rechargeable and therefore can be used as a cheap alternative to Li-ion batteries.
In this article we have discussed advantages and the problems associated with Lithium batteries, designed a protection circuit for them and discussed a few more ways to power your portable Raspberry Pi projects.