Learn how to overclock your Raspberry Pi 4 to boost its performance.
While the Raspberry Pi 4B is certainly impressive compared to its predecessors, other single-board computers, and even some budget laptops, it is not really built to run the heavy loads more expensive computers can handle.
However, there is one way to squeeze more performance out of your Pi: overclocking. Overclocking speeds up the CPU and/or GPU but requires more energy and effective heat dissipation.
Preparing to Overclock Your Pi 4
The two most important things to consider when overclocking your Pi 4 are:
- Power supply
- Your Pi’s cooling setup
Part of the overclocking process includes feeding the on-board processors a higher voltage than usual, so having a power supply that can handle the increased load is a must.
The Raspberry Pi Foundation suggests a power supply that can constantly output above 4.8V. If you do not have an official Pi 4 charger, be aware that not all USB phone charger bricks will be able to keep up with the Pi’s requirements. If your Pi is being starved of current, you will see this warning icon:
This icon lets you know your Pi needs more current.
I have found that the Nintendo Switch charger is able to power the Pi 4 in a pinch.
Since we will be providing more power to our Pi’s processors, they will work faster. However, this means they’ll also heat up more. Thanks to the dynamic clocking feature, your Pi will only be overclocked if the processes running need it. This means that depending on your project, you may not need an advanced cooling system.
If your Pi reaches 80 - 85 °C, your CPU speed will be throttled automatically to try to lower the temperature and display this warning icon:
The warning icon when your Pi reaches 80 - 85°C.
If the temperature goes above that, both the CPU and GPU will be throttled, displaying this warning icon:
The warning icon when your Pi's temperature goes beyond 85°C.
A small heatsink will increase the time before your processor speed gets throttled, but if these warning icons persist, an active cooling setup would be best. Perhaps you could even make it a TEC-based one.
Overclocking your Pi
Once you have completed the preparations, the actual process of overclocking is only a few commands away.
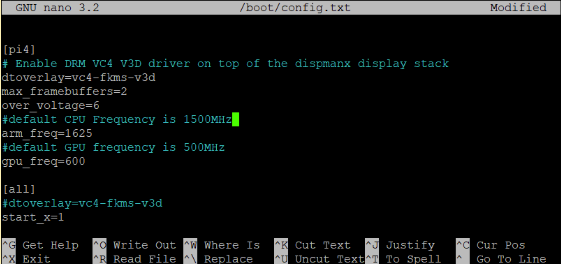
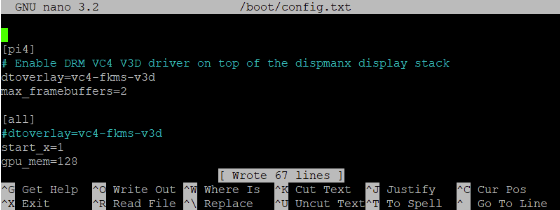
First, open a Terminal and type sudo nano /boot/config.txt to open up the configuration file with nano, the text editor. The sudo part of the command gives you root privilege to edit the file. Using the arrow keys, scroll down until you see the [pi4] section.
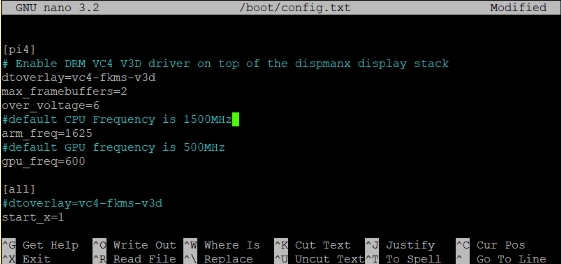
In the space between max_framebuffers=2 and [all], type in over_voltage=(a number 1-6),
arm_freq=(your preferred value), and gpu_freq=(your preferred value).
Now exit the editor by pressing CTRL+X and then press ‘Y’ to save the file. Type sudo reboot to load the new settings.
The general rule for overclocking is to do it in small steps. As a result, I only slightly increased the frequency of the CPU and GPU while giving them a .15V higher voltage. Feel free to experiment by raising the arm_freq and gpu_freq values as Raspberry Pi supports overclocking.
If your Pi does not boot because of the new settings, holding down shift during boot will disable overclocking, so you can revert them to their previous functions.
Will Overclocking Void the Warranty on a Pi 4?
The only way to void your warranty by overclocking is to type force_turbo=1 in the config file (so I in no way recommend this if you’d like your Pi to live a long, warranty-backed life). This command could really damage your Pi because it irreversibly sets a bit in the SoC to identify turbo’d Pi’s.
For an in-depth explanation on overclocking, different overclocking options, and official documentation, read the official Raspberry Pi Foundation overclocking docs.


