In this article, see how easy it is to connect a keypad to a Raspberry Pi 4 for a variety of uses.
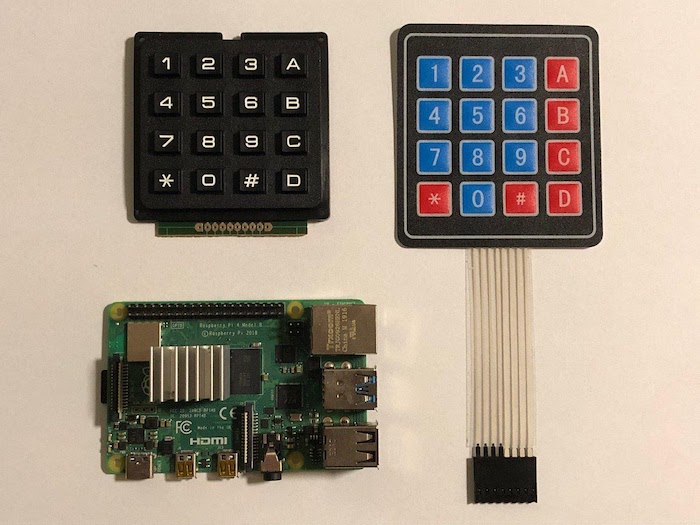
There are numerous ways for users to input data on a Raspberry Pi. One of them is to use a 16-button keypad that contains the numbers from zero to nine as well as a few extra buttons:
A Raspberry Pi 4 and keypads.
In this article, I’ll explain how such keypads work and how you can easily incorporate them into your Raspberry Pi 4 projects.
Understanding the Keypad
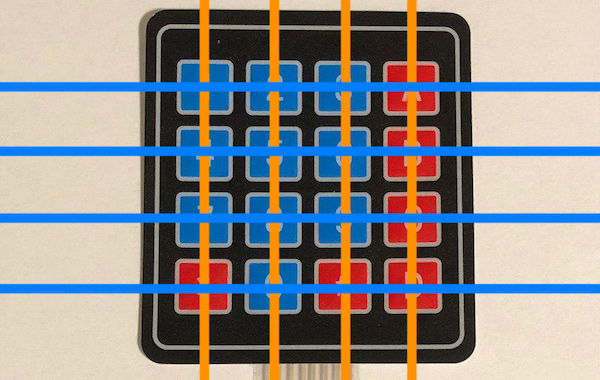
The keyboard I used can be divided into four rows and four columns like this:
The keypad can be broken down into four columns and four rows.
To detect which button is pressed, the Raspberry Pi has to send a pulse to each of the four rows of the keyboard. When a user presses a button that’s connected to the line which is currently pulled high, the corresponding column is also pulled high.
By decoding the combination of line and column, you can determine which button got pressed.
If a user, for example, presses the B button located on the second row in the fourth column, the Raspberry Pi detects this button press when it sends a pulse to the second line and then checks which of the four columns was pulled high.
Connecting the Keypad to the Raspberry Pi 4
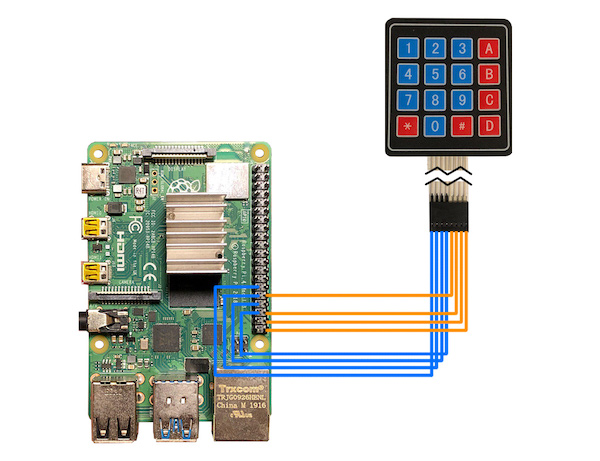
Keypads that operate this way don’t need any power to work. This means that you can simply connect all eight data lines of the keypad to any eight GPIO pins on your Raspberry Pi:
Connections between the keypad and the Pi 4.
I used the same color scheme as in the image above. The blue connections correspond to the rows, and the orange ones represent the columns.
A Simple Code Example
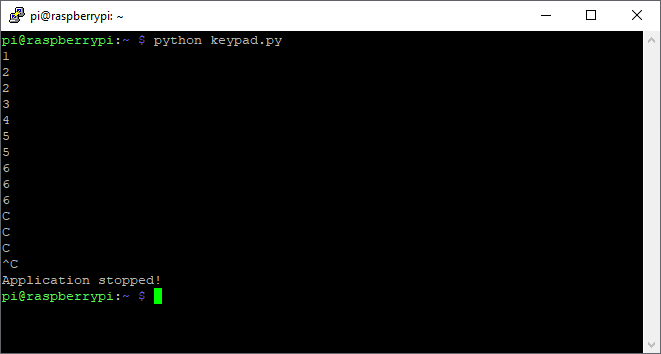
Once you made the connections, as discussed above, it’s time to run a simple test program that will print the buttons, a user presses on the keypad, to the Raspberry Pi’s console:
# GPIO setup and imports omitted

def readLine(line, characters):
	GPIO.output(line, GPIO.HIGH)
	if(GPIO.input(C1) == 1):
    	    print(characters[0])
	if(GPIO.input(C2) == 1):
        	    print(characters[1])
	if(GPIO.input(C3) == 1):
    	    print(characters[2])
	if(GPIO.input(C4) == 1):
    	    print(characters[3])
	GPIO.output(line, GPIO.LOW)

try:
	while True:
    	    readLine(L1, ["1","2","3","A"])
    	    readLine(L2, ["4","5","6","B"])
    	    readLine(L3, ["7","8","9","C"])
    	    readLine(L4, ["*","0","#","D"])
    	    time.sleep(0.1)
except KeyboardInterrupt:
	print("\nApplication stopped!")
As you can see, the test program contains a method called readLine.
The readLine method sends the pulse discussed above to a single line and then checks which of the buttons got pressed while the line is pulled high. This is simply repeated for all four rows. The method also takes a list of symbols that the buttons correspond to.
The Pi is ready to accept information from the keypad.
This program is a simple example. It will not detect if a button is being held down. It will simply recognize a new keystroke with every pulse it sends on the output line.
A program that correctly detects individual keypresses and that implements a simple code-lock is included at the end of this article.
The keypad is ready to go!
Keypads Work for Projects Basic to Advanced
Cheap keypads usually all operate the same way. They have four rows and four columns. Input can be detected by sending a pulse on every single line and then checking every column to determine the button that was pressed.
A basic application is easy to implement, but if you want more advanced features, the code can quickly get quite complex.
Full Keypad Code
# This example is a hello world example
# for using a keypad with the Raspberry Pi

import RPi.GPIO as GPIO
import time

L1 = 5
L2 = 6
L3 = 13
L4 = 19

C1 = 12
C2 = 16
C3 = 20
C4 = 21

GPIO.setwarnings(False)
GPIO.setmode(GPIO.BCM)

GPIO.setup(L1, GPIO.OUT)
GPIO.setup(L2, GPIO.OUT)
GPIO.setup(L3, GPIO.OUT)
GPIO.setup(L4, GPIO.OUT)

GPIO.setup(C1, GPIO.IN, pull_up_down=GPIO.PUD_DOWN)
GPIO.setup(C2, GPIO.IN, pull_up_down=GPIO.PUD_DOWN)
GPIO.setup(C3, GPIO.IN, pull_up_down=GPIO.PUD_DOWN)
GPIO.setup(C4, GPIO.IN, pull_up_down=GPIO.PUD_DOWN)

def readLine(line, characters):
    GPIO.output(line, GPIO.HIGH)
    if(GPIO.input(C1) == 1):
        print(characters[0])
    if(GPIO.input(C2) == 1):
        print(characters[1])
    if(GPIO.input(C3) == 1):
        print(characters[2])
    if(GPIO.input(C4) == 1):
        print(characters[3])
    GPIO.output(line, GPIO.LOW)

try:
    while True:
        readLine(L1, ["1","2","3","A"])
        readLine(L2, ["4","5","6","B"])
        readLine(L3, ["7","8","9","C"])
        readLine(L4, ["*","0","#","D"])
        time.sleep(0.1)
except KeyboardInterrupt:
    print("\nApplication stopped!")
Full Codepad Code
# This program allows a user to enter a
# Code. If the C-Button is pressed on the
# keypad, the input is reset. If the user
# hits the A-Button, the input is checked.

import RPi.GPIO as GPIO
import time

# These are the GPIO pin numbers where the
# lines of the keypad matrix are connected
L1 = 5
L2 = 6
L3 = 13
L4 = 19

# These are the four columns
C1 = 12
C2 = 16
C3 = 20
C4 = 21

# The GPIO pin of the column of the key that is currently
# being held down or -1 if no key is pressed
keypadPressed = -1

secretCode = "4789"
input = ""

# Setup GPIO
GPIO.setwarnings(False)
GPIO.setmode(GPIO.BCM)

GPIO.setup(L1, GPIO.OUT)
GPIO.setup(L2, GPIO.OUT)
GPIO.setup(L3, GPIO.OUT)
GPIO.setup(L4, GPIO.OUT)

# Use the internal pull-down resistors
GPIO.setup(C1, GPIO.IN, pull_up_down=GPIO.PUD_DOWN)
GPIO.setup(C2, GPIO.IN, pull_up_down=GPIO.PUD_DOWN)
GPIO.setup(C3, GPIO.IN, pull_up_down=GPIO.PUD_DOWN)
GPIO.setup(C4, GPIO.IN, pull_up_down=GPIO.PUD_DOWN)

# This callback registers the key that was pressed
# if no other key is currently pressed
def keypadCallback(channel):
    global keypadPressed
    if keypadPressed == -1:
        keypadPressed = channel

# Detect the rising edges on the column lines of the
# keypad. This way, we can detect if the user presses
# a button when we send a pulse.
GPIO.add_event_detect(C1, GPIO.RISING, callback=keypadCallback)
GPIO.add_event_detect(C2, GPIO.RISING, callback=keypadCallback)
GPIO.add_event_detect(C3, GPIO.RISING, callback=keypadCallback)
GPIO.add_event_detect(C4, GPIO.RISING, callback=keypadCallback)

# Sets all lines to a specific state. This is a helper
# for detecting when the user releases a button
def setAllLines(state):
    GPIO.output(L1, state)
    GPIO.output(L2, state)
    GPIO.output(L3, state)
    GPIO.output(L4, state)

def checkSpecialKeys():
    global input
    pressed = False

    GPIO.output(L3, GPIO.HIGH)

    if (GPIO.input(C4) == 1):
        print("Input reset!");
        pressed = True

    GPIO.output(L3, GPIO.LOW)
    GPIO.output(L1, GPIO.HIGH)

    if (not pressed and GPIO.input(C4) == 1):
        if input == secretCode:
            print("Code correct!")
            # TODO: Unlock a door, turn a light on, etc.
        else:
            print("Incorrect code!")
            # TODO: Sound an alarm, send an email, etc.
        pressed = True

    GPIO.output(L3, GPIO.LOW)

    if pressed:
        input = ""

    return pressed

# reads the columns and appends the value, that corresponds
# to the button, to a variable
def readLine(line, characters):
    global input
    # We have to send a pulse on each line to
    # detect button presses
    GPIO.output(line, GPIO.HIGH)
    if(GPIO.input(C1) == 1):
        input = input + characters[0]
    if(GPIO.input(C2) == 1):
        input = input + characters[1]
    if(GPIO.input(C3) == 1):
        input = input + characters[2]
    if(GPIO.input(C4) == 1):
        input = input + characters[3]
    GPIO.output(line, GPIO.LOW)

try:
    while True:
        # If a button was previously pressed,
        # check, whether the user has released it yet
        if keypadPressed != -1:
            setAllLines(GPIO.HIGH)
            if GPIO.input(keypadPressed) == 0:
                keypadPressed = -1
            else:
                time.sleep(0.1)
        # Otherwise, just read the input
        else:
            if not checkSpecialKeys():
                readLine(L1, ["1","2","3","A"])
                readLine(L2, ["4","5","6","B"])
                readLine(L3, ["7","8","9","C"])
                readLine(L4, ["*","0","#","D"])
                time.sleep(0.1)
            else:
                time.sleep(0.1)
except KeyboardInterrupt:
    print("\nApplication stopped!")