Learn how you can use the open-source library OpenCV with a Raspberry Pi to create face and object detection!
Updated to work on Raspbian Buster and tested with Raspberry pi 3, 3B+ and 4.
OpenCV (open source computer vision library) is a very useful library — it provides many useful features such as text recognition, image recognition, creation of depth maps, and machine learning.
This article will show you how to install OpenCV and other libraries on Raspberry Pi that will come in handy when doing face detection and other projects. After installing libraries, we will do a simple project in which we will detect faces from an image. From there, you can move on to other projects like facial recognition door lock using Raspberry Pi.
What is OpenCV?
OpenCV is an open source computer vision and machine learning software library. OpenCV is released under a BSD license making it free for both academic and commercial use. It has C++, Python, and Java interfaces and supports Windows, Linux, Mac OS, iOS, and Android.
OpenCV was designed for computational efficiency and a strong focus on real-time applications.
How to Install OpenCV on a Raspberry Pi
To install OpenCV for Python, we need to have Python installed. Since Raspberry Pi's are preloaded with Python, we can install OpenCV directly.
First we need to make sure that Raspberry pi is up to date. Type the following command to update your Raspberry Pi.
Then type the following command in the terminal to get the dependencies required for installing OpenCV on your Raspberry Pi.
sudo apt-get install libhdf5-dev -y && sudo apt-get install libhdf5-serial-dev -y && sudo apt-get install libatlas-base-dev -y && sudo apt-get install libjasper-dev -y && sudo apt-get install libqtgui4 -y && sudo apt-get install libqt4-test -y
Now we can install OpenCV on Raspberry Pi. Type the following command to install OpenCV 4 for Python 3 on your Raspberry Pi, pip3 tells us that OpenCV will get installed for Python 3.
pip3 install opencv-contrib-python==4.1.0.25
After those steps, OpenCV should be installed. Let's test our work!
Testing OpenCV
To check whether OpenCV is correctly installed or not, try importing OpenCV by typing:
If no errors are shown, your installation was successful!
To know which version of OpenCV you have, type the following command:
This message tells you which version on OpenCV you installed on your Raspberry Pi.
Recommended Optional Libraries
There are also other libraries to install that will come in handy when you do object detection and other projects, so I highly recommend you to also install these.
NumPy
The first library is NumPy — a library that makes array operations in Python easy to perform. Install NumPy by typing the following command:
pip3 install python-numpy
Matplotlib
The second library is Matplotlib. Matplotlib is a Python plotting library that produces publication quality figures in a variety of hard copy formats and interactive environments across platforms. Install Matplotlib by typing the following command:
pip3 install python-matplotlib
Now we are done installing OpenCV and helpful accompanying libraries on Raspberry Pi. Let's move forward to face detection using OpenCV on Raspberry Pi.
Face Detection on Pictures Using OpenCV
Let's start by writing the code that will detect faces in the images it receives. For this, you need a cascade file.
Type following command to get the cascade file.
wget https://raw.githubusercontent.com/shantnu/Webcam-Face-Detect/master/haarcascade_frontalface_default.xml
Then we need an image on which we want to perform face detection. Get the image by typing following command or enter the name of image on line 8.
wget https://pmchollywoodlife.files.wordpress.com/2019/11/sasha-malia-obama-thanksgiving-pic-shutterstock-ftr-1-1.jpg
Now run the following code and it will perform face detection on the given image.
# Import OpenCV library
import cv2

# Load a cascade file for detecting faces
faceCascade = cv2.CascadeClassifier("haarcascade_frontalface_default.xml");

# Load image
image = cv2.imread("sasha-malia-obama-thanksgiving-pic-shutterstock-ftr-1-1.jpg")

# Convert into grayscale
gray = cv2.cvtColor(image, cv2.COLOR_BGR2GRAY)

# Look for faces in the image using the loaded cascade file
faces = faceCascade.detectMultiScale(gray, 1.2, 5)
for (x,y,w,h) in faces:
        # Create rectangle around faces
    cv2.rectangle(image,(x,y),(x+w,y+h),(255,255,0),2)

# Create the resizeable window
cv2.namedWindow('Obama', cv2.WINDOW_NORMAL)

# Display the image
cv2.imshow('Obama', image)

# Wait until we get a key
k=cv2.waitKey(0)

# If pressed key is 's'
if k == ord('s'):
    # Save the image
    cv2.imwrite('convertedimage.jpg', image)
    # Destroy all windows
    cv2.destroyAllWindows()
# If pressed key is ESC
elif k == 27:
    # Destroy all windows
    cv2.destroyAllWindows()
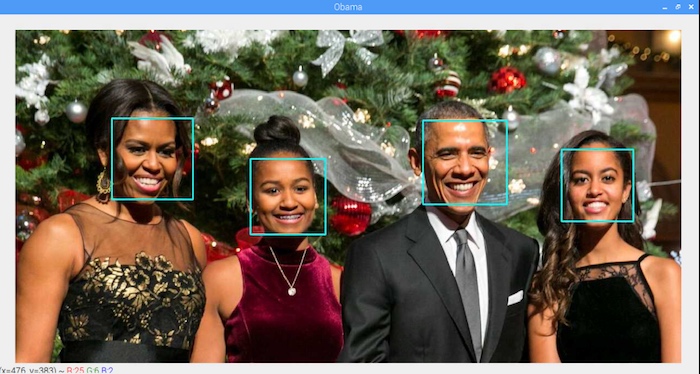
After running the code, it will draw rectangles around the faces as shown in the picture below.
After running the code, rectangles will appear around all detected faces.