Try these two simple beginner Python programs for Raspberry Pi.
Python is a high-level programming language created by Guido van Rossum in 1991. It is a programming language just like C++, C#, Java or any other programming language. Python is very easy to use, has a clean syntax, but is a powerful language. In this tutorial, you'll learn how to open Python on your Raspberry Pi, print "Hello World", blink an LED, and use pulse-width modulation (PWM) to make your LED fade. It's easier than you'd think!
Python in Raspberry Pi
Python is the most common programming language for Raspberry Pi. Let's open up Python and get started!
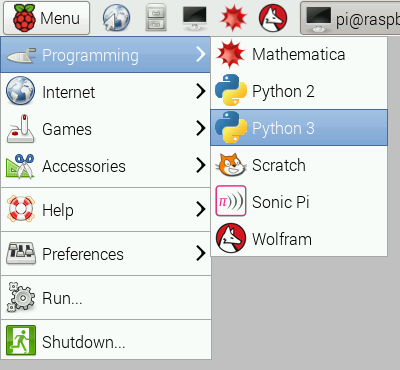
To open Python in Raspberry Pi
- In Menu->Programming -> and click on Python 3
You will see a screen with a cursor.
Hello World
Type “print ("Hello World!")” into the Python window and press enter
You will see “Hello World!” written in blue. Congratulations, you just made your first Python command! If you have an LED to go with your Raspberry Pi, you can learn some simple code to make it blink or fade!
Make an LED Blink With Python and Raspberry Pi
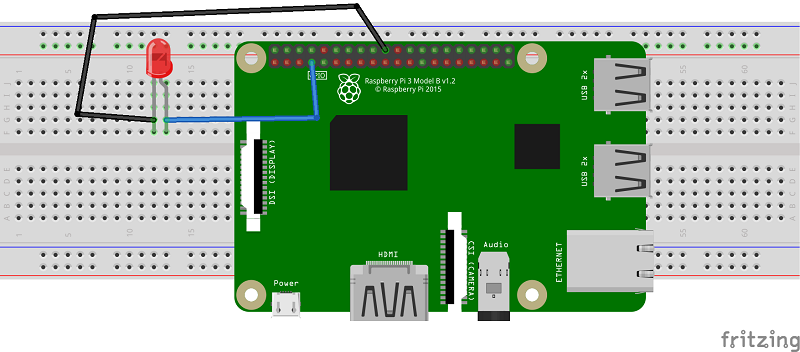
First, you'll need to connect your LED to your Raspberry Pi. Follow the diagram below, there are only two connections!
Now all you need to do is open Python's IDLE editor (As shown above) and open a new window (CTRL + N). Next, enter the code below and save it.
import RPi.GPIO as GPIO
import time
# blinking function
def blink(pin):
GPIO.output(pin,GPIO.HIGH)
time.sleep(1)
GPIO.output(pin,GPIO.LOW)
time.sleep(1)
return
# to use Raspberry Pi board pin numbers
GPIO.setmode(GPIO.BOARD)
# set up GPIO output channel
GPIO.setup(11, GPIO.OUT)
# blink GPIO17 50 times
for i in range(0,50):
blink(11)
GPIO.cleanup()
Save the file and run it by pressing F5. You should see your LED blinking, congrats, you've done your first Raspberry Pi hardware project! If you're up for more, let's use PWM to make our LED fade!
What is PWM?
PWM (Pulse Width Modulation) is a type of Digital Signal. A Digital Signal can have only two possible states, ON or OFF, 0 or 1, or in the case of this project, 0 or 5 volts. That's why making the LED blink didn't require PWM, because the LED was simply turning ON and OFF. In PWM signals, we can have both of these two states for a specified time period.
Suppose you want to control the brightness of an LED, the possible approach is to turn on an LED for a small period of time and then turn it off again for a small period of time. So, when this ON and OFF happens at very high speed, it gives the effect of dimmed LED. Have a look at the figure below.
The wider the square wave is, the brighter the LED will shine.
Setting Up Your Circuit
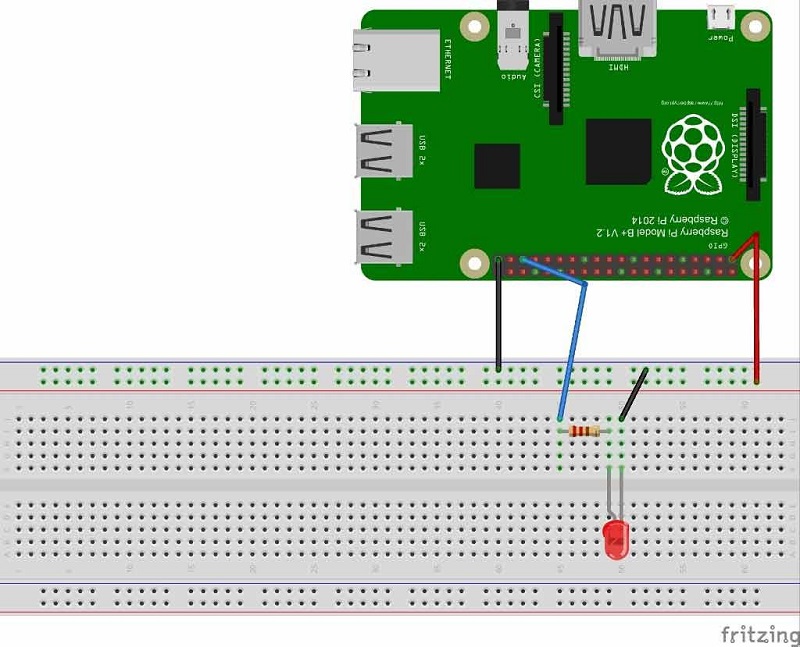
Connect your Raspberry Pi and LED as shown in the circuit below. The LED is connected to GPIO19.
Once you have your circuit connected, open up Python 3 and press CTRL + N to open a new window. Copy the code below into the window:
import RPi.GPIO as IO
import time
IO.setwarnings(False)
IO.setmode (IO.BCM)
IO.setup(19,IO.OUT)           # initialize GPIO19 as an output.
p = IO.PWM(19,100)          # 100Hz frequency
p.start(0)
while 1:

for x in range (50):


p.ChangeDutyCycle(x)
time.sleep(0.1)

for x in range (50):
p.ChangeDutyCycle(50-x)
time.sleep(0.1)
When you start the program, your LED should go back and forth between being bright and dim. Congratulations, you've completed two Raspberry Pi projects!


