A beginner's guide to getting started with the IoT by using a Raspberry Pi to connect devices.
By Aradhana Kumar and Vaibhav Mathur
This Raspberry Pi project is the best way to get started on working with the IoT (internet of things) and to build your knowledge to expand it to other applications. The first problem was figuring out a simple enough sample project to learn how to make sensors communicate with each other. So, we made a step-by-step guide for Pi beginners so you can learn various methods that can be used to make your application of choice.
In short, we use the Raspberry Pi to record temperature on a trigger, and then push notifications from the server to your Android device. You can also find all the project files for the Android app below this tutorial. Here is what you will learn from this project:
- Setting up a Raspberry Pi
- Using a temperature sensor (DS18B20)
- Using a PIR sensor
- Using a temperature and PIR sensor together
- Setting up and working with a web server to store data and run other applications
- Using Python, PHP, and MySQL
- Using Google Cloud Messaging (GCM) service to send temperature notification to an Android app when the situation arises and to display stored data
We have divided the whole Raspberry Pi IoT project into two parts. The first part consists of setting up the Raspberry Pi and interfacing it with the sensors. The second part covers building the Android application and connecting it to the server.
If you aren't familiar with Linux and terminal, check out Basic Linux Commands for Beginners. Note: We’ll be remotely accessing the Raspberry Pi’s terminal through SSH, so you won’t need a dedicated monitor, mouse or keyboard in any part of this tutorial. You would also want to download the following software:
- Win32 Disk Imager (Windows users)
- PuTTY (Windows users)
- Advanced IP Scanner
- WAMP/LAMP/MAMP server (This project was done using a Windows laptop on a WAMP server)
How Does It Work?
The Raspberry Pi is interfaced with a temperature sensor and PIR sensor and reads data from it through its GPIO pins. After this, the data is relayed to a web server and subsequently pushed to your Android device through the Google Cloud Messaging (GSM) service. A brief outline of the process:
Raspberry Pi
↓
Interface temperature sensor (DS18B20) and PIR sensor
↓
Store data from sensors in a web server
↓
Google Cloud Messaging (GCM) service to send temperature notification to an Android app when situation arises and to display stored data
You are working with: DS18B20
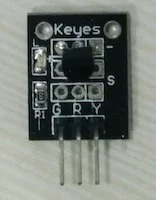
Raspberry Pi can only handle digital signals. The DS18B20 is a digital temperature sensor. In the above Keyes model of the sensor that we used, the left-most pin is Ground, the center pin is VCC, and the right-most pin is Output/Data pin. The sensor that we used came with a 4.7K-ohm resistor connected between VCC and the data pin. You might have to connect an external one in case yours does not have it. It requires an input voltage of 3.3V.
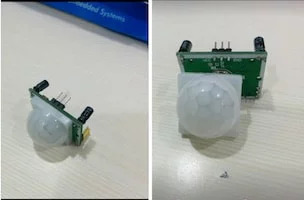
The PIR sensor detects motion using infrared rays. It is important to know that this motion sensor has a detection delay of about 3 seconds (adjustable) during which the pin state stays high and the sensing distance is adjustable from 3–7 meters. It also comes with a lock time (in our case, 3 seconds) which is the minimum time interval between two accepted signals. It requires an input voltage of 5V. Pin specifications are given on the sensor itself (picture on the right).
Setting Up the Pi for the Raspberry Pi IoT Project
If you already have a Raspberry Pi set up, move over to the next step to start with your Raspberry Pi IoT project. Otherwise, download the Raspbian OS for your Pi. There are many other distributions you can use, but Raspbian remains the most common and convenient for beginners. Extract the .img file from the downloaded zip folder and write it to your SD card.
For Windows Users:
- Insert the SD card reader with the SD card in it. Figure out the Drive assigned to it.
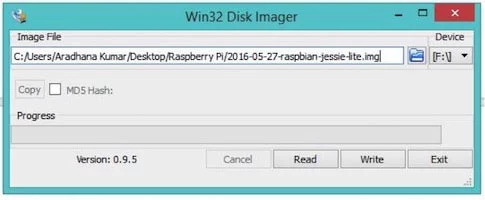
- Run Win32 Disk Imager (you may have to run this as administrator), and select the extracted image file and the drive letter. Be very careful to select the correct drive—you do not want to unintentionally destroy other data. It should look something like this:
- Click "Write". Wait for the process to complete and eject the SD card.
Side note: While on this step, we got stuck because our SD card became read-only due to a tiny lock on the SD card reader that we had ignored. Watch out!
For Linux Users:
- Run df -h on the command line. This will list out the devices currently mounted on your device.
- Insert the SD Card reader with the SD Card in it and run df -h again to figure out the device name. It’ll be something like /dev/mmcblk0.
- Unmount the SD Card with umount /dev/mmcblk0 replacing /dev/mmcblk0 with your own device name. You might want to format the SD Card with FAT32 (use sudo mkdosfs -F 32 -v /dev/mmcblk0) just to be sure.
- Now, write the .img file to your SD Card with sudo dd bs=1M if="/home/linux/2016-05-27-raspbian-jessie-lite.img" of=/dev/mmcblk0. Edit to add the path to your extracted file (after if=) and your device name (after of=). Wait for the process to complete and eject the SD card.
For Mac users:
- Connect the SD card reader with the SD card inside.
- From the Apple menu, choose "About This Mac", then click on "More info..."; if you are using Mac OS X 10.8.x Mountain Lion or newer, then click on "System Report".
- Click on "USB" (or "Card Reader" if using a built-in SD card reader) then search for your SD card in the upper-right section of the window. Click on it, then search for the BSD name in the lower-right section; it will look something like diskn where "n" is a number (for example, disk4). Make sure you take a note of this number.
- Unmount the partition so you will be allowed to overwrite the disk. To do this, open Disk Utility and unmount it; do not eject it, or you will have to reconnect it. Note that on Mac OS X 10.8.x Mountain Lion, "Verify Disk" (before unmounting) will display the BSD name as /dev/disk1s1 or similar, allowing you to skip the previous two steps.
- From the terminal, run the following command: sudo dd bs=1m if=path_of_your_image.img of=/dev/rdiskn. Remember to replace "n" with the number you noted before!
- If this command fails, try using disk instead of rdisk: sudo dd bs=1m if=path_of_your_image.img of=/dev/diskn
After writing the image file to your SD Card, insert it into the respective slot (at the back of your Pi) and we are ready to boot!
Headlessly Booting Your Raspberry Pi IoT System
Getting a dedicated monitor, mouse, and keyboard to use your Raspberry Pi might become an unnecessary hassle. Access to the terminal is sufficient to get most things done. So we eliminate the need for extra hardware by logging into the Pi using your personal laptop through SSH. Latest versions of Raspbian come with SSH enabled by default, so you can run Pi remotely even while setting it up for the first time.
- Get a router with DHCP enabled. This is necessary because we want our Pi to have a unique IP address to be able to connect to it. Connect both your laptop and your Pi to the router via ethernet cables. Your laptop and Pi now share a local area network and can identify each other using their unique IP address.
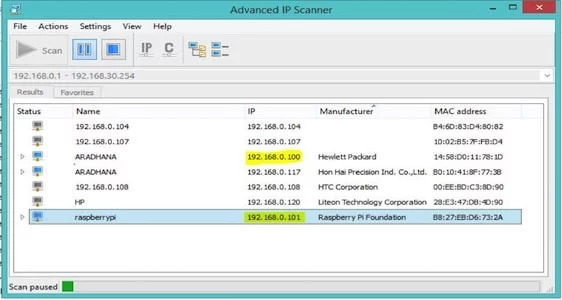
- To use SSH, you'll need the IP address of your Pi. Run the Advanced IP Scanner. This will list out the IP addresses of all devices on your network and their manufacturer. You’ll see something like this:
For Windows Users
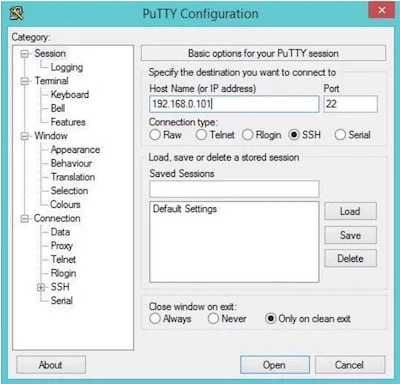
- Use PuTTY to access Pi’s Terminal. Run PuTTY and simply enter the IP address determined in the above step.
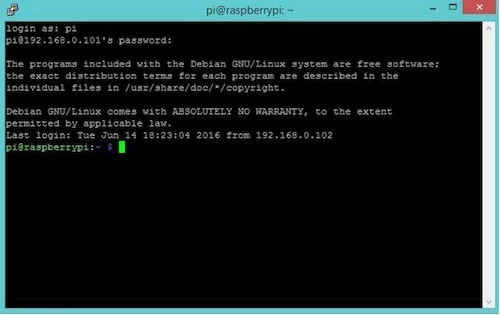
Subsequently, you will receive a login prompt. Use login id as pi and password as raspberry.
Side Note: For first-time login, you’ll receive a warning for a security alert. Click on "Yes" and proceed. You have now opened a terminal session on your Raspberry Pi, which can be accessed through your Windows laptop.
For Linux and Mac Users:
- Open your terminal window and enter the following command: ssh 192.168.0.101 -l pi (Put the IP address of your Pi after ssh). Enter the password as raspberry. You can now access the Pi’s terminal on the terminal window of your host computer.
Please note that the cursor won’t move forward while entering the password due to default settings.
Initial Configuration:
- Enter the command sudo raspi-config in the terminal window and get started with the initial configuration.
- Go to >Raspi-Config>expand_rootfs>OK to configure the Pi to use the entire space on the SD card (otherwise only as much space will be used up as the OS requires).
- Apart from the above, you can go through the other available options and configure according to your needs.
Woohoo! Your Raspberry Pi is now ready for you to go crazy!
Installing a WAMP/LAMP/MAMP Server on Your Laptop
You can install WAMP/LAMP/MAMP servers following this tutorial or several others you can find through an internet search.
We were working on a Windows laptop, therefore we have the Bitnami WAMP Stack loaded. There are other development environments available too. Some of the further steps are specific to Bitnami WAMP Stack; you can customize them according to your servers.
While installing Bitnami WAMP Stack, you will be prompted to create a MySQL "root" account by entering a password. Make one and remember it.
Note: Since this project is purely for learning purposes, our server-side codes are both in Python and PHP. You will have to configure your Apache server to run .py files, though. You can do this by editing the httpd.conf file in the apache install directory.
In Bitnami Wampstack, you’ll have to make the same edit in three files in the following locations:
- C:\Bitnami\wampstack-5.6.22-0\apache2\conf\httpd.conf
- C:\Bitnami\wampstack-5.6.22-0\apache2\conf\original\httpd.conf
- C:\Bitnami\wampstack-5.6.22-0\apache2\conf\bitnami\bitnami.conf
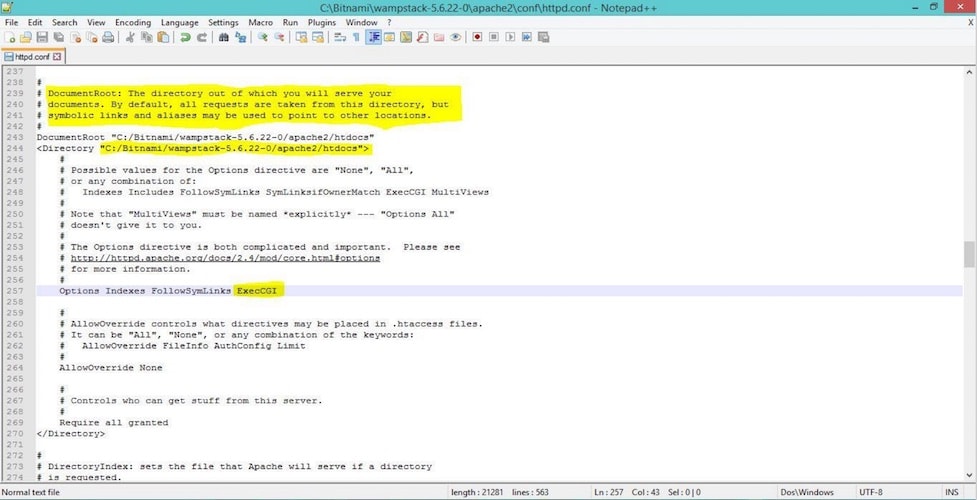
- Search for the line: "Options Indexes FollowSymLinks" and add "ExecCGI"
Note: Your DocumentRoot directory, and all your CGI scripts should be saved in this directory.
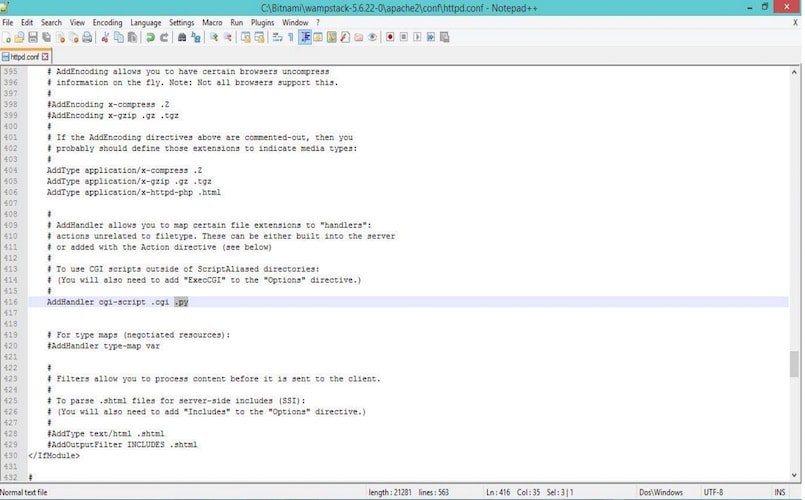
- Search for the line: "#Add Handler cgi-script .cgi". Uncomment it and add a ".py" in the end.
- Restart your Apache Server to apply the configuration changes.
- Now, save a test Python file in your DocumentRoot Directory and run it on your browser to check if things are working correctly. You can check the error log (C:\Bitnami\wampstack-5.6.22-0\apache2\logs\error.log) for hindrances and correct them as required.
Creating a Database and Table to Store Temperature Readings and GCM RegIDs
Login to PHPMyAdmin (enter: localhost/phpmyadmin/ in the address bar of your browser) using the password you entered during installation of Bitnami WAMP Stack with username root, and create a new database called "templog".
Now, create two tables in that database.
- temp-at-interrupt: This will store all the recorded temperatures as well as the date and time of the trigger. (Three fields: Date, Time, Temperature.)
- regids: This will store all the RegIDs of the registered users (one Field: RegID).
You now have all the essentials in place. Let’s get started with the device and sensor setup and get down to the codes!
Interfacing a Temperature Sensor for the Raspberry Pi IoT Project
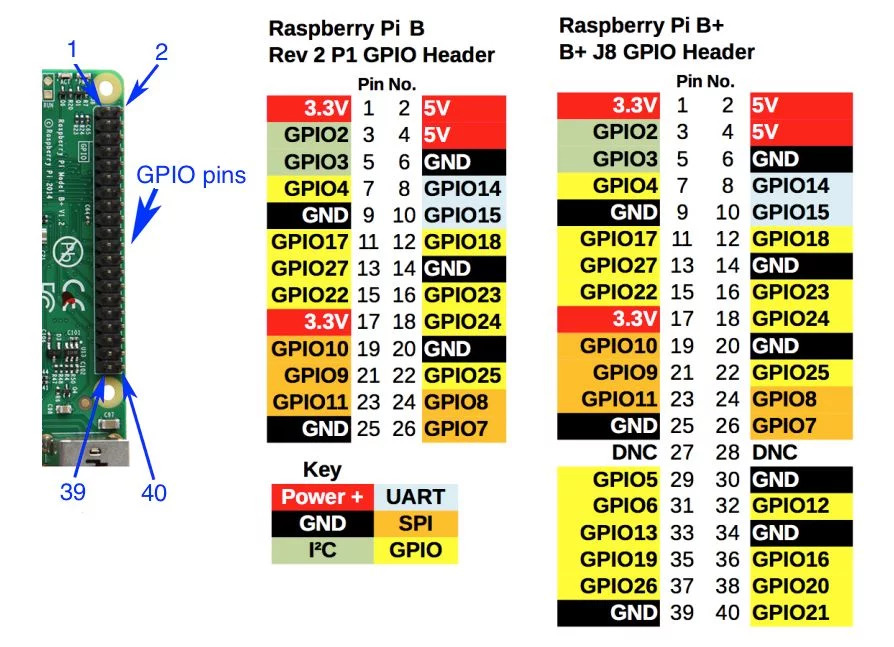
Connect the temperature sensor to your Raspberry Pi as such:- Connect the Ground Pin of the sensor to physical pin 6 of the GPIO board.
- Connect the Data Pin to physical pin 7 of the GPIO board.
- Connect VCC to physical pin 1 (3.3V) of the GPIO board.
For a better understanding of pins and numbering conventions, refer to this image:
You will have to add one-wire support to work with the sensor. Edit the /boot/config file by running the command sudo nano /boot/config.txt and add dtoverlay=w1-gpio to the end of the file.
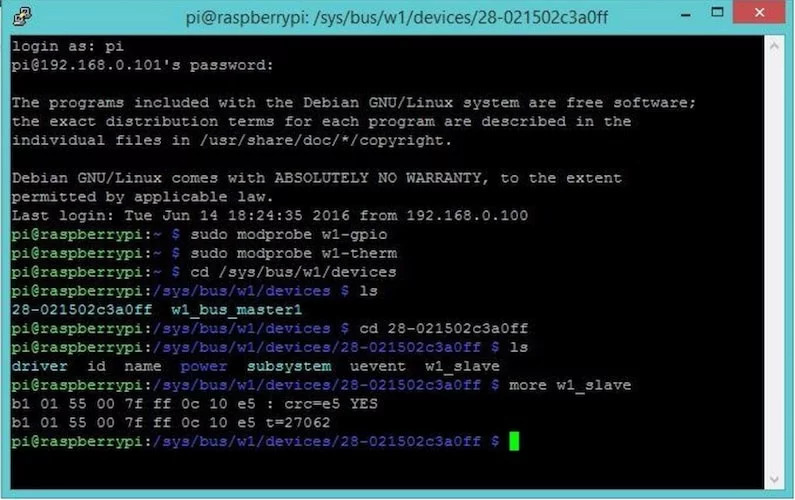
Now run the commands as shown to get the current temperature detected by the sensor:
In our case, 28-021502c3a0ff is the device name assigned to the temperature sensor. Edit the command cd 28-021502c3a0ff according to your device name. If it says "t=27062", that means that the current temperature is 27.062 degree Celsius. "YES" in line 1 signifies that a valid temperature has been recorded in the file.
Interfacing the PIR Sensor With the Raspberry Pi IoT System
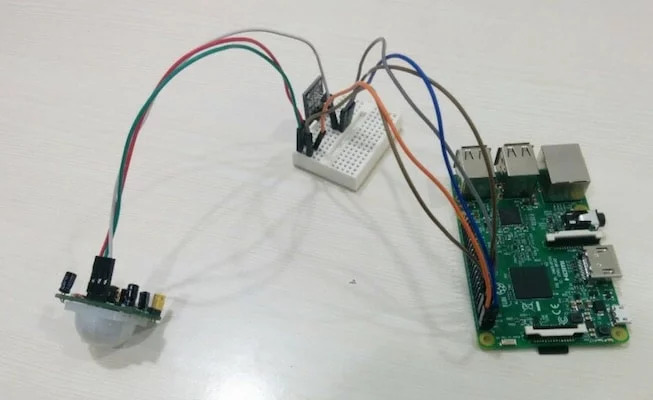
Connect the PIR sensor to your Raspberry Pi as follows:
- Connect the Ground pin of the PIR sensor to the Ground pin of the temperature sensor.
- Connect VCC pin to physical pin 2 (5V) of the GPIO board.
- Connect Output pin to physical pin 11 of the GPIO board.
Make a file called trigger.py by running the command sudo nano trigger.py on the command line of the Pi’s terminal and save the following code:
#!/usr/bin/env python
import os
import RPi.GPIO as gpio
import time
import datetime
import glob
import MySQLdb
from time import strftime
import urllib
def probe_temp(tempfile): #Returns tamperature value at the time of interrupt
try:
file = open(tempfile, 'r')
lines = file.readlines()
file.close()
except:
return None
status = lines[0][-4:-1]
if status == 'YES':
tempstr = lines[1][-6:-1]
tempval = float(tempstr)/1000
return tempval
else:
print "Error in reading file, please try again"
def main():
PIR_Input = 11 #PIR sensor connected to pin 11
gpio.setmode(gpio.BOARD) #differential numbering of board pins, need to specify which convention being used
gpio.setup(PIR_Input, gpio.IN)#specifying physical pin 11 as input
os.system('sudo modprobe w1-gpio') #loads the kernel
os.system('sudo modprobe w1-therm')
devicename = glob.glob ('/sys/bus/w1/devices/28*') # useful only if only 1 temperature sensor is connected
if devicename=='':
print "Check DS18B20 connection, no device recognized"
else:
w1tempfile = devicename[0] + '/w1_slave'
print "Process Initialized.\nWaiting for Interrupt..."
try:
while True:
current_state = gpio.input(PIR_Input) #Checks for input
if current_state:
print "Current state of input at pin 11 is", current_state
temperature = probe_temp(w1tempfile)
url = 'http://192.168.0.100/write-to-database.py?temp='+str(temperature)
result = urllib.urlopen(url)
time.sleep(2)
print "\nRecorded Temperature is ", (temperature)
time.sleep(2)
print "\nWriting to Database..."
time.sleep(2)
print "\nProcess Finished.\n"
print "\nProcess Initialized Again.\nWaiting for Interrupt..."
except KeyboardInterrupt:
pass
if __name__=="__main__":
main()
Note: Remember to change the IP Address in the URL to the local IP address of your server.
What This Code Does:
The code checks the current state of the input pin in a while loop. When the PIR sensor detects motion, the current state becomes 1 and the if the condition becomes true. The file name that stores the temperature in the last characters of its second line is w1tempfile. Note that the device name for a DS18B20 will always be of the type 28-xxxx, and in the case of multiple temperature sensors, each will have its own unique name. The function probe_temp returns the value of recorded temperature in degrees Celsius. Next, a request is made to the server and the temperature value is sent through the GET method. We’ll get to the server side script to handle the request in a minute. The net time sleep is 6 seconds, meaning the "if" loop takes a total of 6 seconds to execute. This was done because, with the detection delay and lock time, the minimum wait between registering two different signals by the PIR sensor came to 6s in our case.
Let’s sum up all that we’ve done till now:
- Set up a Raspberry Pi for the first time
- Use SSH to remotely access the terminal window on another device
- Set up a webserver on an external computer to handle requests and store data in MySQL database
- Connect a DS18B20 to the Raspberry Pi and record the current temperature
- Connect PIR sensor and DS18B20 to the Raspberry Pi and use them together so only when the former detects something, the temperature is recorded
Server-Side Scripting for the Raspberry Pi IoT System
We now handle the server side scripts to do the following:
- Get the temperature values sent by the Raspberry Pi.
- Record the data in a database along with the date and time relevant to the data.
- Display the data in a tabular form.
- Send push notifications to registered users when the temperature exceeds a certain threshold.
Download MySQLdb module for Python and make sure it is of the same bitness as your Python.
In your DocumentRoot directory noted before, create a new file called "write-to-database.py" and save the following code:
*Note the shebang used in the first line of the code. Edit it as ...
#!<Path to the python environment in your system>
#!C:\Users\Aradhana Kumar\AppData\Local\Enthought\Canopy\User\Scripts\python.exe
# Server side code to read data sent by pi through GET method.

import cgi, cgitb
import os
import time
import datetime
import glob
import MySQLdb
from time import strftime
import urllib

# Create instance of FieldStorage
form = cgi.FieldStorage()
# Get data from client
temp = form.getvalue('temp')

print "Content-type:text/html\r\n\r\n"
print ""
print ""
print "Data Storage"
print ""
print ""

temperature = float(temp)

# Alert user if recorded temperature is above a threshold (30 degrees in this case)
if temperature >= 30:
push = '1'
message = 'Alert! Current temperature recorded is ' + str(temperature)
url="http://localhost/sending-push-notifications.php?push="+push+"&message="+message
response = urllib.urlopen(url) #sends url request to another file responsible for sending GCM alerts
data = response.read()
print data
else:
print temp

#Code to write the recorded temperature in the MYSQL database 'templog' and table 'temp-at-interrupt'
db = MySQLdb.connect(host="localhost", user="root", passwd="raspberry", db="templog")
cur = db.cursor()

while True:
dateWrite = time.strftime("%Y-%m-%d")
timeWrite = time.strftime("%H:%M:%S")
sql = ("""INSERT INTO `temp-at-interrupt` (`Date`, `Time`, `Temperature`) VALUES (%s,%s,%s);""", (dateWrite,timeWrite,temperature))
try:
cur.execute(*sql)
db.commit()
print "\nProcess finished"
except:
db.rollback()
print "\nProcess Failed to Complete"

cur.close()
db.close()
break
What this code does:
When the Raspberry Pi sends a request to the server, this file identifies and stores the sent temperature value in a variable. In case the value is above our set threshold, it sends a URL request to another file on the same server, which sends a GCM push notification to all registered users. The code is responsible for entering the temperature value as well as the date and time of the moment it was registered into the table in our database.
Now, to display the table in a tabular form, download this file: "temp-readings.php" from here and save it.
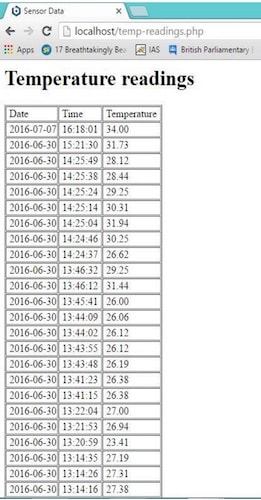
On entering "http://localhost/temp-readings.php" in the address bar of your browser, you should see a table like this for your Raspberry Pi IoT project:
To finish up this Raspberry Pi IoT project, the next steps to build the Android application (or download the project files for it) and to connect it to the server, refer to Part 2 of this tutorial: Part 2


