Learn how you can create a 4G hotspot using a Raspberry Pi and a wireless modem without sacrificing your Ethernet port!
I previously discussed several different methods for getting your Raspberry Pi online on-the-go. One of the methods I covered was to use a smartphone to create a hotspot that the Pi can connect to.
In this article, I’ll discuss how the Raspberry Pi can be set up to act as the hotspot so that other devices can use it to connect to a cellular or Ethernet network.
You can use your Raspberry Pi to create a 4G hotspot!
Choose a Network Adapter
Before you begin, decide which network adapter you want to make accessible via the Raspberry Pi’s Wi-Fi adapter. In my case, that’ll be a 3G cellular modem connected via USB.
For me, it was important that the Raspberry Pi still be reachable via its standard Ethernet port even when it's acting as a hotspot. However, at the end of this article, I’ll also show you how you can share the Ethernet port over the Raspberry Pi’s wireless adapter.
When you use a cellular adapter, make sure that it’s set up correctly and that it’s working.
Take Note of the Adapter Values
On your Raspberry Pi, execute the following command to list the available network interfaces:
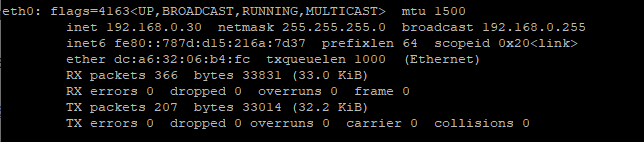
Once you type in the command you should see something like this:
Your available network interfaces.
Take note of the name, address, and netmask of the networking adapter you want to use. In this example, that is eth0, 192.168.0.30, and 24 bits (255.255.255.0).
Keep in mind that this is only an example, and I used eth1 as described above.
Install the Necessary Software
You’ll need to install a couple of small applications for this to work. Before doing that make sure to run the update command:
Once that’s finished, install the following programs:
sudo apt install hostapd bridge-utils
hostapd is a user space daemon for access point and authentication servers. The bridge-utils will make your life much easier when configuring the networking bridge.
The access point daemon automatically starts when it is installed. However, we need to configure it first. Therefore, you need to turn it off manually:
sudo systemctl stop hostapd
Build a Network Bridge
A networking bridge simply connects two or more virtual or real networking devices. In this project, I set up a single bridge that connects eth1 and wlan0 so that that internet connection of eth1 can be shared over the Pi’s Wi-Fi adapter.
To make eth1 sharable, you first have to edit the DHCP daemon’s config file so that eth1 and wlan0 don’t get an address assigned automatically:
sudo nano /etc/dhcpcd.conf
In the file, add the following two lines to the end of the file:
denyinterfaces eth1
denyinterfaces wlan0
Next, you need to create a new bridge by typing:
Where br0 is the name of the new bridge. Next, you need to specify which adapters you want to bridge:
sudo brctl addif br0 eth1
In this case, it’s only one adapter on br0. The addif command will make eth1 a port of the bridge, which means that all frames received on eth1 will be treated as if they were destined for the bridge.
Configuring the Interfaces
Next, we’ll have to define and configure the new bridge. Create a new file in:
/etc/systemd/network/bridge-br0.netdev
and add the following lines to it:
[NetDev]
Name=br0
Kind=bridge
Then create two new configuration files as follows:
1. /etc/systemd/network/bridge-br0-slave.network
[Match]
Name=eth0

[Network]
Bridge=br0
2. /etc/systemd/network/bridge-br0.network
[Match]
Name=br0

[Network]
Address=192.168.8.100/24
Gateway=192.168.8.1
DNS=4.4.4.4
In the second file, make sure to use the IP-Address that you wrote down earlier. I used the address of the eth1 interface.
Also, make sure to change the gateway to the correct address. You can use a public DNS server, like I did, or get the correct one from your ISP.
Once that’s done, restart the daemon:
sudo systemctl restart systemd-networkd
Access Point Setup
Next, we have to configure the access point itself.
In this config file, you can change the SSID and the password of the network, that the Raspberry Pi will create. This file also states which adapter the bridge should use as the other end.
Create a new file:
sudo nano /etc/hostapd/hostapd.conf
And add the following lines to it:
bridge=br0
interface=wlan0
ssid=YOUR_SSID
wpa_passphrase=YOUR_PASSWORD
wpa=2
wpa_key_mgmt=WPA-PSK
wpa_pairwise=TKIP
hw_mode=g
channel=11
wmm_enabled=0
macaddr_acl=0
auth_algs=1
ignore_broadcast_ssid=0
rsn_pairwise=CCMP
Then restart the access point daemon:
sudo systemctl unmask hostapd
sudo systemctl enable hostapd
sudo systemctl start hostapd
Once that’s done, you can use your phone to verify that you can establish a connection and browse the Internet.
Sharing an Ethernet Connection
In this example, I shared a 3G cellular connection via the Pi’s Wi-Fi adapter. That effectively created a 3G wireless hotspot similar to the one you can create with any modern smartphone.
However, it’s also possible to share the Raspberry Pi’s ethernet port over a wireless connection. For that, simply replace all instances of eth1 with eth0, which is the ethernet port on the Raspberry Pi. Make sure to also change the IP address and gateway accordingly!
Further Reading
If you are interested in more information regarding networks, take a look at the following web resources: