Learn how to control a Raspberry Pi GPIO pin from a web server using Node.js and socket.io.
In this tutorial, you are going to learn how to control a GPIO pin on a Raspberry Pi from a web server using Node.js and socket.io. We will create buttons on the web page that will turn the connected LED on or off.
Before creating the web server, we have to install some packages.
Installing Node.js on Raspberry Pi
The first thing you need to do is update your Raspberry Pi.
Then type the following command to update installed packages to the latest version.
sudo apt-get dist-upgrade
Type the following command to install the latest version of Node on Raspberry pi.
curl -sL https://deb.nodesource.com/setup_8.x | sudo -E bash -
Now, with the NodeSource package repository uploaded, we can move on and install Node.js
sudo apt-get install -y nodejs
To check if Node.js is successfully installed, type the following command, which should show you the version of Node.js
Installing the onoff Module
To control the GPIO pins of the Raspberry Pi using Node.js, we will have to install the “onoff” module. Type the following command to install it.
Installing socket.io for Node.js
Now install the web socket module for Node.js that will allow us to control the GPIO pin of Raspberry Pi from the webpage.
npm install socket.io --save
Creating the Web Server and HTML File
Now we have installed all the required packages and it’s time to create the web server and html file. Both of these files should be in the same directory.
Index.html
Let’s first make the html file that will create the buttons on the web browser. Create the html file by typing nano index.html and paste the below code in it.
<!DOCTYPE html>
<html>
<title>GPIO Control</title>

<body>
    <h2>Control GPIO 4</h2>
    <button type="button" id="state" onclick="LEDOn()" style="background-color:green;">ON</button>
    <button type="button" id="state" onclick="LEDOff()" style="background-color:red;">OFF</button>
    <script src="https://cdnjs.cloudflare.com/ajax/libs/socket.io/2.0.3/socket.io.js"></script>
    <script>
        var socket = io.connect(); //load socket.io-client and connect to the host
        function LEDOn() {
            socket.emit("state", 1); //send button state to server
        }

        function LEDOff() {
            socket.emit("state", 0); //send button state to server
        }
    </script>

</html>
</body>

</html>
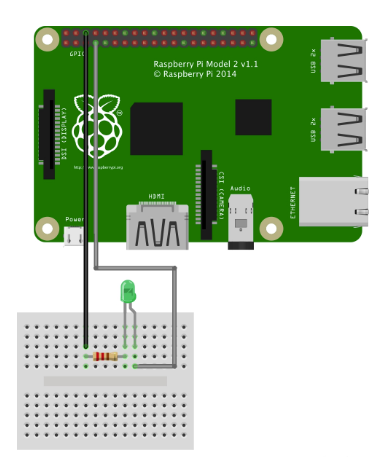
Connecting the LED to Raspberry Pi
Now connect the LED to GPIO 4 using a 220 ohm resistor as shown in the diagram below:
Creating the Web Server
Now let’s set up a web server!. The Node.js file will open the requested file and will return the content of the file and if anything goes wrong, it will throw 404 error.
Create the file by typing nano webserver.js and paste the below code in it.
var Gpio = require('onoff').Gpio; //require onoff to control GPIO
var LEDPin = new Gpio(4, 'out'); //declare GPIO4 an output
var fs = require('fs'); //require filesystem to read html files
var http = require('http').createServer(function handler(req, res) { //create server
  fs.readFile(__dirname + '/index.html', function (err, data) { //read html file
    if (err) {
      res.writeHead(500);
      return res.end('Error loading socket.io.html');
    }

    res.writeHead(200);
    res.end(data);
  });
});

var io = require('socket.io')(http) //require socket.io module and pass the http object

http.listen(8080); //listen to port 8080

io.sockets.on('connection', function (socket) {// WebSocket Connection
  var buttonState = 0; //variable to store button state

  socket.on('state', function (data) { //get button state from client
    buttonState = data;
    if (buttonState != LEDPin.readSync()) { //Change LED state if button state is changed
      LEDPin.writeSync(buttonState); //turn LED on or off
    }
  });
});
We have created both the web server and the HTML files, so it’s time to run the web server and control the GPIO pin of the Raspberry Pi.
Type the following command in the terminal to start the web server:
Then go to your browser and open the web page using [Raspberrypi-ip]:8080
In my case, it is 192.168.4.1:8080
You should see two buttons on your screen and when you press these buttons, the LED connected to GPIO4 of the Raspberry Pi will turn on or off.
Check out the video below to see the project in action!