Learn to keep track of the Date and Time on your Raspberry Pi with this article on how to use an RTC Module
The Raspberry Pi does not contain a built-in clock that runs when the board is powered off. Instead, it utilizes a network time protocol (NTP), which relies on an Ethernet or Wi-Fi connection each time it is powered on. To keep track of time without using the Internet to sync every time the Pi is booted up, a real-time clock (RTC) module is needed.
An RTC is an electronic device that keeps track of the current date and time by using an internal battery that allows it to continue running even when the primary source of power is turned off. There are different types of RTC modules available for different needs.
In this article, we will talk about how to use the RTC DS3231 module with a Raspberry Pi as a hardware clock using a library.
Hardware
Software
Connecting the Pi Zero to the DS3231
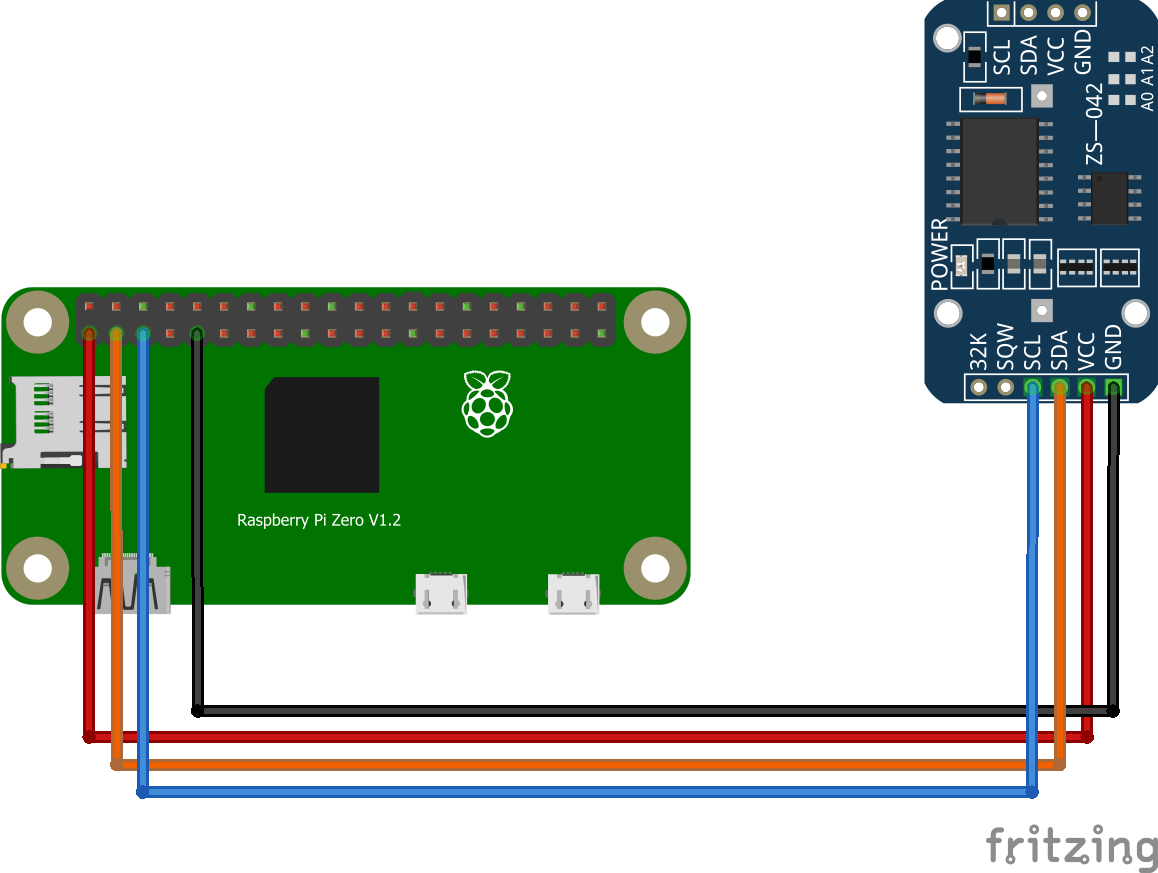
First, we must connect our RTC module to our Raspberry Pi Zero. Before doing the actual wiring, make sure that the Raspberry Pi is turned off or powered down.
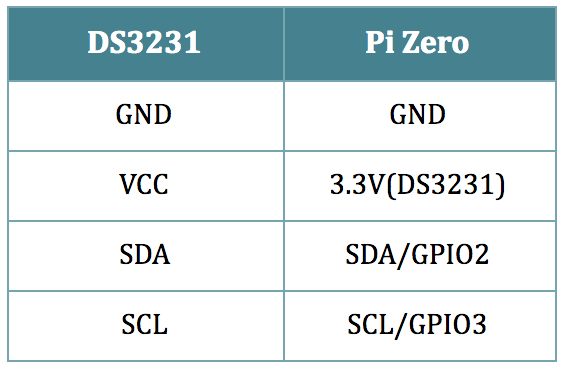
Follow the connections in the table and circuit diagram below.
The DS3231 has a 3.3V operating voltage so it requires the VCC 3.3V. We are using the I2C communication protocol to interface the RTC module to our Pi Zero.
Setting up the RTC Module
To set up the RTC module, we need to enable the I2C on our Raspberry Pi.
Run raspi config on the terminal:
$sudo raspi-config
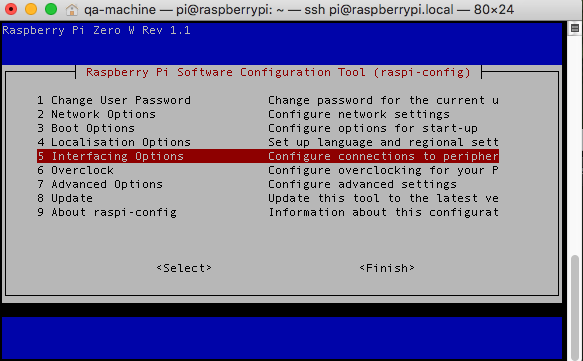
In the configuration tool, select Interfacing Option.
Selecting interfacing option
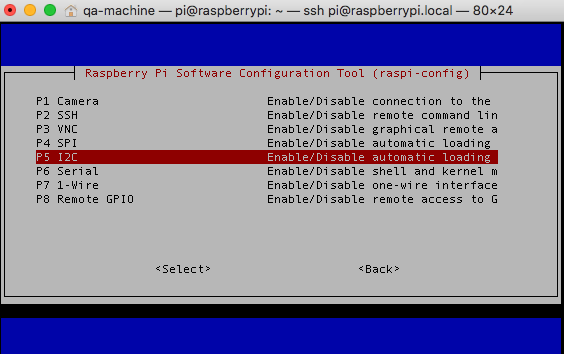
Then enable I2C by selecting P5 I2C.
After enabling the I2C, reboot the Pi with:
$sudo reboot
Verifying the RTC Module Connection
With the I2C interface enabled, we can verify if our connection to the RTC module works.
Before installing anything on the Pi, make sure your Pi’s firmware is up-to-date. Often, errors that occur during the installation of dependencies of packages are due to an outdated version of the Pi.
$sudo apt-get update -y
$sudo apt-get upgrade -y
We need to install python-smbus i2c-tools to see whether our Raspberry Pi detected our I2C connection from the RTC module.
On terminal run:
$sudo apt-get install python-smbus i2c-tools
Then:
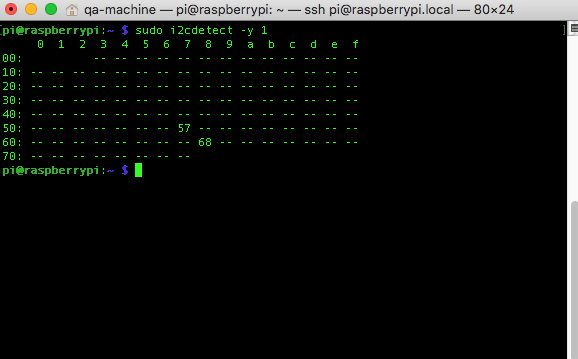
$sudo i2cdetect -y 1
For the older Pi 1, run using
$sudo i2cdetect -y 0
The 0x68 is a popular address for real-time clocks, especially for the DS3231. Having a #68 on the address means that a driver wasn’t using the address. If the address result is “UU”, it is currently being used by a driver.
Using the RTC Module and Library
Let's try to use the RTC using the DS3231 library.
For Raspberry Pi Zero Lite version or Headless, we might need to install Python before moving forward since it wasn’t included in the packages installed on Raspbian Lite.
Install Python on the Pi.
$sudo apt-get install python-pip
$sudo apt-get install python3-pip
Next, install git so we can clone the library on git.
$sudo apt install git-all
Let’s clone the library and check if we can use the RTC with the RTC_SDL_DS3231 library.
To do that, input the command below using the terminal.
$sudo git clone https://github.com/switchdoclabs/RTC_SDL_DS3231.git
Once done cloning, create a Python file “RTCmodule”. Copy the code below and paste in the blank py file. Then save it.
import time
import SDL_DS3231

ds3231 = SDL_DS3231.SDL_DS3231(1, 0x68)
ds3231.write_now()

while True:
print “Raspberry Pi=\t” + time.strftime(%Y-%m-%d %H:%M:%S”)
print “Ds3231=\t\t%s” % ds3231.read_datetime()
time.sleep(10.0)
Code Walkthrough
First, we import the modules we are using for the project.
import time
import SDL_DS3231
We initialize the clock.
ds3231 = SDL_DS3231.SDL_DS3231(1, 0x68)
Then, we print the time of both the Raspberry Pi and the RTC module.
print “Raspberry Pi=\t” + time.strftime(%Y-%m-%d %H:%M:%S”)
print “Ds3231=\t\t%s” % ds3231.read_datetime()
Now run the file.
$python RTCmodule.py
The result should be the same as below, with the time of the Raspberry and the RTC module.
Raspberry Pi and DS3231 date and time.
How to Make the DS3231 Clock Different From the Pi’s Clock
To make the DS3231 hardware clock different from the Pi’s clock, we can use the write_all() command.
"ds3231.write_all(seconds,minutes,hours,day,date,month,year,save_as_24h=True)"
Range:
- seconds [0,59],
- minutes [0,59],
- hours [0,23],
- day [0,7],
- date [1-31],
- month [1-12],
- year [0-99]
Using the same code before but replace ds3231.now() with ds3231.write_all()
import time
import SDL_DS3231

ds3231 = SDL_DS3231.SDL_DS3231(1, 0x68)
ds3231.write_all(29,30,4,1,3,12,92,True)
while True:

print “Raspberry Pi=\t” + time.strftime(%Y-%m-%d %H:%M:%S”)
print “Ds3231=\t\t%s” % ds3231.read_datetime()
time.sleep(10.0)
The RTC module’s clock has changed
We can see that the DS3231’s date and time changed to the values used. With this, we can use the RTC and the library for some projects. However, since this project is to use the RTC on our Raspberry Pi, there is a bit more to do.
Using the RTC Module on the Raspberry
In the next step, we need to set up the DS3231 for use on the Raspberry Pi. First, complete the steps above.
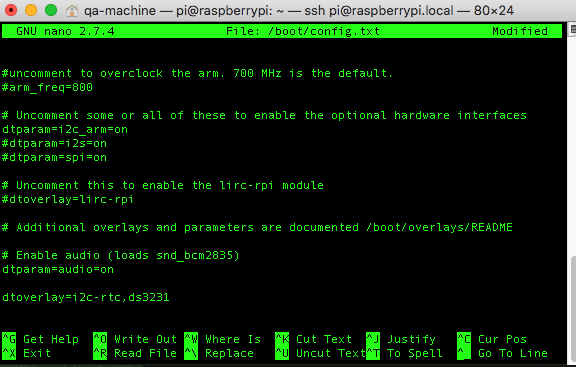
We must use the 0x68 address of the RTC. We need to edit the config.txt and add the device tree overlay.
Run
$sudo nano /boot/config.txt
Then edit the Pi configuration and add the RTC chip you are using.
dtoverlay=i2c-rtc,ds1307
or
dtoverlay=i2c-rtc,pcf8523
or
dtoverlay=i2c-rtc,ds3231
to the end of the file
Save and restart the Pi to check the state of the 0x68 address.
$sudo reboot
$sudo i2cdetect -y 1
Next, we must disable the “fake hwclock”, which interferes with our RTC real hwclock.
To disable the fake hwclock, run the following commands on the terminal.
$sudo apt-get -y remove fake-hwclock
$sudo update-rc.d -f fake-hwclock remove
$sudo systemctl disable fake-hwclock
Making the DS3231 the Main Clock
Once we disable the fake-hwclock, we can make our real-time clock hardware our main clock.
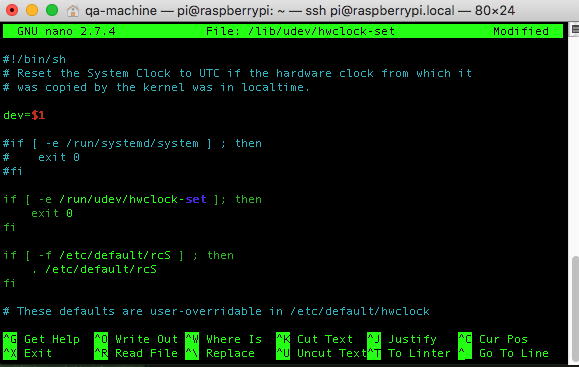
Run $sudo nano /lib/udev/hwclock-set and enter the following lines.
#if [-e/run/systemd/system];then
#exit 0
#if
Commenting out the initial lines.
#/sbin/hwclock --rtc=$dev --systz --badyear
#/sbin/hwclock --rtc=$dev --systz
Commenting out the rest of the lines
Now we are ready to test if our setup is working.
How to Sync Time From Raspberry Pi to RTC
Initially, the RTC will have an incorrect time. We need to correct its time so that we can use the RTC as our hardware clock.
To check the date, the RTC runs
$sudo hwclock
To correct the time of the RTC, we must have an Ethernet or Wi-Fi connection to sync the correct time from the internet to our RTC module.
To check the date and time input in the terminal, enter $date.
Or use $ date --date="Feb 2 2014 13:12:10" to set the date and time manually. Note that if you set this up manually, it will be automatically corrected if there is an Ethernet or Wi-Fi internet connection.
How to Sync Time From RTC to Pi
We can also set the Pi’s time based on the RTC module’s time. We can do that by entering:
$sudo hwclock --systohc
or
$sudo hwclock -w
We can also set the time and date on our RTC module using:
$sudo hwclock --set --date "Sat Aug 10 08:31:24 PDT 2013"
or
$sudo hwclock --set --date "8/11/2013 23:10:45"
With the time synced, the last step it to insert a battery into the RTC module so that it can continue to save the date and time. The next time you boot your Raspberry Pi, the date and time will be automatically synced from the RTC module!