Windows 10 IoT core is a cut down version of Windows 10, created for designing with systems such as the Raspberry Pi.
Windows 10 IoT core is a cut down version of Windows 10, designed for low-end systems such as the Raspberry Pi. One of the massive features of the system is its ability to give users access to the .Net framework for producing IoT applications.
However, getting Windows 10 IoT core onto a Pi is not the easiest of things to accomplish, so in this tutorial we will see how to do just that.
Get Windows 10
The first stage in installing Windows 10 IoT core is to have a Windows 10 system on a regular laptop or PC. Unfortunately, this is compulsory and unavoidable but there are some upsides to using Windows 10:
- It’s dead cheap – SoftwareGeeks sell Windows 10 licenses for less than $20
- It’s easy to install – Installing Windows 10 onto a pre-existing windows system is easy
- It’s modern – Being a modern operating system you have access to the latest tools
Download Windows 10 IoT Core Dashboard
Unlike other operating systems, using Windows 10 IoT on the Raspberry Pi is not entirely obvious or straight forward.
On systems such as Raspbian you download the ISO, flash an SD card, then use the desktop to run Python or C / C++ programs, whereas on Windows 10 IoT core it appears that you have to remotely access the system (there are menus but you can’t just navigate the SD card and then launch an application). This is where the Dashboard comes in which you can download from Microsoft's website.
Create your Raspberry Pi Image
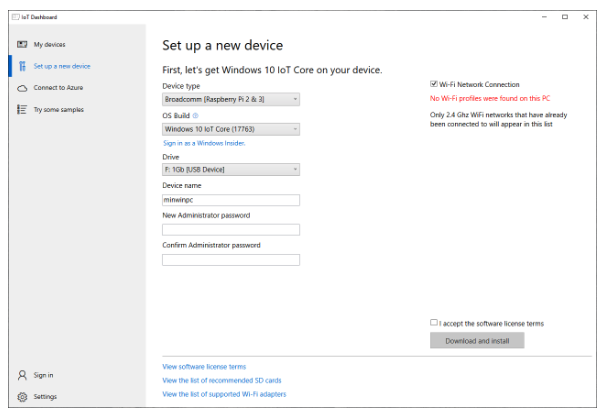
With the microSD card in a card reader connected to your system, you are ready to create your Raspberry Pi Windows 10 IoT image. Load the Windows 10 IoT dashboard and click “Setup a new device” in the panel on the left of the window.
Ensure you select Raspberry 2 and 3 as the device time, choose the latest Windows 10 IoT build, and select the microSD card drive from the Drive selection. At this point, you can also input a device name and admin password. When ready tick the box at the bottom and click “Download and Install”.
Get Visual Studio 2017
With the OS downloading, it’s time to download Visual Studio 2017 community. Luckily for us, this costs nothing but does require a Microsoft account which you can register for free.
Installing Visual Studio 2017 takes a while, so at this point you may want to get a cup of tea while both the OS and Visual Studio download. During the installation just select the default options.
Launch Visual Studio 2017
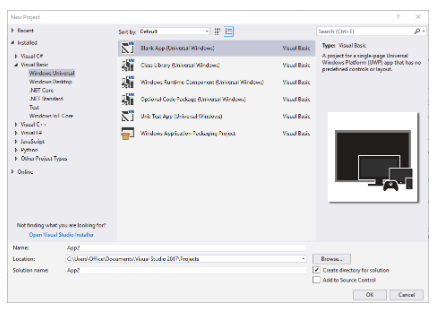
The next step is to run Visual Studio 2017 and attempt to create a “Universal Application”. To do this click File > New Project and then Visual Basic > Windows Universal > Blank App. At this point, Windows will send a prompt about not having libraries; install the libraries or software it requires.
This is needed so that Windows can target the ARM device on the Raspberry Pi. When we come back to actually create apps for the Pi, we will be using a different project template (more on this later).
Get the Windows 10 IoT Template
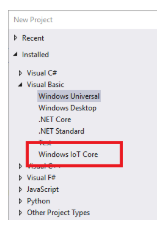
Once Visual Studio 2017 has installed the needed components, you will need to install the Windows 10 IoT project template.
Once downloaded, run the file and install the needed templates to produce background applications (those that run in the background on the Pi). You can check that this worked by reopening Visual Studio 2017, navigate to File > New Project, and check to see if there is a “Windows IoT Core” option under Visual Basic.
Turn the Pi on and Setup Windows
Setting up Windows IoT Core on the Pi is very straightforward and will require the following things
- Monitor
- HDMI Lead for monitor
- Mouse
- Keyboard
- Internet Connection
Make sure that the Pi is running on the same network as the computer that you will control the Pi with. In my case, my Pi is connected to the office network which is also connected to my computer, printers, and server.
During the installation, you will be asked to enter credentials and agree/disagree to options but these won’t be covered here as it is incredibly straight forward.
Note – Windows IoT Core on the Pi is incredibly slow to boot so do be patient!
If everything goes to plan at this point and your Raspberry Pi has booted then go back to the Windows IoT Dashboard and check to see if your device is on the list under My Devices.
Confirm Visual Studio 2017 Works
The last step is to see if Visual Studio can compile a Windows IoT Core program and remotely debug the Pi. That’s right, you can program and debug the Pi remotely which is insanely useful when developing on a Single Board Computer that may not have a monitor or keyboard.
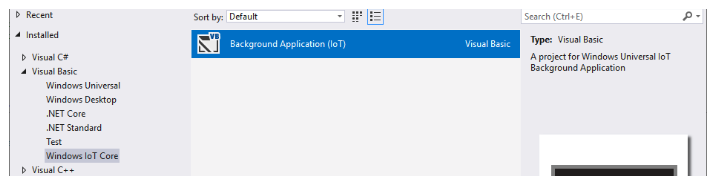
Create a new Windows IoT Core background application by clicking File > New Project and then under Windows IoT Core select Background Application.
In the StartupTask.vb file delete all the code and enter the code below (this will test GPIO26).
Imports Windows.ApplicationModel.Background
Imports Windows.Devices.Gpio
Imports Windows.System.Threading

Public NotInheritable Class StartupTask
    Implements IBackgroundTask

    Const LED_PIN As Short = 26
    Const INTERVAL As Short = 1   'Interval in seconds
    Private gpio
    Private pin As GpioPin
    Private pinValue As GpioPinValue
    Private blinktimer As ThreadPoolTimer
    Private cancelled As Boolean = False
    Private deferral As BackgroundTaskDeferral = Nothing


    Public Sub Run(taskInstance As IBackgroundTaskInstance) Implements IBackgroundTask.Run

        'Handler for cancelled background task
        AddHandler taskInstance.Canceled, New BackgroundTaskCanceledEventHandler(AddressOf onCanceled)

        'Background task continues to run even after IBackgroundTask.Run returns
        deferral = taskInstance.GetDeferral()

        'Initialize GPIO
        initGPIO()

        'Create a periodic timer
        blinktimer = ThreadPoolTimer.CreatePeriodicTimer(New TimerElapsedHandler(AddressOf blinktimer_tick), TimeSpan.FromMilliseconds(1))

    End Sub

    Private Sub onCanceled(sender As IBackgroundTaskInstance, reason As BackgroundTaskCancellationReason)
        cancelled = True
    End Sub

    Sub blinktimer_tick(state As Object)

        If Not cancelled Then
            'Toggele Pin Value
            If (pinValue = GpioPinValue.High) Then
                pinValue = GpioPinValue.Low
            Else
                pinValue = GpioPinValue.High
            End If

            pin.Write(pinValue)
        Else
            'if the task is cancelled
            'Stop the timer And finish execution
            blinktimer.Cancel()
            deferral.Complete()
        End If
    End Sub

    Private Sub initGPIO()
        'Get the default GPIO controller for the system
        gpio = GpioController.GetDefault()

        If Not gpio Is Nothing Then
            'Open a connection to the GPIO Pin
            pin = gpio.openpin(LED_PIN)
            pinValue = GpioPinValue.Low

            'Write Pin value low to turn on LED
            pin.Write(pinValue)

            'Set the pin for output
            pin.SetDriveMode(GpioPinDriveMode.Output)
        End If

    End Sub

End Class
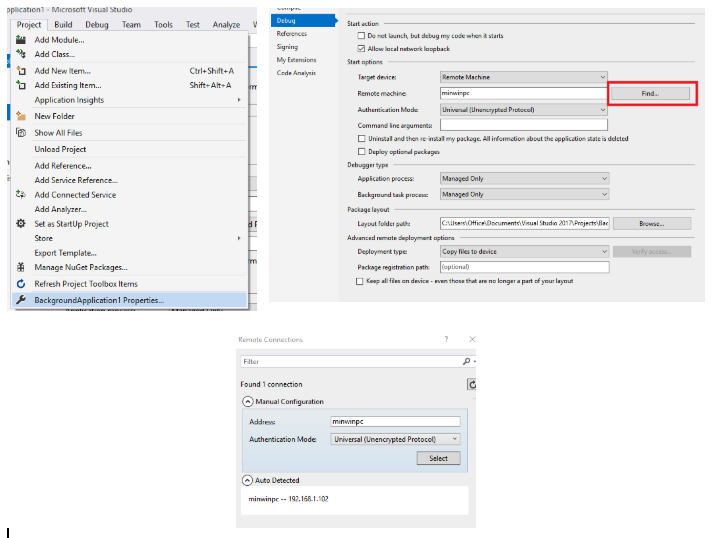
To program the Raspberry Pi, you will need to navigate to Project —> Properties and under Debug click Find next to Remote machine. Your machine should be listed under Auto Detected.
With the system targeted, it’s time to test it all out. Click the Green Arrow at the top that says Remote Machine.
If you get a message saying that the build was successful and the deployment started, you have a system ready for creating IoT apps!