Learn how to build a simple paint app using OpenCV on Raspberry Pi.
In this article, you are going to learn about how to build a simple paint app using OpenCV. This tutorial will help you become more familiar with creating your own user interfaces for any applications you are trying to build with platforms like Arduino and Raspberry Pi.
If this is the first time you are using OpenCV, check out my earlier tutorial on how to setup OpenCV on a Raspberry Pi.
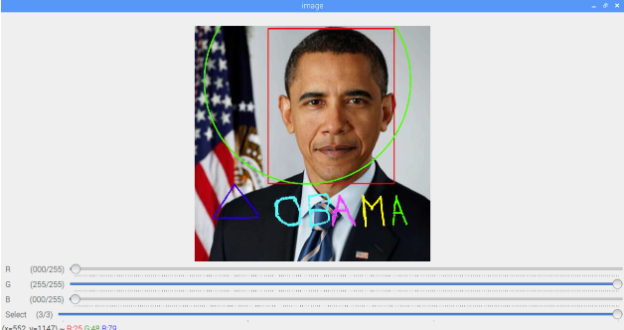
The app will have four trackbars: three will be used to change the color (B, G, R) and the fourth will be used to select between a rectangle, circle, straight line, or free line.
It is also possible to use the trackbars as switches. By default, OpenCV does not have a button functionality, but we can use the trackbars as buttons.
Another useful function we can use in this app is the mouse callback function which will execute whenever a mouse event takes place.
The different shapes we can draw with our OpenCV paint app.
Python Code
Here is the full Python code for creating the simple paint app:
import math
import cv2

def nothing(x):
    pass

# Load an image
img = cv2.imread('obama.jpg')
cv2.namedWindow('image', cv2.WINDOW_NORMAL)

# Create trackbars for color change
cv2.createTrackbar('R','image',0,255,nothing)
cv2.createTrackbar('G','image',0,255,nothing)
cv2.createTrackbar('B','image',0,255,nothing)

# Create trackbars for drawing shapes
cv2.createTrackbar('Select', 'image',0,3,nothing)

drawing = False # true if mouse is pressed
ix,iy = -1,-1
# mouse callback function
def draw(event,x,y,flags,param):
    global ix,iy,drawing
    if event == cv2.EVENT_LBUTTONDOWN:
        drawing = True
        ix,iy = x,y
    elif event == cv2.EVENT_MOUSEMOVE:
        if drawing == True:
            if s == 3:
                cv2.circle(img,(x,y),5,(b, g, r),-1)
    elif event == cv2.EVENT_LBUTTONUP:
        if drawing == True:
             if s == 0:
                cv2.rectangle(img,(ix,iy),(x,y),(b, g, r),5)
             elif s == 1:
                cv2.circle(img,(int((ix+x)/2), int((iy+y)/2)),int(math.sqrt( ((ix-x)**2)+((iy-y)**2) )),(b, g, r),5)
             elif s == 2:
                cv2.line(img,(ix,iy),(x,y),(b, g, r),5)

        drawing = False

cv2.setMouseCallback('image',draw)

while(1):
    cv2.imshow('image',img)
    k = cv2.waitKey(1) & 0xFF
    if k == 27:
    	break
    # get current positions of four trackbars
    r = cv2.getTrackbarPos('R','image')
    g = cv2.getTrackbarPos('G','image')
    b = cv2.getTrackbarPos('B','image')
    s = cv2.getTrackbarPos('Select','image')

cv2.destroyAllWindows()
Reading an Image
The function cv2.imread() is used to read the image, and its argument is the name of the image. If the image is in the working directory, just write the name of the image. Otherwise, you will have to give the full path of the image.
We will create a window and label it as ‘image’. All the trackbars will be attached to this window.
img = cv2.imread('obama.jpg')
cv2.namedWindow('image', cv2.WINDOW_NORMAL)
Creating the Trackbars
To create the trackbars, we use the cv2.createTrackbar() function, which has five arguments:
- The trackbar name
- The window name to which it is attached
- The default value
- The maximum value
- The callback function (which is executed every time the trackbar value changes)
The callback function always has a default argument which is the trackbar position. In our case, the function does nothing, so we simply pass.
We created three trackbars for red, green, and blue. Each trackbars has a default value of 0 and a maximum value of 255 and is attached these to the window named ‘image’.
Next we need to create a trackbar to select between a rectangle, circle, straight line and free line with a default value of 0 and a maximum value of 3. We’ll set the values as follows:
- 0: Rectangle
- 1: Circle
- 2: Straight line
- 3: Free line
# Create trackbars for color change
cv2.createTrackbar('R','image',0,255,nothing)
cv2.createTrackbar('G','image',0,255,nothing)
cv2.createTrackbar('B','image',0,255,nothing)

# Create trackbars for drawing shapes
cv2.createTrackbar('Select', 'image',0,3,nothing)
Mouse Callback Function
We can now create a mouse callback function which executes when a mouse event takes place. A mouse event can be anything related to the mouse: left-button down, left-button up, left-button double-click, etc.
The function gives us the coordinates (x,y) for every mouse event. With this event and location, we can do whatever we like.
Creating a mouse callback function has a specific format which is the same everywhere. It differs only in what the function does. In our case, the callback function is the draw function which will draw a rectangle, circle, straight line, or free line depending on the position of the fourth trackbar.
def draw(event,x,y,flags,param):
    global ix,iy,drawing
    if event == cv2.EVENT_LBUTTONDOWN:
        drawing = True
        ix,iy = x,y
    elif event == cv2.EVENT_MOUSEMOVE:
        if drawing == True:
            if s == 3:
                cv2.circle(img,(x,y),5,(b, g, r),-1)
    elif event == cv2.EVENT_LBUTTONUP:
        if drawing == True:
             if s == 0:
                cv2.rectangle(img,(ix,iy),(x,y),(b, g, r),5)
             elif s == 1:
                cv2.circle(img,(int((ix+x)/2), int((iy+y)/2)),int(math.sqrt( ((ix-x)**2)+((iy-y)**2) )),(b, g, r),5)
             elif s == 2:
                cv2.line(img,(ix,iy),(x,y),(b, g, r),5)

        drawing = False
cv2.setMouseCallback('image',draw)
Get Trackbar Position
Cv2.getTrackbarPos() function is used to get the current position of the trackbar. The first argument it takes is the name of the trackbar we created before and the second argument is the name of the window to which it is going to attach.
# get current positions of four trackbars
    r = cv2.getTrackbarPos('R','image')
    g = cv2.getTrackbarPos('G','image')
    b = cv2.getTrackbarPos('B','image')
    s = cv2.getTrackbarPos('Select','image')