A distance measurement is required or advantageous for many (outdoor) projects.
In this project, we will use hardware ultrasonic sensor and Raspberry Pi 3, Software
Python code. Not everyone is familiar with ultrasonic sensor and Raspberry Pi3. Therefore, in the front part ,we will introduce some basic knowledge about ultrasonic sensor and Raspberry Pi3. This is conducive to understanding the project better. And then, we will have a look at the project of wiring Ultrasonic Sensor (HC-SR04) with Raspberry Pi3roduction for your project
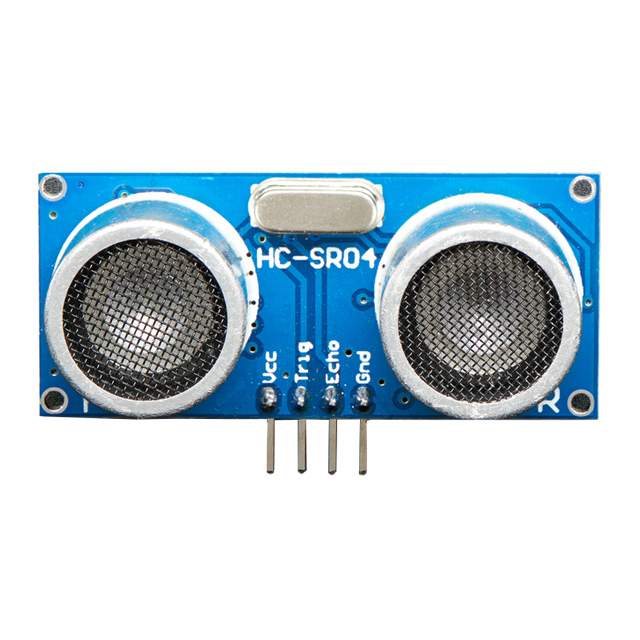
Ultrasonic Sensor (HC-SR04) + Raspberry Pi3
A distance measurement is required or advantageous for many (outdoor) projects. These small modules, which start at 1-2 dollars and can measure distances of up to 4-5 meters using ultrasound, are surprisingly accurate. The connection and control are demonstrated in this tutorial.
5.1 Hardware
Raspberry pi 3
Ultrasonic Sensor(s) - HC-SR04
A set of resistors for each sensor you are connecting
330Ω and 470Ω
Jumper wires to connect the sensor(s) to the pi
Breadboard to connect the sensor(s) to the pi
5.2 Wire Setup
Pins
The sensor has four (labeled) pins that must be connected to the Raspberry Pi's pins.
Pin 2 to VCC (5v - power)
Pin 6 to GND (ground)
Pin 12 receives a TRIG signal (GPIO18)
The ECHO resistor 330
- Attach it to Pin 18 at one end (GPIO24)
- Connect it to Pin6 as well, using a 470 resistor (ground).
- This is done because GPIO pins can only withstand a maximum voltage of 3.3V.
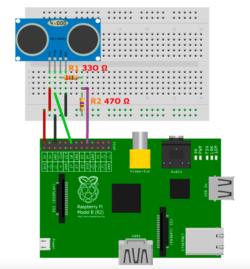
5.3 Breadboard
As shown in the circuit diagram, connect the sensor to the pi using a breadboard.
By replicating this exact setup on the other half of the breadboard, an additional sensor can be connected to the pi.
Connect the VCC and GND pins together (2 and 6)
For the TRIG and ECHO connections, use any two GPIO pins.
Just make sure to include the correct GPIO pins in your code.
5.4 Software
Python
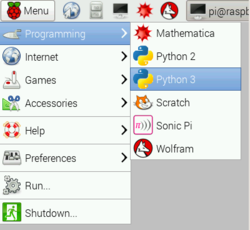
Create a new script
Choose Menu → Programming → Click on Python 3 to create a new script
When you run the code, the script below will print the distance of the object in front of the sensor.
Because this code is easily manipulated to add another sensor, all variables have a "1" after them.
Simply copy and paste each section of code, renaming variables with a "2."
Make sure to connect a TRIG2 and an ECHO2 to the pi's two new GPIO Pins and to mirror the circuit diagram on the other half of the breadboard.
import RPi.GPIO as GPIO
import time
GPIO.setmode(GPIO.BCM)
TRIG1 = 18
ECHO1 = 24
#print ("Distance Measurement In Process")
GPIO.setup(TRIG1, GPIO.OUT)
GPIO.output(TRIG1, False)
GPIO.setup(ECHO1, GPIO.IN)
#print ("Waiting For Sensor1 To Settle")
time.sleep(.1)
GPIO.output(TRIG1, True)
time.sleep(0.00001)
GPIO.output(TRIG1, False)
while GPIO.input(ECHO1) == 0:
pass
pulse_start1 = time.time()
while GPIO.input(ECHO1) == 1:
pass
pulse_end1 = time.time()
pulse_duration1 = pulse_end1 - pulse_start1
distance1 = pulse_duration1 * 17150
distance1= round(distance1, 2)
print ("Distance1:",distance1, "cm")
time.sleep(10)
GPIO.cleanup()
Make a copy of your script and save it as ultrasonic distance.py.
Go to File and click on Save as
In the Save in field, navigate to the C: drive and then select a folder to save in.
In the File name field, enter ultrasonic distance.py.
Select All Files in the Save as type field.
Click the Save button.
To run the script, use the terminal.
Clicking on the monitor icon at the top of the screen will launch the terminal.
Enter cd "folder name" to change directory to your pythonpractice folder, then enter ultrasonic distance.py to run your program.
Know more about Raspberry pi 3 Ultrasonic Sensor(s) - HC-SR04