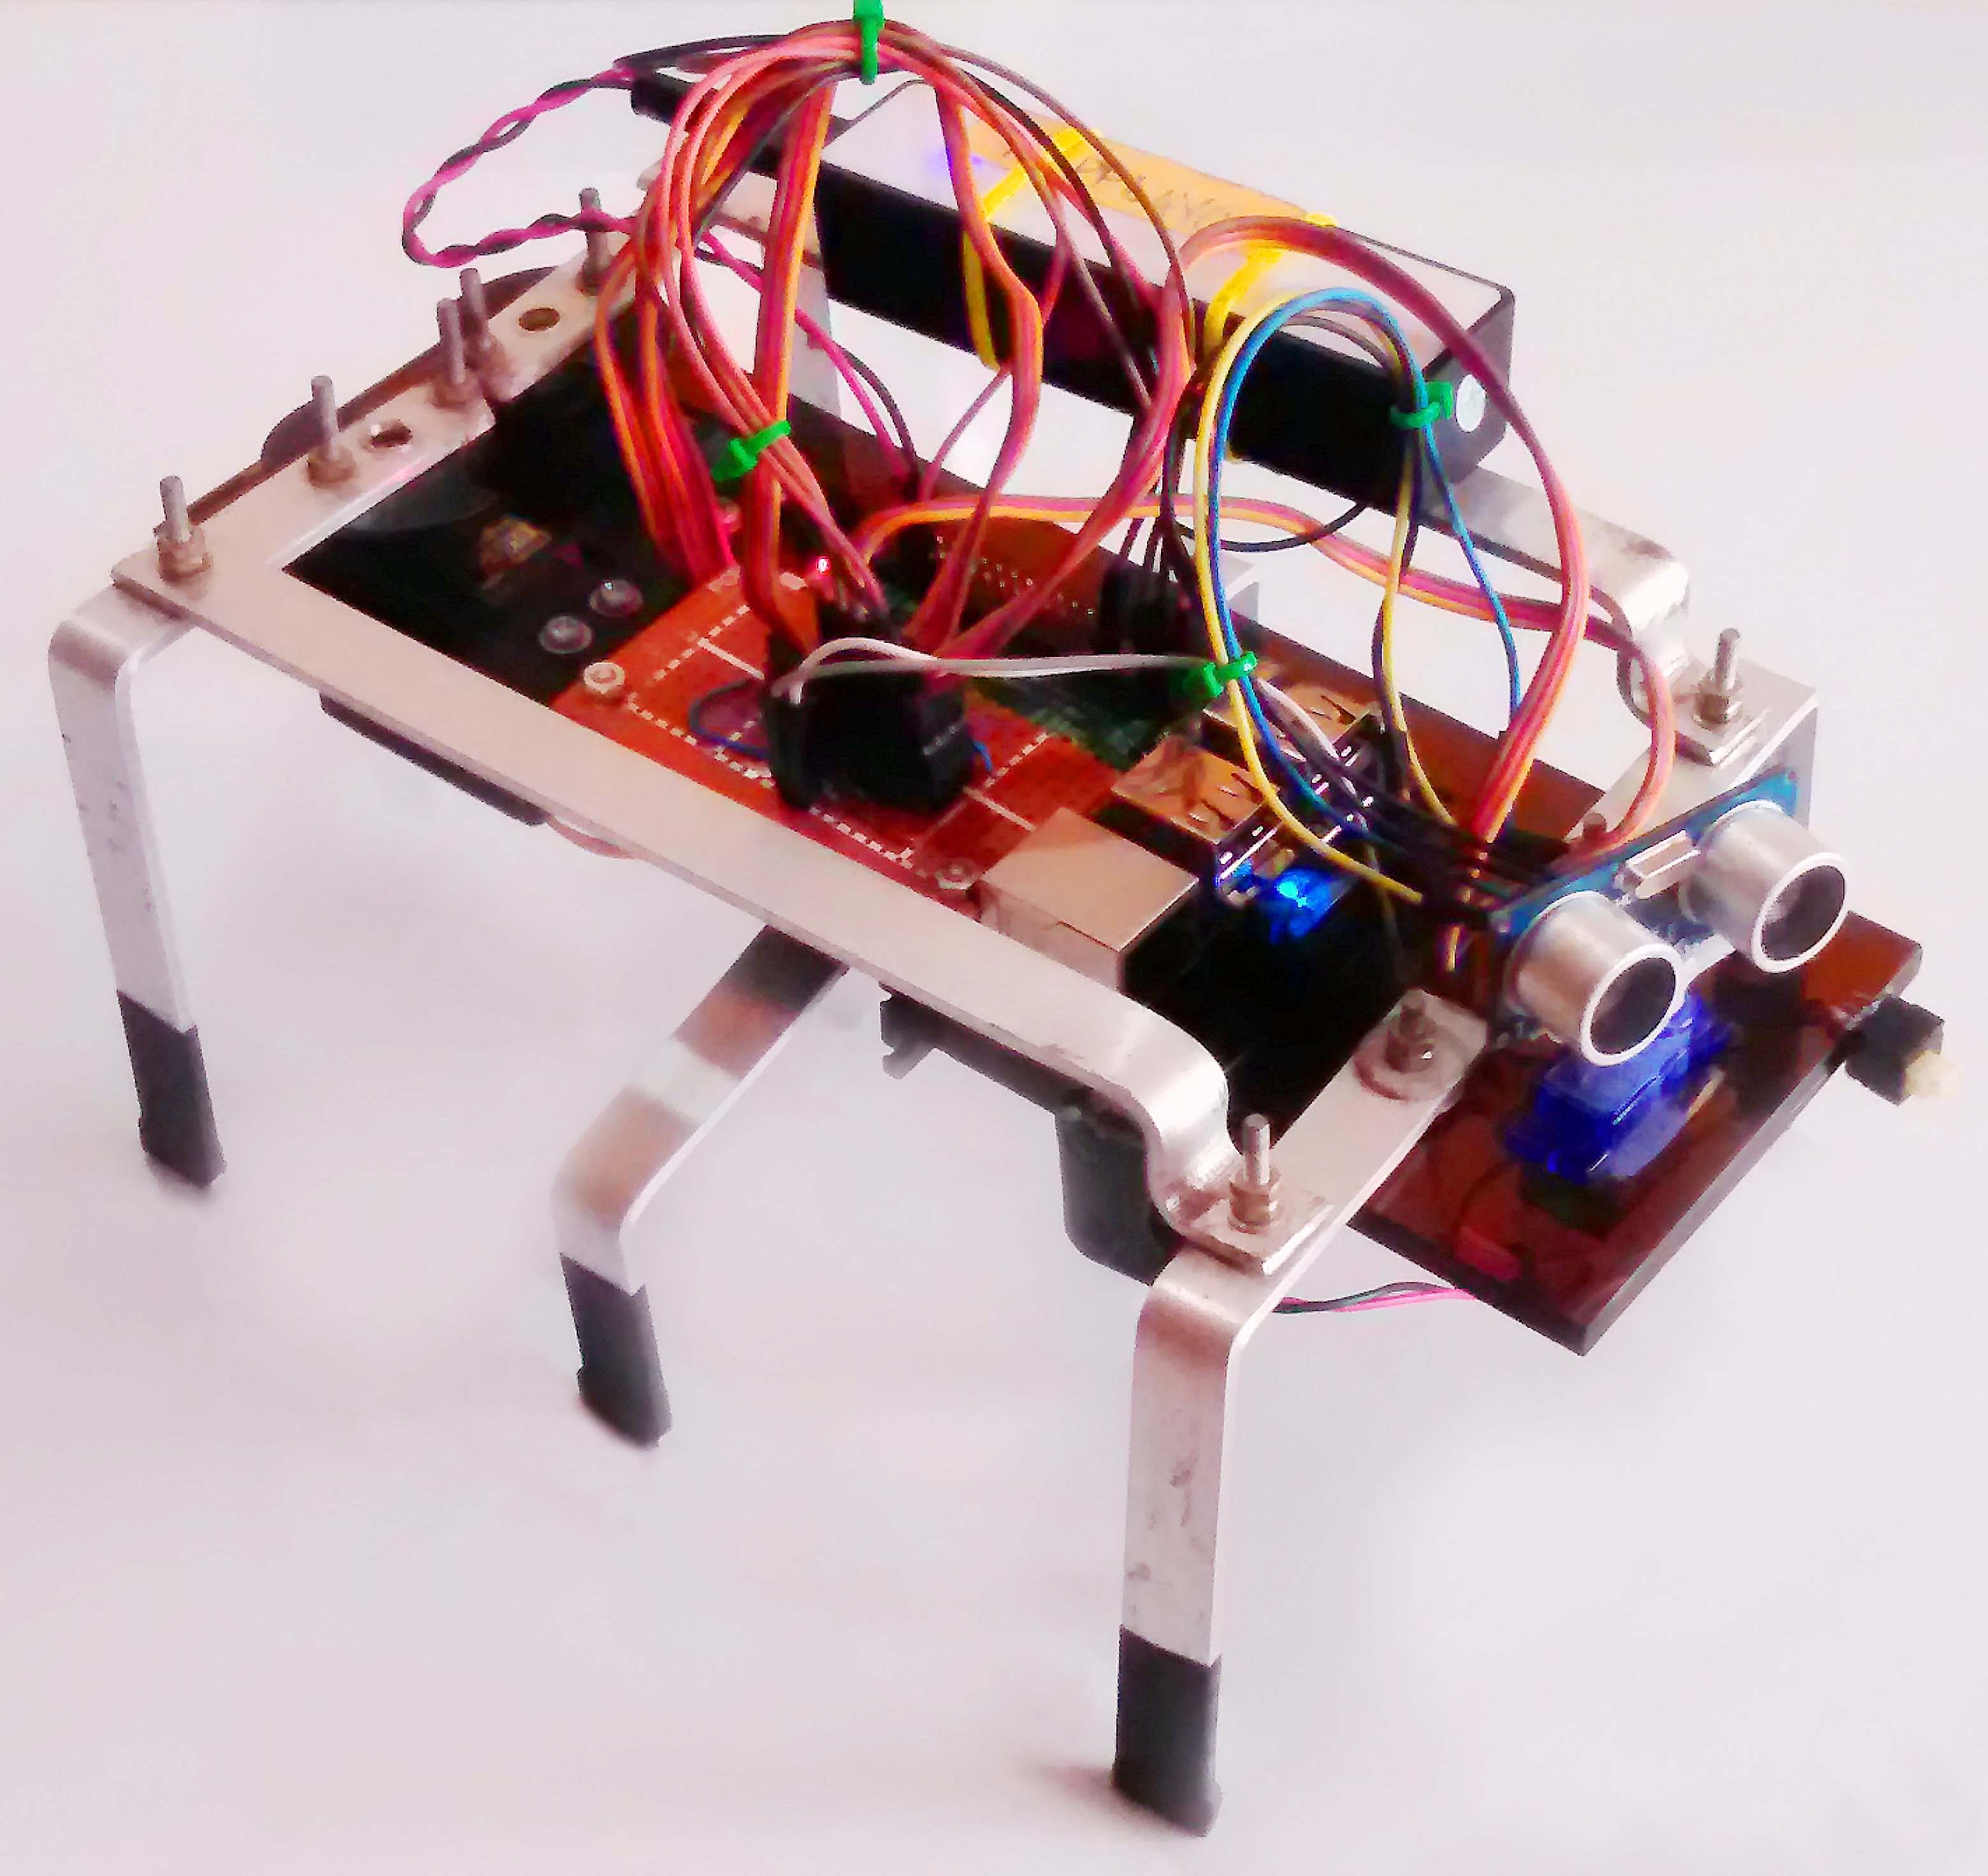
A Raspberry Pi powers this walking robot that can either run autonomously or be controlled by a smartphone.
For my next project, I decided to create my version of a popular robot project: the hexapod walker. This Raspberry Pi-powered robot will have an autonomous mode where it runs by itself and avoids obstacles, and a manual mode where it can be controlled by a smart phone. Interested? Here's how I did it.
Hexapod Walker Concept
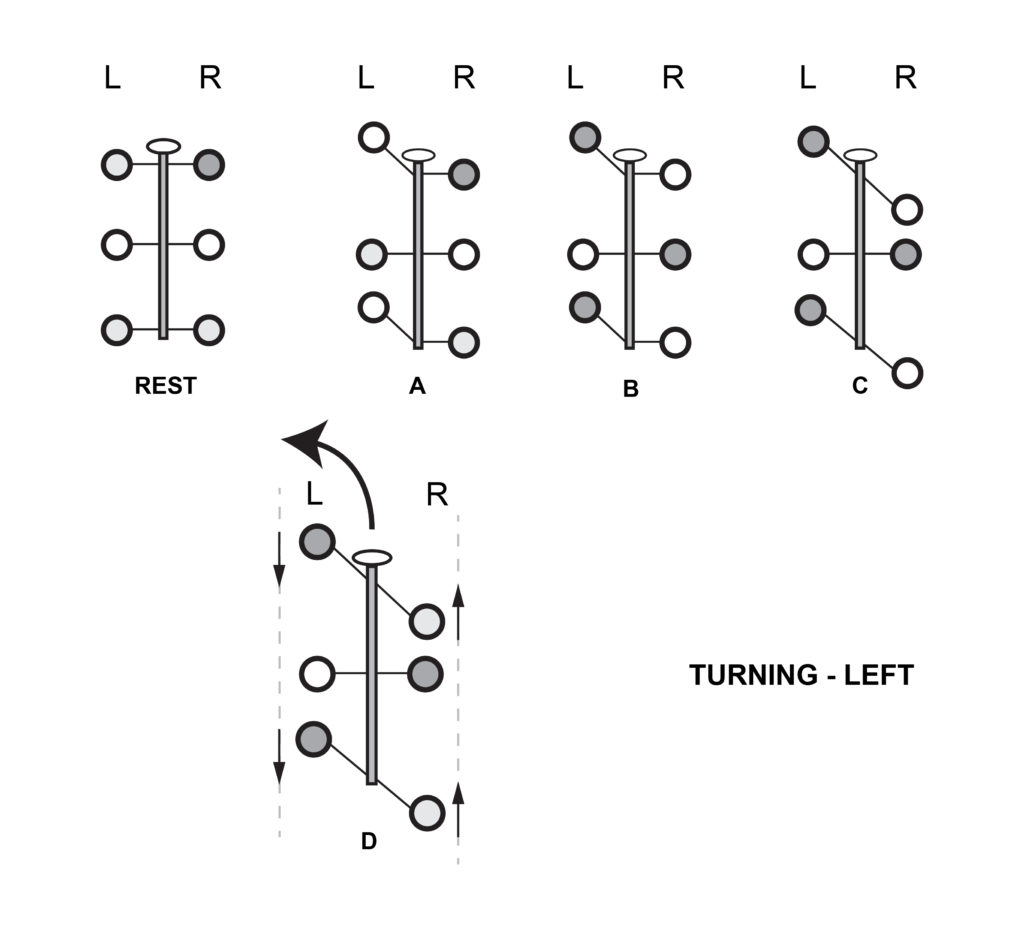
This hexapod walker will follow the tripod gait, which is used by most animals and insects. The tripod gait is illustrated below:
 Image courtesy of NC State University
There are lots of ways to use this gait in a hexapod walker. I chose to build a three-servo motor version which I found to have a balance between price and performance. Then I added another servo motor where the "eyes" of the robot are mounted.
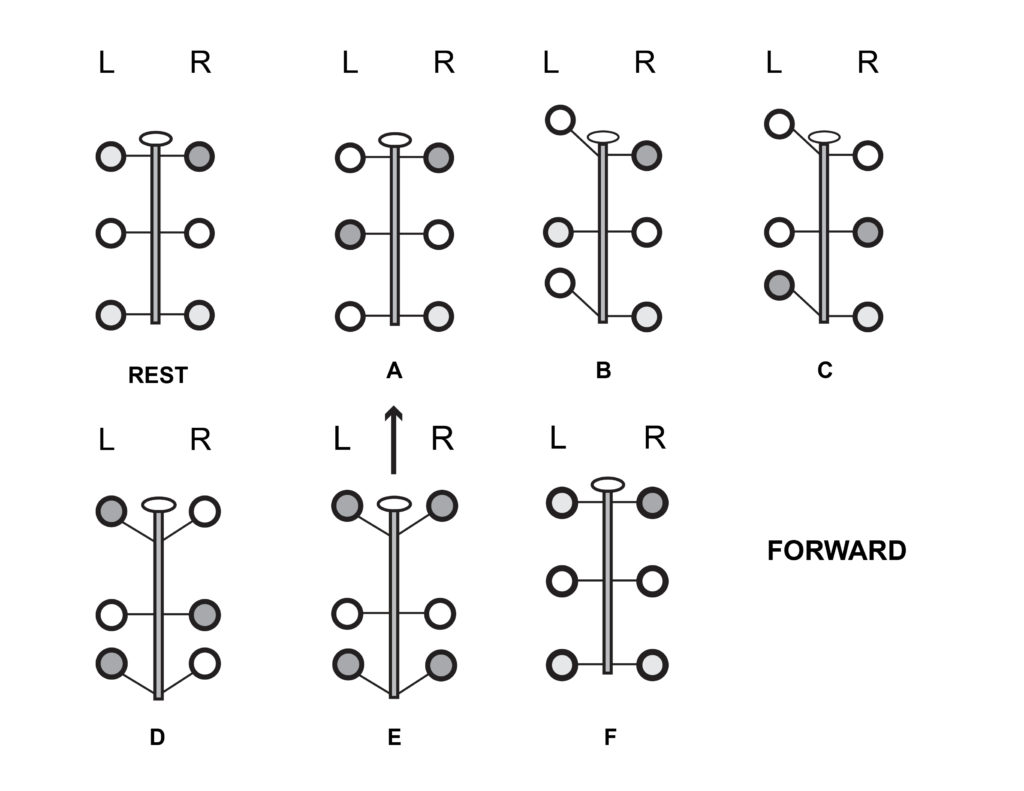
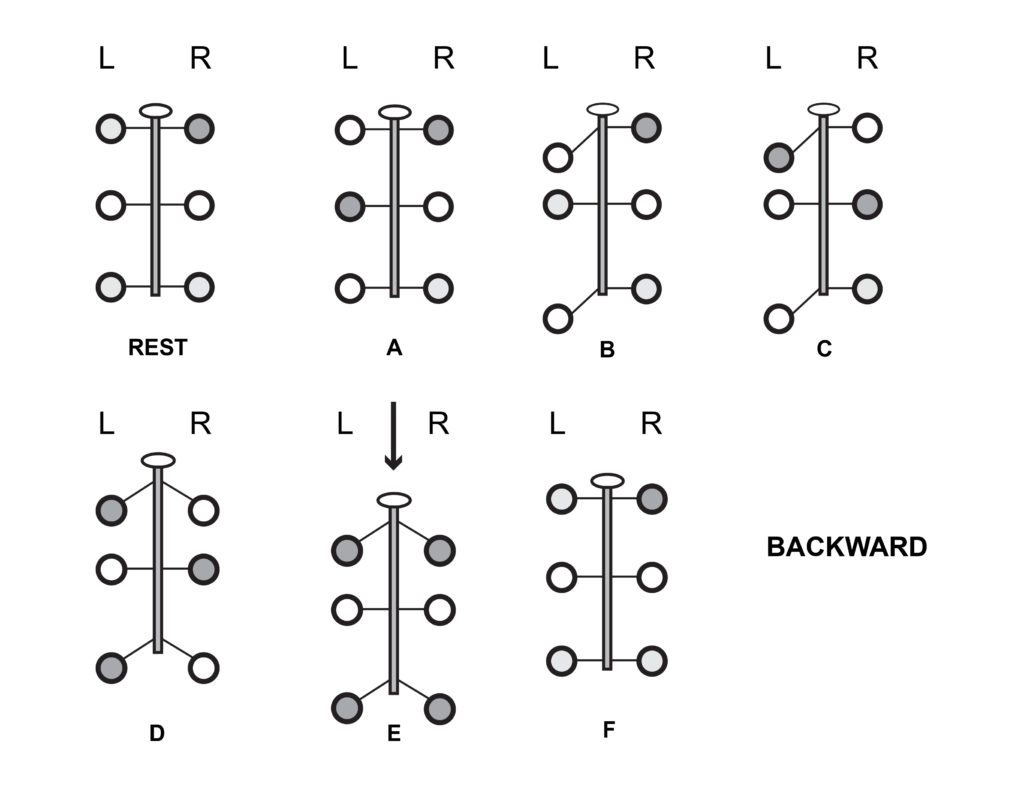
The robot will have three movements: forward, backward, turn right, and turn left. Any movement always involves tilting the robot to the right or left and then moving the leg that is lifted by the tilt. Below are the diagrams for the movements (a gray on a leg means the weight of the robot is on that leg).
The turn-right movement is basically the turn-left movement in reverse.
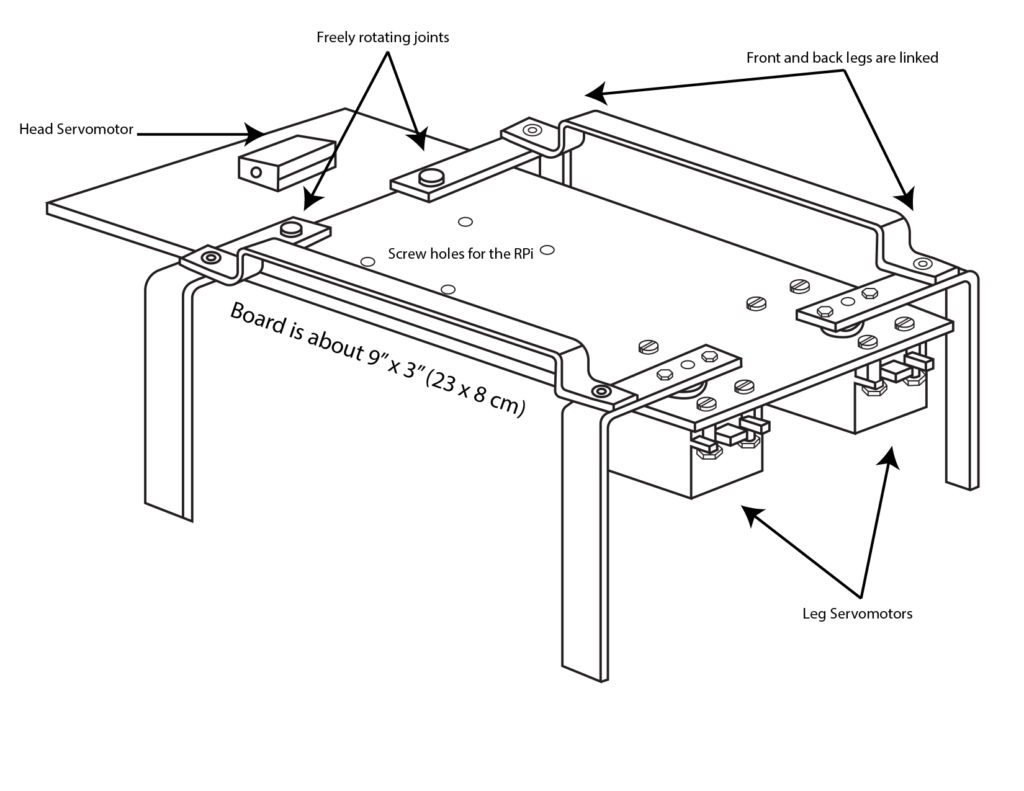
To make a three-servo motor design possible, the front and the corresponding back leg need to be interconnected while the third servo motor tilts the walker.
This hexapod walker can operate in two modes. In the first mode (autonomous) the walker is free to roam. If it detects an obstacle, it will go backward two steps and then turn right. The second mode will allow the user to control the movement of the hexapod walker using any smartphone connected to the same network as the robot.
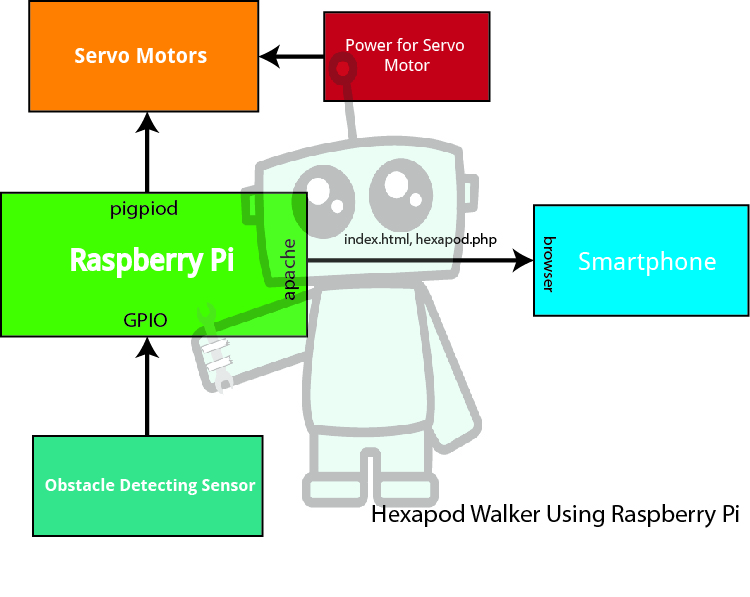
Based on my design requirements, I needed a controller that can 1) control four servos simultaneously 2) read input from an obstacle-detecting sensor 3) connect to a network for wireless control. Creating an Arduino Hexapod Walker was tempting, but the added cost in featuring wireless connectivity plus the extra challenge (Arduino would be easier) made me decide to go with the Raspberry Pi.
Here's the framework of my design:
Building Instructions
The hexapod walker have three major parts: the body/platform, the legs, and the head.
Building the Body
Here’s an example layout you can use to build the body of the walker. I used an acrylic board as my platform. Details of the legs follow.
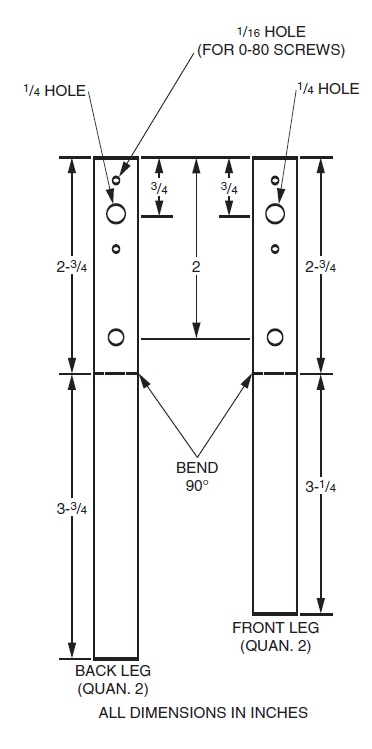
Building the Legs
Here’s a layout for the legs. Mine used 1/2″ x 1/8 ” aluminum bars. The legs should be hard enough to hold the weight of the hexapod walker. No plastics please!
Here's the leg for the tilt:
Mounting the RPi and Head
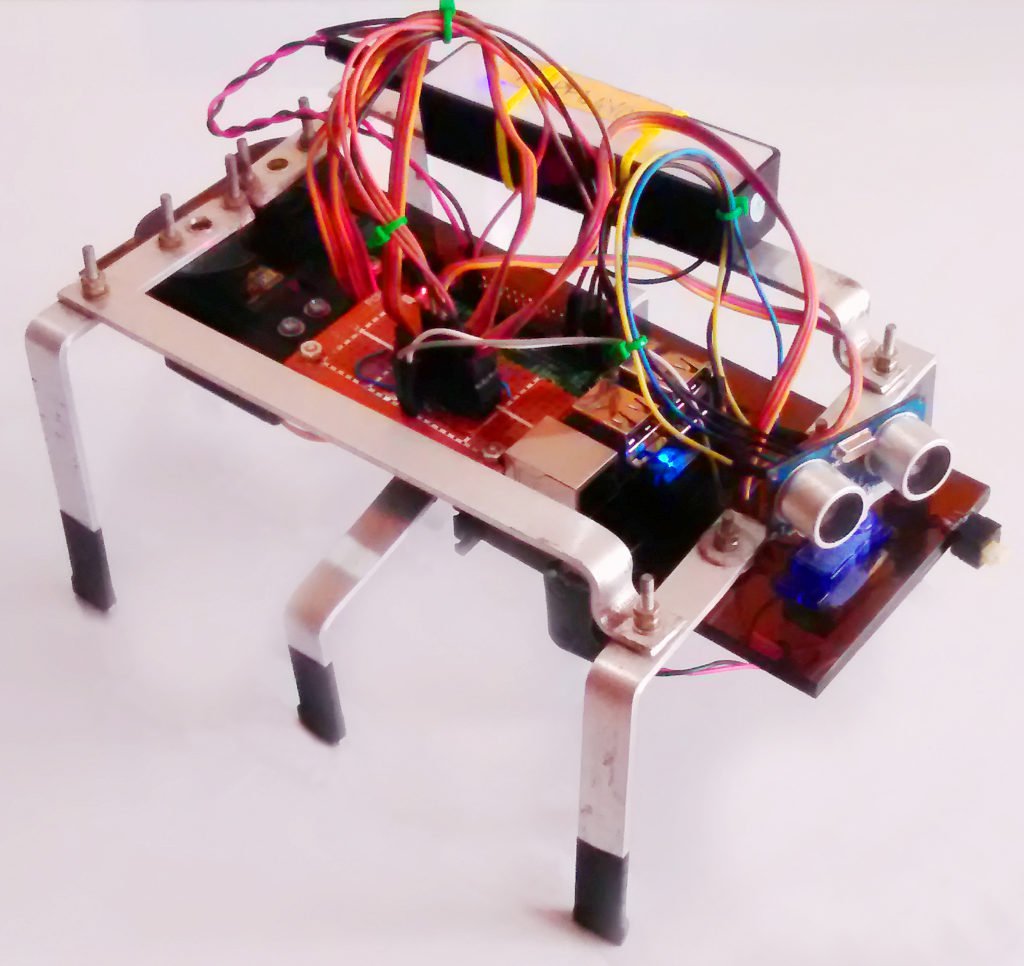
I added holes on the acrylic board then I attached the RPi with screws and nuts. The head part consists of the ultrasonic sensor and the micro servo attached to the board. I used hot glue to attach the sensor the micro servo:
A better view of the leg movements:
Wiring Connections
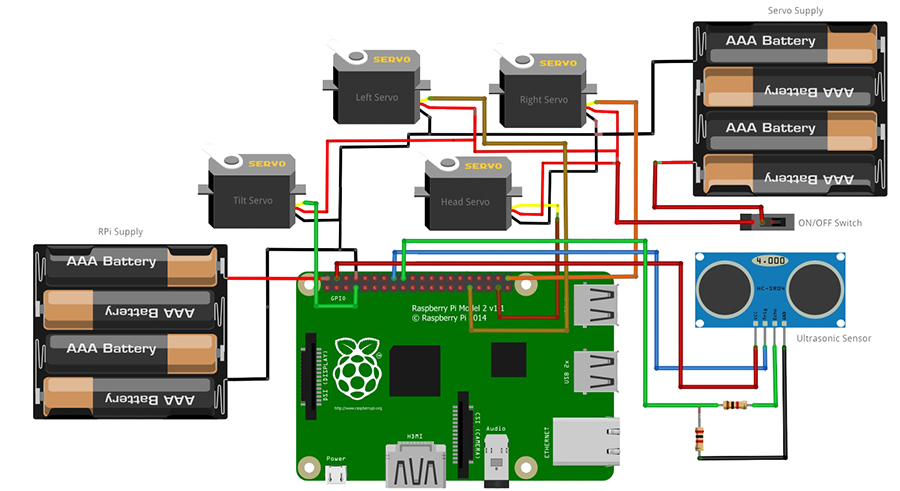
Here's how I connected the components:
tilt servo - > GPIO4
right leg -> GPIO21
left leg -> GPIO6
head -> GPIO26
HC-SR04 trigger - > GPIO23
HC-SR04 echo - > GPIO24
There's a need to add a voltage divider for the echo connection to the Raspberry Pi because the Pi's GPIO's can't accept voltages greater than 3.3V. I also added another board with male and female headers to make the wiring look cleaner (see below).
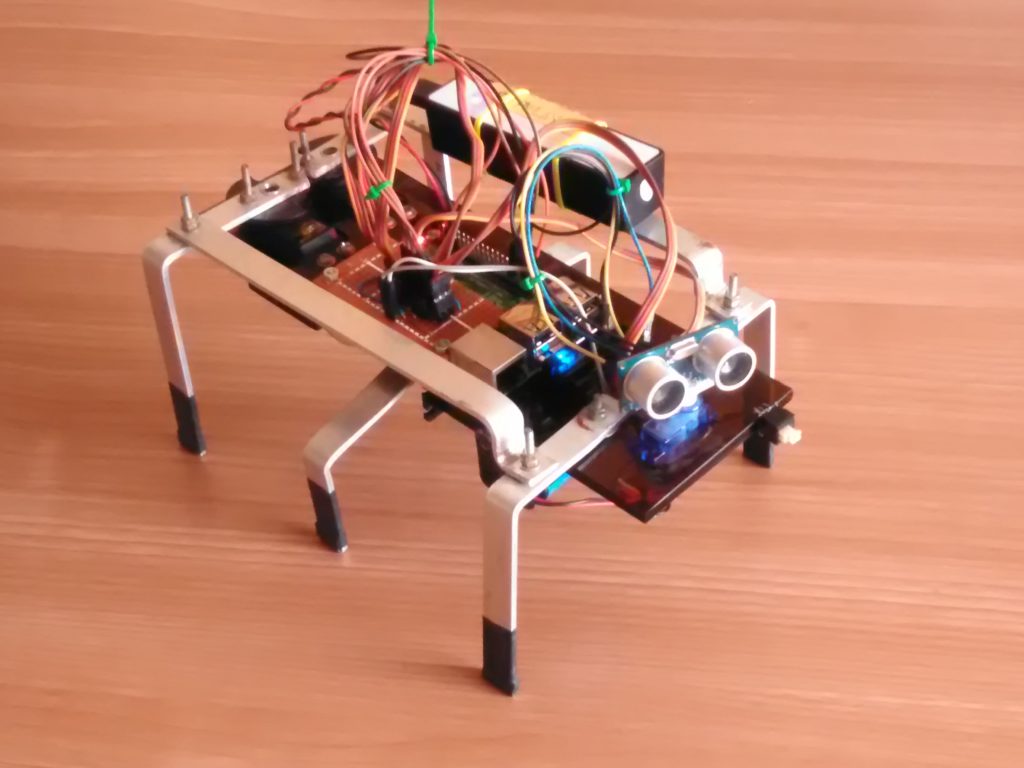
Here's the fully assembled hexapod walker:
Software
Pigpio for Servo Control
I used Python, which is pre-installed on the RPi, to code the walker. You'll be needing an external library called
pigpio to control the servo motors. Use SSH to access your RPi and issue these commands to install the pigpio library:
wget abyz.co.uk/rpi/pigpio/pigpio.zip
unzip pigpio.zip
cd PIGPIO
make
sudo make install
Pigpio uses a daemon called pigpiod which means the servo control becomes a background process. Before you can use the pigpio python library, you must run this daemon by simply issuing the command:
pigpiod
Not doing so will result in errors in the python code I presented below.
To make pigpiod run everytime the Raspberry Pi boots, edit the root contrab:
sudo crontab -e
then add the following line at the end:
@reboot /usr/local/bin/pigpiod
Apache for Raspberry Pi Server
Next, you need to install
apache for the Raspberry Pi for the WiFi control feature:
sudo apt-get install apache2 -y
This will create a folder
/var/www/html/ which will contain all pages on the apache server we just set up. If the setup is successful, you can now access your RPi's IP address via a web browser.
There are two ways to implement control over WiFi. One, the simpler way, is to use a wireless router and just use a device that connects on the same network as the RPi. The second way is to make the RPi the access point, just like how I did with my RPi rover robot. The first method has noticeable latency especially if the walker goes far away from the router. The second method won't require you to have a wireless router but will draw considerable power from your RPi power source. I used the first method in this project.
Python Program
Here's the python code for the hexapod walker:
#!/usr/bin/python

import RPi.GPIO as GPIO
import pigpio
import time
import sys
import os
import signal
GPIO.setmode(GPIO.BCM)
GPIO.setwarnings(False)

tilt = 4
br = 21
bl = 6
trig = 23
echo = 24
head = 26

GPIO.setup(trig, GPIO.OUT)
GPIO.setup(echo, GPIO.IN)

pi = pigpio.pi()


def backward():
pi.set_servo_pulsewidth(tilt, 800)
time.sleep(0.15)
pi.set_servo_pulsewidth(bl, 800)
time.sleep(0.15)
pi.set_servo_pulsewidth(tilt, 2000)
time.sleep(0.15)
pi.set_servo_pulsewidth(br, 1800)
time.sleep(0.15)
pi.set_servo_pulsewidth(tilt, 1500)
time.sleep(0.15)
pi.set_servo_pulsewidth(bl, 1500)
time.sleep(0.15)
pi.set_servo_pulsewidth(br, 1500)
time.sleep(0.15)
return;

def forward():
pi.set_servo_pulsewidth(tilt, 800)
time.sleep(0.15)
pi.set_servo_pulsewidth(bl, 1800)
time.sleep(0.15)
pi.set_servo_pulsewidth(tilt, 2000)
time.sleep(0.15)
pi.set_servo_pulsewidth(br, 800)
time.sleep(0.15)
pi.set_servo_pulsewidth(tilt, 1500)
time.sleep(0.15)
pi.set_servo_pulsewidth(bl, 1500)
time.sleep(0.15)
pi.set_servo_pulsewidth(br, 1500)
time.sleep(0.15)
return;

def left():
pi.set_servo_pulsewidth(tilt, 800)
time.sleep(0.15)
pi.set_servo_pulsewidth(bl, 1800)
time.sleep(0.15)
pi.set_servo_pulsewidth(tilt, 2000)
time.sleep(0.15)
pi.set_servo_pulsewidth(br, 1800)
time.sleep(0.15)
pi.set_servo_pulsewidth(tilt, 1500)
time.sleep(0.15)
pi.set_servo_pulsewidth(bl, 1500)
time.sleep(0.15)
pi.set_servo_pulsewidth(br, 1500)
time.sleep(0.15)
return;

def right():
pi.set_servo_pulsewidth(tilt, 800)
time.sleep(0.15)
pi.set_servo_pulsewidth(bl, 800)
time.sleep(0.15)
pi.set_servo_pulsewidth(tilt, 2000)
time.sleep(0.15)
pi.set_servo_pulsewidth(br, 800)
time.sleep(0.15)
pi.set_servo_pulsewidth(tilt, 1500)
time.sleep(0.15)
pi.set_servo_pulsewidth(bl, 1500)
time.sleep(0.15)
pi.set_servo_pulsewidth(br, 1500)
time.sleep(0.15)
return;

def stop():
pi.set_servo_pulsewidth(tilt, 0)
time.sleep(0.15)
pi.set_servo_pulsewidth(bl, 0)
time.sleep(0.15)
pi.set_servo_pulsewidth(br, 0)
time.sleep(0.15)

return

def obstacleDetected():
backward()
backward()
backward()
backward()
backward()
right()
right()
right()

return

def turnHead():
pi.set_servo_pulsewidth(head, 700)
time.sleep(0.5)
pi.set_servo_pulsewidth(head, 2100)
time.sleep(0.5)
pi.set_servo_pulsewidth(head, 1500)
time.sleep(0.5)

return

def autoMode():
print ("Running in auto mode!")

turnHead()

time.sleep(0.5)
GPIO.output(trig, 0)
time.sleep(0.5)

GPIO.output(trig,1)
time.sleep(0.00001)
GPIO.output(trig,0)

while GPIO.input(echo) == 0:
pulse_start = time.time()

while GPIO.input(echo) == 1:
pulse_end = time.time()

pulse_duration = pulse_end - pulse_start

distance = pulse_duration * 17150

distance = round(distance, 2)

if distance > 1 and distance < 35:
obstacleDetected()
else:
forward()
forward()
forward()

pi.set_servo_pulsewidth(head, 2100)
time.sleep(0.5)
return

def manualMode():

move = str(sys.argv[2])

if move == "F" or move == "f":
print("Moving forward!")
forward()
elif move == "B" or move == "b":
print("Moving backward!")
backward()
elif move == "L" or move == "l":
print("Moving left!")
left()
elif move == "R" or move == "r":
print("Moving right!")
right()
else:
print("Invalid argument!")

return

def main():
opt = str(sys.argv[1])

if opt == "A" or opt == "a":
autoMode()
elif opt == "M" or opt == "m":
manualMode()

return

while True:
main()

GPIO.cleanup()
pi.stop()
The servo control is done via pigpio's set_servo_pulsewidth function. This command accepts pulse widths from 500 to 2500 in microseconds. You can read more about this command here.
Apparently, the pigpiod daemon keeps the servomotors running so I needed to issue a killall python (found on the php file) to stop the motors. The rest of the code is pretty straightforward; I created separate functions for each movement (forward, backward, etc.).
The main function reads an argument and decide which action to perform. You can run this code in terminal to test the movements of the hexapod walker. For example, to move it forward, issue the command
python hexapod.py m f
Of course, I didn't design this robot for terminal control, I designed it for smartphones. For that, we'll need two web pages: index.html and hexapod.php. The index.html will contain all the buttons necessary to control the robot and the http request while the hexapod.php file serves the http request and connects with the python code above.
Here's the screenshot of the web UI:
Hexapod Walker Web UI courtesy of P. Candole
The index.html and hexapod.php as well the python code above can be found on my repository.
How to Operate the Hexapod Walking Robot
In case you want to build one using my design, here's what you need to do:
- Know your hexapod walker's IP address. It's the same IP address you use to SSH to the robot.
- Using a smartphone (or a computer) web browser, access the IP address of the robot. For example, I placed my index.html and hexapod.php in 192.168.1.90/hexapod so that's where the UI can be found.
- The robot doesn't move unless you select "Auto" or "Manual". Selecting "Auto" disables the arrow buttons. The hexapod walker then starts walking by itself and will be moving its head left and right. Selecting "Manual" will enable the arrow buttons. You then use the buttons to control the robot.
Video
Here's my hexapod walker in action!
Do you want to build your own hexapod walker? If you have some questions, kindly post a comment below!
Reference for the three-servo walker: "PIC Robotics: A Beginner's Guide to Robotics Projects Using the PICmicro" by John Iovine
