Maker Pro
Raspberry Pi

Controlling a DC Motor with Raspberry Pi4

June 04, 2020 by Mr. Sarful hassan
Share
banner

In this tutorial, I will show you how to connect some motors to your Raspberry Pi4.

Introduction

In this tutorial, I will show you how to connect some motors to your Raspberry Pi4. DC Motor with Raspberry Pi lies with the Motor Driver.

What is motor Driver: A Motor Driver is a special circuit or IC that provides the necessary power (or rather the current) to the motor for smooth and safe operation.

we should never connect a motor directly to Raspberry Pi

Components Required

  1. Raspberry Pi 4 Model B
  2. L298N Motor Driver Module
  3. Lipo Battery 3300mAh
  4. Connecting wires (Jumper Wires)
  5. 5V – 2A Power Supply for Raspberry Pi
  6. 5V DC Motor

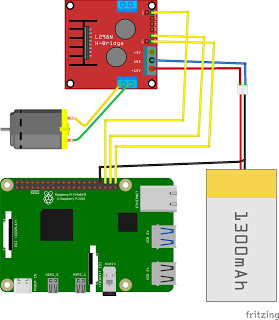
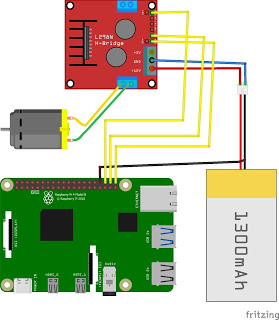
Circuit Diagram

dht11_bb.jpg
import RPi.GPIO as GPIO
from time import sleep

# Pins for Motor Driver Inputs 
Motor1A = 21
Motor1B = 20
Motor1E = 16
 
def setup():
    GPIO.setwarnings(False)
    GPIO.setmode(GPIO.BCM)              # GPIO Numbering
    GPIO.setup(Motor1A,GPIO.OUT)  # All pins as Outputs
    GPIO.setup(Motor1B,GPIO.OUT)
    GPIO.setup(Motor1E,GPIO.OUT)
 
def loop():
    # Going forwards
    GPIO.output(Motor1A,GPIO.HIGH)
    GPIO.output(Motor1B,GPIO.LOW)
    GPIO.output(Motor1E,GPIO.HIGH)
    print("Going forwards")
 
    sleep(5)
    # Going backwards
    GPIO.output(Motor1A,GPIO.LOW)
    GPIO.output(Motor1B,GPIO.HIGH)
    GPIO.output(Motor1E,GPIO.HIGH)
    print("Going backwards")
 
    sleep(5)
    # Stop
    GPIO.output(Motor1E,GPIO.LOW)
    GPIO.output(Motor1B,GPIO.LOW)
    print("Stop")

def destroy():  
    GPIO.cleanup()

if __name__ == '__main__':     # Program start from here
    setup()
    try:
            loop()
    except KeyboardInterrupt:
        destroy()
Author

Avatar
Mr. Sarful hassan

Love #python #raspberrypi #ardunio #Electronics  

Related Content

Categories

Comments


You May Also Like