Learn Advanced application of Raspberry Pi – Controlling an LED Based on Web
The reason why Raspberry Pi is so amazing is the networking function and support by numerous open source web applications. With it, your own Internet of Things system can be constructed conveniently. In this lesson, we will learn how to control an LED based on the web with Raspberry Pi. You can use your mobile phone, tablet pc or computer to control the LED too, as long as it is in the same Local Area Network (LAN) with your Raspberry Pi.
Components
- 1* Raspberry Pi
- 1* Breadboard
- 1* LED
- 1* Resistor (220Ω)
- Jumper wires
Principle
WebIOPi is a fully integrated Internet of Things framework for the Raspberry Pi. It is a lightweight web server program on the Raspberry Pi platform which provides users a solution for remote access to Raspberry Pi. That is, you can remotely operate your Raspberry Pi and control the hardware connected to it by a browser or an APP.
WebIOPi is a fully integrated Internet of Things framework for the Raspberry Pi. It is a lightweight web server program on the Raspberry Pi platform which provides users a solution for remote access to Raspberry Pi. That is, you can remotely operate your Raspberry Pi and control the hardware connected to it by a browser or an APP.
Control method:
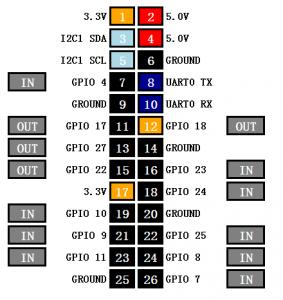
1) Click outside IN/OUT to switch between the input and output modes of GPIOs
2) In the output mode, click the inside figures to switch between high and low outputs. After connecting the LED to GPIO17, click block 11, and you will see the state of the LED changed
3) In the input mode, the inside figures represent the input states of GPIO
Summary
In this lesson, you have learnt how to build the Internet of Things for WebIOPi platform based on Raspberry Pi and how to control your device remotely on the platform. You can learn WebIOPi in depth and make full use of your knowledge to make more fun things.