Get to know CUDA, or Compute Unified Device Architecture, Nvidia's platform for programming GPUs!
The Jetson Nano developer kit is Nvidia’s latest system on module (SoM) platform created especially for AI applications. It houses a 64-bit quad-core ARM Cortex-A57 CPU with 128 Nvidia Maxwell GPU cores. A 4GB DDR4 RAM provides satisfactory speed for real and intensive machine learning applications.
In recent times, the application of GPUs to general-purpose programming has opened a plethora of opportunities in accelerated computing that shatters the limitations of traditional CPU-based programming.
This article discusses the basics of parallel computing, the CUDA architecture on Nvidia GPUs, and provides a sample CUDA program with basic syntax to help you get started.
Evolution of CUDA for GPU Programming
GPUs were historically used for enhanced gaming graphics, 3D displays, and design software. GPU-accelerated computing refers to the paradigm of enhanced programming using the GPU and CPU processing powers together for computationally expensive mathematical operations like matrix operations, ray casting, and 3D rendering.
Compute unified device architecture (CUDA) is an Nvidia-developed platform for parallel computing on CUDA-enabled GPUs. It opens the paradigm of general-purpose computing on graphical processing units (GPGPU). The CUDA platform provides an interface between common programming languages like C/C++ and Fortran with additional wrappers for Python.
CUDA Programming Architecture
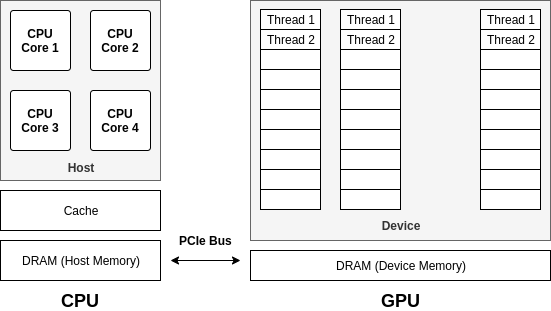
CPU architecture is meant for sequential execution of complex control instructions or data management. GPU architecture is meant for parallel execution of simple control logic. GPUs are not standalone systems and a CPU (host) together with a GPU (device) forms a heterogeneous computation platform. The independent GPU and CPU memory communicate via a PCI-express bus.
A CUDA-compliant code has two components: computationally light CPU (host) code and computationally expensive GPU (device) code that performs parallel execution. A CUDA program has separately defined CPU and GPU code. The GPU code consists only of the functions that are going to be parallelly executed on it. OpenGL is the open-source version of CUDA and runs on CPUs and GPUs from almost all vendors.
Parallel programming architecture
During the execution of the CUDA code, memory exchange happens between the host and the device. The device executes the code and then returns the result to the host. While a normal C/C++ code has a .c or .cpp suffix, a CUDA code has a .cu extension and uses the nvcc compiler.
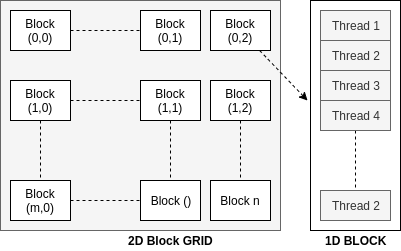
A grid is a collection of all threads of the parallel cores running at the moment spawned by a single compute kernel. Each grid has several blocks, each containing several individual threads. The grid can have multi-dimensional (1D, 2D and 3D) blocks and each block can have a multi-dimensional (1D, 2D, and 3D) thread arrangement. A CUDA thread is very analogous to pthread in terms of abstraction for control of logical threads.
Steps in Parallel Code Execution
The process of execution of parallel code involves coordination between the CPU and GPU, memory exchange, process synchronization, and kernel invocation management.
CUDA Programming Interface
A CUDA kernel function is the C/C++ function invoked by the host (CPU) but runs on the device (GPU). The keyword __global__ is the function type qualifier that declares a function to be a CUDA kernel function meant to run on the GPU. The call functionName<<<num_blocks, threads_per_block>>>(arg1, arg2) invokes a kernel function.
The most important keywords to identify the location of a thread executing a kernel function are threadIdx<x,y,z>, blockIdx<x,y,z>, blockDim<x,y,z> and threadDim<x,y,z> representing the three-dimensional thread ID, block ID, block dimensions, and thread dimensions respectively.
For a three-dimensional block of size (dimx, dim_y, dim_z) and the threadID (id_x, id_y, id_z) the thread has thread_index = id_x + id_y * dim_x + id_z * dim_x * dim_y.
Each kernel function computes its own thread index on which it is supposed to execute. The arguments passed within the <<<>>>, num_blocks and threads_per_block suggests the user’s intent towards how many parallel threads they want to execute.
#include <iostream>
#include <cuda_runtime.h>
#include <math.h>
#include <stdlib.h>

// Kernel function to add the elements of two arrays
__global__ void addNums(int *output, int *x, int *y, int num_iters) {
  for (int i = 0; i < num_iters; i++) {
    output[i] = x[i] + y[i];
  }
}

int main() {
  // Declare the variables
  int num_iters = 12000000;
  int *x;
  int *y;
  int *output;

  // Seeding the random number generator
  srand(10);

  std::cout << "Hello World, this is CUDA sample code" << std::endl;

  // Declare the memory size for the variables from the unified memory location accessible from CPU or GPU
  cudaMallocManaged(&x, num_iters*sizeof(int));
  cudaMallocManaged(&y, num_iters*sizeof(int));
  cudaMallocManaged(&output, num_iters*sizeof(int));

  // Initialization with random numbers
  for (unsigned int i = 0; i < num_iters; i++) {
    output[i] = 0;
    x[i] = rand();
    y[i] = rand();
  }

  // Run the kernel function on each 64 threads on 32 blocks of the GPU
  addNums<<<32, 64>>>(output, x, y, num_iters);

  // Synchronization between the CPU and GPU (CPU waiting for GPU to finish before accessing the memory)
  cudaDeviceSynchronize();

  // Releasing the memory
  cudaFree(x);
  cudaFree(y);

  std::cout << "Code Execution Completed" << std::endl;

  return 0;
}
For the sample code above, an explanation for each snippet is already provided in the comments. To execute this code on a Jetson Nano, follow the following steps.
1. Confirm that the Nvidia CUDA Compiler (nvcc) is installed and the correct path is sourced. The JetPack comes preinstalled with the compiler. Add the appropriate paths to the compiler in the bash file to run the compiler via the command line. The output should mention the current version of the compiler.
// Open the ~/.bashrc file
~$ sudo gedit ~/.bashrc
// Append these two lines to the file
export PATH=${PATH}:/usr/local/cuda/bin
export LD_LIBRARY_PATH=${LD_LIBRARY_PATH}:/usr/local/cuda/lib64
// Source the file
~$ source ~/.bashrc
// Confirm the compiler version
~$ nvcc --version
2. Save the code provided in file called sample_cuda.cu. The file extension is .cu to indicate it is a CUDA code.
3. Compile the code: ~$ nvcc sample_cuda.cu -o sample_cuda
4. Execute the code: ~$ ./sample_cuda
The cudaMallocManaged(), cudaDeviceSynchronize() and cudaFree() are keywords used to allocate memory managed by the Unified Memory System. They make the host wait for the device to finish execution and clear the memory on the device.
This simple example runs an additional program that runs in parallel and execution time is at least 100 times faster than the same on a CPU. This is a very rudimentary example and a complex AI project executes vector operations several times more complex than this which justifies the use of GPUs.
GPUs have intricate memory design, low-latency communication, and efficient task execution which makes them critical for the heavy computations needed in self-driving vehicles, robotics, and high-definition graphics applications.
Next Steps With CUDA
The real essence of edge computing platforms lies in testing AI algorithms on them. The next step is to run an object detection algorithm on the Jetson Nano development board and analyze the performance differences when inference is run with and without CUDA technology.