Use Servo Core, a library for controlling servo motors based on the Arduino Servo Library, all in C#.
In this project you'll learn how to make a fun mini soccer game using servos that are activated by standard push buttons. To control the servos we'll use ServoCore, a framework that simplifies servo programming that is part of Netduino.Foundation.
Servos are integrated packages that usually include a DC electric motor, torque-increasing gearing, and electronics to control the motor. They gained popularity as parts of remote controlled cars, airplanes, etc., but are now also very commonly used in robotics.
Servos can draw a lot of current, especially under load. Additionally, most common hobby servos require 6V. For this reason, an external power supply should be used when they’re used in practical applications.
Push buttons (or momentary tactile buttons) are physical buttons that are used to complete a circuit when pressed and break the circuit when released. Push buttons come is a wide range of sizes and configurations, we'll use a common type with four (4) leads that are designed to fit standard prototype boards. When the button is pressed, all four leads are connected. You can read more about push buttons here.
Netduino.Foundation is a platform for quickly building connected things using the .NET MicroFramework on Netduino. Created by Wilderness Labs, it's open source and maintained by the Netduino community.
If you're new to Netduino development, I suggest you go to the Getting started with Netduino project to set up your development environment.
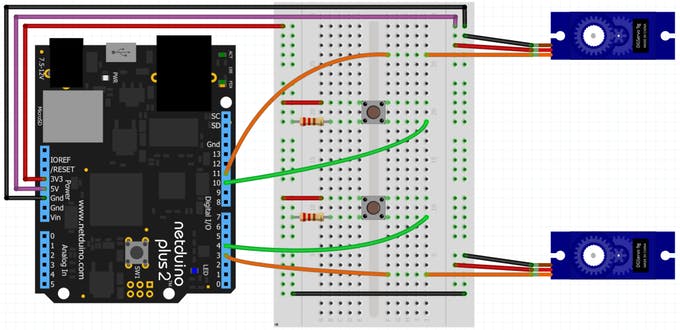
Step 1 - Assemble the circuit
The circuit for our soccer game looks like this:
Connecting a Servo with a Netduino for testing purposes
Power Rails
We'll connect both a 3.3V and 5V power rails. We use the 3.3V power rail with the push buttons signal to the Netduino when we want to move the servo or soccer player. We could use 5V as our input, as the Netduino inputs are 5V tolerant, however, it is best practice to trigger inputs with 3.3V.
We'll use the 5V rail to power the servos. As mentioned above, for production applications it is best practice to use an external power supply.
Pull down resistor
The push buttons used on this project have two (2) pairs of redundant pins. Notice that the digital pin of the Netduino is connected to GND via a resistor. When the button is at rest (not pressed), the input pins are set to ground. When pressing the button, all four (4) pins are connected, which connects the 3.3V power rail to our input pins on the Netduino. The resistor is used so we don't have a direct, low resistance path between power and ground when the button is pressed.
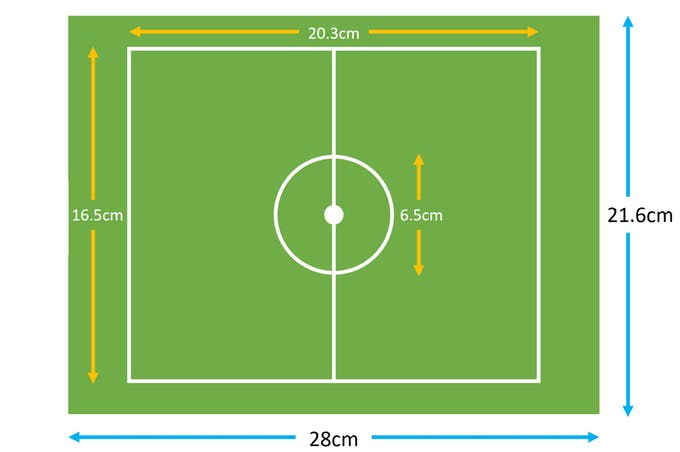
Step 2 - Assemble the soccer field
For the soccer field, you will need a letter size sheet cardboard. The soccer lines are just decorations, so feel free to draw them anyway you want.
For the walls of the board, you will need two (2) of thinner cardboard strips, with the following dimensions.
Cut two cardboard strips for the walls of the soccer field
Glue the lower half to the edges of the soccer field.
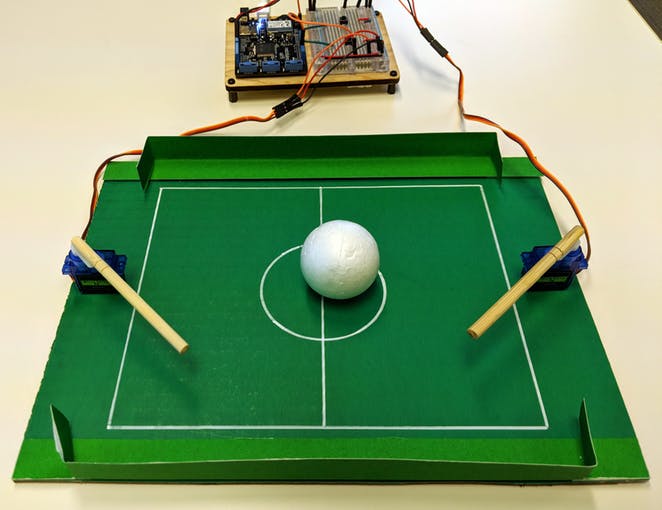
Use double sided tape to attach the servos on the surface of the field with a stick connected to the servo's rotating arm; we use popsicle sticks or half of chop sticks.
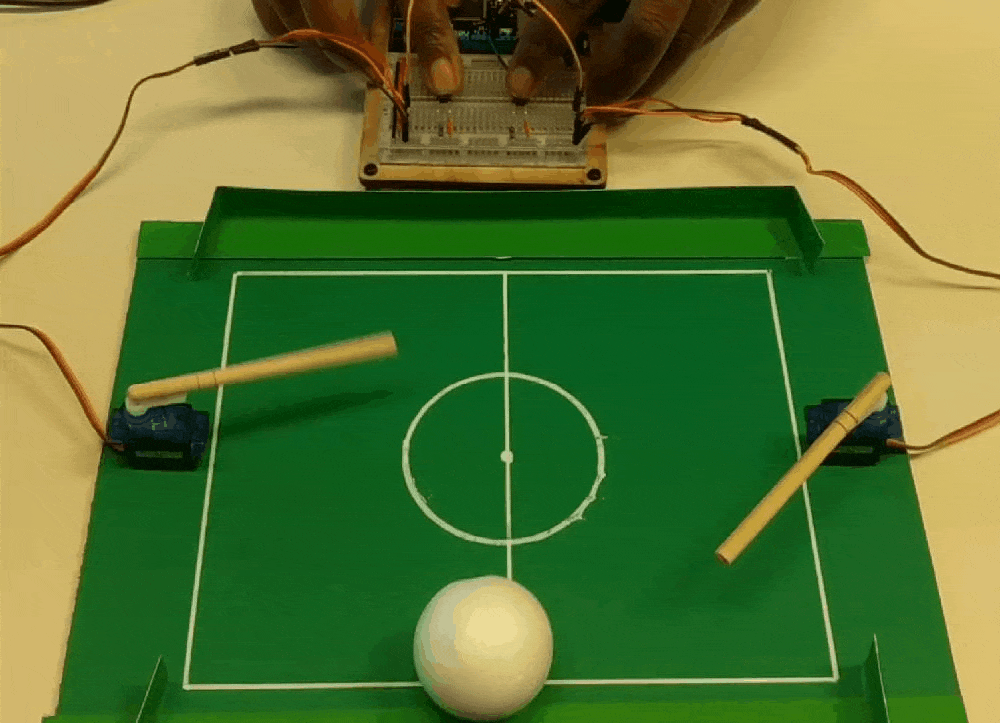
Your soccer field should look like this:
Soccer field fully assembled
Step 3 - Create a Netduino project
Create a Netduino project in Visual Studio 2015 for Windows or in Visual Studio for Mac; name the project SoccerField.
Step 4 - Add Netduino Foundation libraries
Windows
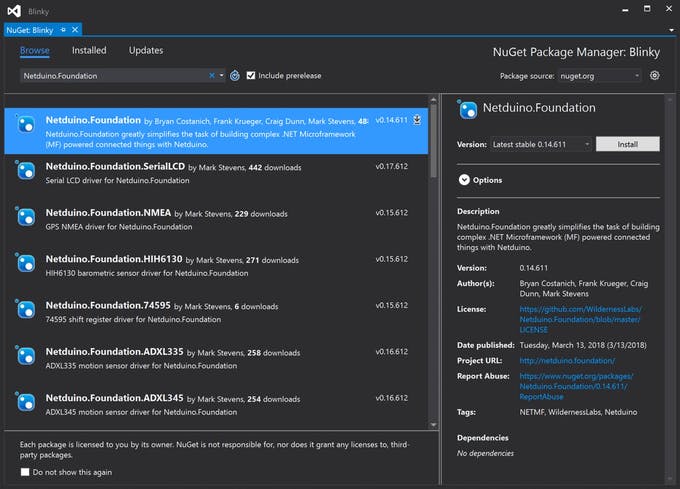
Right-click on your SoccerSample project and click Manage NuGet Packages. In the Browse tab, search for Netduino.Foundation; it should be the first search result. Click the Install button.
Adding Netduino.Foundation NuGet Package
Now search for Netduino.Foundation.Servo and add it to your project.
macOS
Alt-click on your SoccerField project in the Solution Explorer, and click Add => Add NuGet Package to open the NuGet Package window. Search for the Netduino.Foundation package and click Add Package to add it to your project.
Adding Netduino.Foundation NuGet Package
Now search for Netduino.Foundation.Servo and add it to your project.
Step 5 - Add code to control soccer field
Add PlayerController
It is a good practice to create a Controller class for every peripheral involved to make the project structure more scalable and maintainable. Controller classes will encapsulate the peripheral-specific logic needed to control the hardware.
Add a PlayerController class for you servos with the following code:
using System.Threading;
using Netduino.Foundation.Servos;
namespace Soccer
{
   public class PlayerController
   {
       protected bool _kickRight;
       protected Servo _servo;
       public PlayerController(Servo servo)
       {
           _servo = servo;
           _servo.RotateTo(0);
       }
       public void Kick()
       {
           Thread _animationThread = new Thread(() =>
           {
               _kickRight = !_kickRight;
               if (_kickRight)
               {
                   _servo.RotateTo(180);
               }
               else
               {
                   _servo.RotateTo(0);
               }
           });
           _animationThread.Start();
       }
   }
}
This controller manages the behavior of a single servo, and its only public method Kick makes the servo rotate from 0 to 180 degrees and back. Notice that the servo rotation logic inside Kick is enclosed in a Thread _animationThread. This makes the servo control asynchronous in case the button is pressed while the servo is moving.
Add App Class
For this project, we implement a common App software pattern that manages all the peripherals and main logic.
Add a new App class to your project, and paste the following code:
using System;
using Netduino.Foundation.Servos;
using N = SecretLabs.NETMF.Hardware.Netduino;
using Microsoft.SPOT.Hardware;
namespace Soccer
{
   public class App
   {
       protected InterruptPort _buttonTeamA;
       protected PlayerController _playerTeamA;
       protected InterruptPort _buttonTeamB;
       protected PlayerController _playerTeamB;
       public App()
       {
           InitializePeripherals();
       }
       protected void InitializePeripherals()
       {
           _buttonTeamA = new InterruptPort(N.Pins.GPIO_PIN_D4,
                true, Port.ResistorMode.PullDown,
                Port.InterruptMode.InterruptEdgeHigh);
           _buttonTeamA.OnInterrupt += OnButtonTeamA;
           var servoA = new Servo(N.PWMChannels.PWM_PIN_D3,
                NamedServoConfigs.Ideal180Servo);
           _playerTeamA = new PlayerController(servoA);
           _buttonTeamB = new InterruptPort(N.Pins.GPIO_PIN_D10,
                true, Port.ResistorMode.PullDown,
                Port.InterruptMode.InterruptEdgeHigh);
           _buttonTeamB.OnInterrupt += OnButtonTeamB;
           var servoB = new Servo(N.PWMChannels.PWM_PIN_D11,
                NamedServoConfigs.Ideal180Servo);
           _playerTeamB = new PlayerController(servoB);
       }
       private void OnButtonTeamA(uint data1, uint data2, DateTime time)
       {
           _playerTeamA.Kick();
       }
       private void OnButtonTeamB(uint data1, uint data2, DateTime time)
       {
           _playerTeamB.Kick();
       }
       public void Run()
       {
       }
   }
}
Notice that our App class is declaring four class properties: two InterruptPorts and two PlayerController class objects.
In the constructor, we invoke the InitializePeripherals method in which instantiates all four class objects. _playerTeamA and _playerTeamB are used to control the servos, and the InterruptPorts are used for the push buttons. _buttonTeamA and _buttonTeamB register the OnInterrupt event, and it calls the Kick method of the corresponding PlayerController team.
Implement Main method in the Program class
Finally, create a new App class object and invoke the Run method. Your code should look like this:
Step 6 - Run the project
Click the run button in Visual Studio to see your soccer game in action! Toss a ball in the middle of the field and press the push buttons to make the servos kick on both sides!
Check out Netduino.Foundation!
This project is only the tip of the iceberg in terms of the extensive exciting things you can do with Netduino.Foundation.
- It comes with a huge peripheral driver library with drivers for the most common sensors and peripherals.
- The peripheral drivers encapsulate the core logic and expose a simple, clean, modern API.
- This project is backed by a growing community that is constantly working on building cool connected things and are always excited to help new-comers and discuss new projects.
References