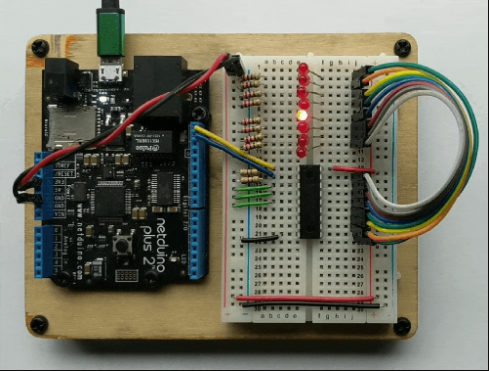
Sometimes you run out IO ports on your main prototype board. Netduino works seamlessly with different IO expanders, like an MCP23008.
This project shows you how to use a MCP23008 I/O port expander to extend peripheral support seamlessly and control eight (8) leds using only two (2) control wires. You'll code as if the LEDs are connected directly to the Netduino using Netduino.Foundation's Unified GPIO Architecture.
The MCP23008 chip is an 8-bit (8 port) digital I/O expander chip that communicates over I2C. It provides eight (8) IP ports and can be used to add additional digital input and output ports to a Netduino. It can also be combined with up to seven (7) additional MCP23008 chips, providing up to sixty four additional ports.
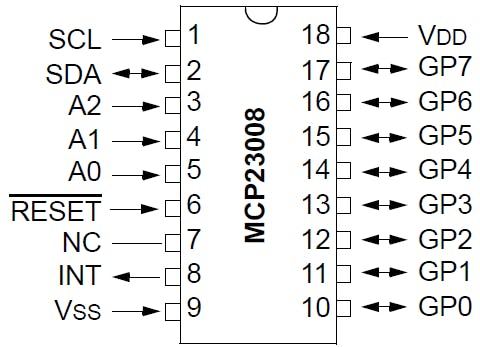
To connect the MCP23008 chip, consider the Pin Datasheet below.
Pin Mapping of the MCP23008
MCP23008 is a common integrated circuit in the hardware world and is the typical interface chip for hardware such as I2C LCD backpacks.. You can read more here.
Netduino.Foundation is a platform for quickly and easily build connected things using the.NET MicroFramework on Netduino. Created by Wilderness Labs, it's completely open source and maintained by the Netduino community.
If you're new in Netduino development, I suggest you go to the Getting started with Netduino project to properly set up your development environment.
Step 1 - Assemble the circuit
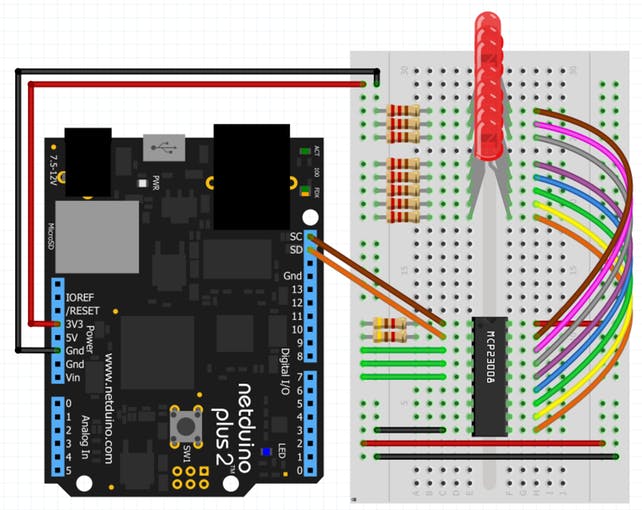
For this project, wire up your breadboard and Netduino as shown in the Fritzing diagram:
Circuit Diagram of a MCP23008
Note - all three address pins (three green jumper wires on the left of the chip) are pulled high. This specifies the I2C address for the MCP23008 - in this case the address is 39.
Step 2 - Create a Netduino project
Create a Netduino project in Visual Studio 2015 for Windows or the latest Visual Studio for Mac; name the project Blinky_MCP23008.
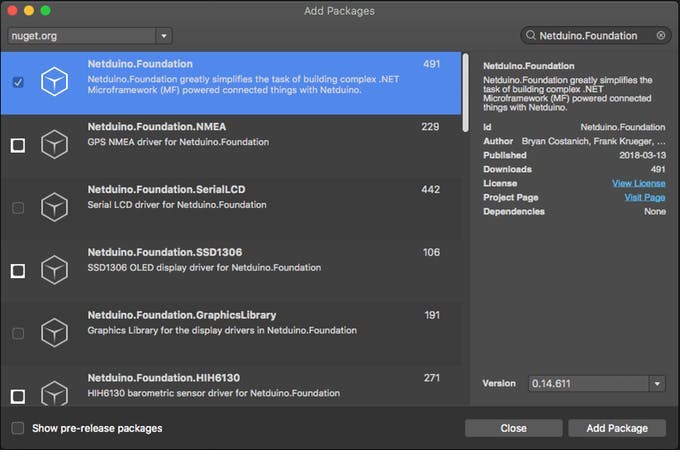
Step 3 - Add the Netduino.Foundation NuGet Package
Windows
Right-click on your Blinky_MCP23008 project and click Manage NuGet Packages. In the Browse tab, search for Netduino.Foundation; it should be the first search result. Click the Install button.
Adding Netduino.Foundation NuGet package
Now search for Netduino.Foundation.MCP23008 and add it to your project.
macOS
Alt-click on your Blinky_MCP23008 project in the Solution Explorer, and click Add => Add NuGet Package to open the NuGet Package window. Search for the Netduino.Foundation package and click Add Package to add it to your project.
Adding Netduino.Foundation NuGet package
Now search for Netduino.Foundation.MCP23008 and add it to your project.
Step 4 - Write the code for the MCP23008 Project
Add App Class
For this project, we implement a common App software pattern that manages all the peripherals and main logic.
Add a new App class to your project, and paste the following code:
using Microsoft.SPOT;
using Netduino.Foundation.ICs.IOExpanders.MCP23008;
using System.Threading;
namespace Blinky_MCP23008
{
   public class App
   {
       static MCP23008 _mcp = null;
       public App()
       {
           InitializePeripherals();
       }
       protected void InitializePeripherals()
       {
           _mcp = new MCP23008(39);
       }
       public void Run()
       {
           // create an array of ports
           DigitalOutputPort[] ports = new DigitalOutputPort[8];
           for (byte i = 0; i <= 7; i++)
           {
               ports[i] = _mcp.CreateOutputPort(i, false);
           }
           while (true)
           {
               // count from 0 to 7 (8 leds)
               for (int i = 0; i <= 7; i++)
               {
                   // turn on the LED that matches the count
                   for (byte j = 0; j <= 7; j++)
                   {
                       ports[j].State = (i == j);
                   }
                   Debug.Print("i: " + i.ToString());
                   Thread.Sleep(250);
               }
           }
       }
   }
}
Program Class
Finally, create a new App class object and invoke the Run method. Your code should look like this:
using System.Threading;
namespace Blinky_MCP23008
{
   public class Program
   {
       public static void Main()
       {
           App app = new App();
           app.Run();
           Thread.Sleep(Timeout.Infinite);
       }
   }
}
Step 5 - Run the project
Click the run button in Visual Studio to see your LEDs light up! They'll turn on and off in sequence, being controlled by the GP ports on the MCP23008. It should look like to the following gif:
MCP23008 Sample project running
Check out Netduino.Foundation!
This project is only the tip of the iceberg in terms of the extensive exciting things you can do with Netduino.Foundation.
- It comes with a Huge Peripheral Driver Library with drivers for the most common sensors and peripherals available in the market.
- All the peripheral drivers are simplified with built-in functionality, exposed by a clean, modern API.
- This project is backed by a growing community that is constantly working on building cool connected things and always excited to help new-comers and discuss new projects.
References