Use the power of Netduino to make a compact size Simon game on a half breadboard with LEDs, push buttons, and a piezo speaker.
In this project, you'll build a game inspired by the popular logic game Simon using a Netduino, LEDs of different colors, push buttons and a piezo speaker, and you'll create the logic using Netduino.Foundation.
Push buttons (or momentary tactile buttons) are physical buttons that are used to complete a circuit when pressed and break the circuit when released. Push buttons come is a wide range of sizes and configurations, we'll use a common type with four (4) leads that are designed to fit standard prototype boards. When the button is pressed, all four leads are connected. You can read more about push buttons here.
Piezo speakers (or piezoelectric speaker) is a loudspeaker that uses the piezoelectric effect for generating sound. The initial mechanical motion is created by applying a voltage to a piezoelectric material, and this motion is typically converted into audible sound using diaphragms and resonators.
Netduino.Foundation is a platform for quickly and easily building connected things using the.NET MicroFramework on Netduino. Created by Wilderness Labs, it's completely open source and maintained by the Netduino community.
If you're new in Netduino development, I suggest you go to the Getting started with Netduino project to properly set up your development environment.
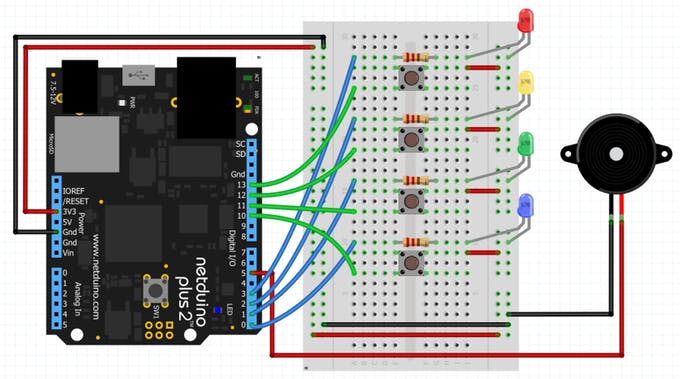
Step 1 - Assemble the Circuit
Circuit assemble of Simon game connected to a Netduino
Step 2 - Create a Netduino Project
Create a Netduino project in Visual Studio 2015 for Windows or the latest Visual Studio for Mac; since our game is a variation of the game Simon, let's call it Simone.
Step 3 - Add the Netduino.Foundation NuGet Package
Windows
Right-click on your Simone project and click Manage NuGet Packages. In the Browse tab, search for Netduino.Foundation; it should be the first search result. Click the Install button.
Add Netduino.Foundation NuGet package to your project
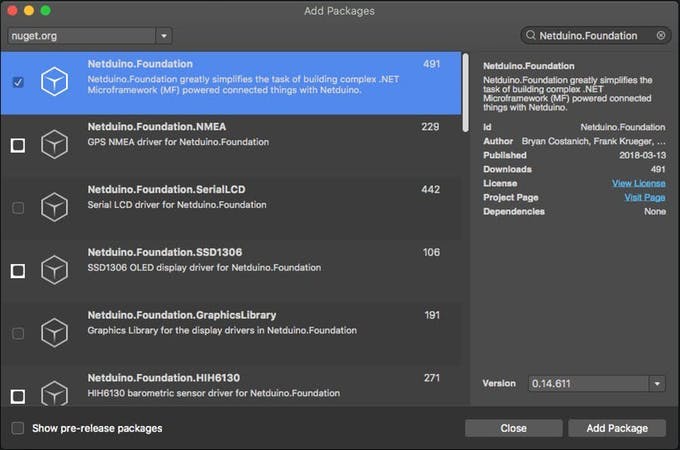
macOS
Alt-click on your Simone project in the Solution Explorer, and click Add => Add NuGet Package to open the NuGet Package window. Search for the Netduino.Foundation package and click Add Package to add it to your project.
Add Netduino.Foundation NuGet package to your project
Step 4 - Write the Code for the Simon Project
Add SimonGame Class
First class we're going to add to the project contains the main logic of the Simon game. Add a new class to your project named SimonGame and add the following code:
using System;
using Microsoft.SPOT;
namespace Simone
{
   public enum GameState
   {
       Start,
       NextLevel,
       Win,
       GameOver,
   }
   public class SimonEventArgs : EventArgs
   {
       public GameState GameState { get; set; }
       public SimonEventArgs (GameState state)
       {
           GameState = state;
       }
   }
   public class SimonGame
   {
       public delegate void GameStateChangedDelegate(object sender, SimonEventArgs e);
       public event GameStateChangedDelegate OnGameStateChanged = delegate { };
       static int MAX_LEVELS = 25;
       static int NUM_BUTTONS = 4;
       int[] Steps = new int[MAX_LEVELS];
       public int Level { get; set; }
       int currentStep;
       Random rand = new Random((int)DateTime.Now.Ticks);
       public void Reset ()
       {
           OnGameStateChanged(this, new SimonEventArgs(GameState.Start));
           Level = 1;
           currentStep = 0;
           NextLevel();
       }
       public int[] GetStepsForLevel ()
       {
           var steps = new int[Level];
           for (int i = 0; i < Level; i++)
               steps[i] = Steps[i];
           return steps;
       }
       public void EnterStep(int step)
       {
           if (Steps[currentStep] == step)
           {
               Debug.Print("Correct step: " + step + " Current step: " + currentStep);
               currentStep++;
           }
           else
           {
               Debug.Print("wrong step: " + step + " should be: " + Steps[currentStep]);
               OnGameStateChanged(this, new SimonEventArgs(GameState.GameOver));
               Reset();
           }
           if(currentStep == Level)
           {
               NextLevel();
           }
       }
       void NextLevel ()
       {
           currentStep = 0;
           Level++;
           if(Level >= MAX_LEVELS)
           {
               OnGameStateChanged(this, new SimonEventArgs(GameState.Win));
               Reset();
               return;
           }
           var level = string.Empty;
           for (int i = 0; i < Level; i++)
           {
               Steps[i] = rand.Next(NUM_BUTTONS);
               level += Steps[i] + ", ";
           }
           Debug.Print(level);
           OnGameStateChanged(this, new SimonEventArgs(GameState.NextLevel));
       }
   }
}
Notice that the SimonGame class implements the following methods:
- Reset - Starts the game from the first level
- int[] GetStepsForLevel - Returns a series of steps of a certain level
- EnterStep - Verifies that the user's button pressed is the correct option
- NextLevel - Used to generate a new sequence of steps for a new level
It also contains GameStates and SimonEventArgs for when triggering an event when the game changes to any state. More on that next.
Add App Class
For this project, we implement a common App software pattern that manages all the peripherals and main logic.
Add a new App class to your project, and paste the following code:
There are several things happening in this class. The most important thing to note here is that Simone works as a state machine, meaning that when starting a game, passing to a next level, winning or losing the game are all game states and when changing states, an event is triggered and OnGameStateChanged event handler will run the appropriate routine depending on the state of the game.
Input - Push Buttons
The only way the user interacts with the Simon game is through four push buttons. In the code, these push buttons are declared on the top, named buttons as an array of four items, and in the InitializePeripherals method, we instantiate each PushButton and after we declare the handlers for each one, which all of them invoke the OnButton method that ultimately checks if the button pressed is the correct step of the game's sequence.
OutPut - LEDs and PiezoSpeaker
The peripherals used for output in this project are the LEDs and the PiezoSpeaker. Using Netduino.Fundation we can simply instantiate four(4) LED and PiezoSpeaker object in the InitializePeripherals method, where we specify in which pins these components are connected to the Netduino.
Animations
To give the user feedback on which state the game is in, we wrote the following animation methods:
- private void ShowStartAnimation()
- private void ShowNextLevelAnimation(int level)
- private void ShowSequenceAnimation(int level)
- private void ShowGameOverAnimation()
- private void ShowGameWonAnimation()
These animation methods are explicit scripts of turning LEDs on and off in a certain sequence to express different states of the game.
Program Class
Finally, create a new App class object and invoke the Run method. Your code should look like this:
Step 5 - Run the Project
Click the run button in Visual Studio to see your Simon game in action! Notice the start animation, and all the LEDs flashing a certain number of times to indicate in which level you currently are!
Check out Netduino.Foundation!
This project is only the tip of the iceberg in terms of the extensive exciting things you can do with Netduino.Foundation.
- It comes with a huge peripheral driver library with drivers for the most common sensors and peripherals.
- The peripheral drivers encapsulate the core logic and expose a simple, clean, modern API.
- This project is backed by a growing community that is constantly working on building cool connected things and are always excited to help new-comers and discuss new projects.
References