Learn how to run Windows XP and Linux at the same time by installing Kubuntu and using VirtualBox.
Serial port access is critically important in my role as an embedded software engineer. This is true no matter what operating system I am using and whether it is on a physical or virtual platform.
My main operating system is Windows XP, but many projects I am involved in require me to use Linux. This can be a problem as there are two reasons why I dislike having multiple computers running at the same time in my workspace. All the extra cables result in a tangled mess and I really like to leave the space open for other equipment like oscilloscopes that I need to complete my work.
To get around this issue, I installed Kubuntu as a guest OS on my Windows host machine. To perform debugging, access to the host’s serial port is required. VirtualBox is an easy-to-configure solution that enables the guest to access the serial port. The only drawback is that there are multiple ways to accomplish this, which can be confusing.
You can use serial port VirtualBox guide , but it also can be tricky. That’s the reason for this post, but before proceeding, let’s talk a little about serial ports.
How Serial Ports are Named
Windows and Linux use very different naming conventions to identify serial ports. On a Windows machine, the ports are named COM1, COM2, etcetera. Linux uses a format of /dev/ttyS0, /dev/ttyS1, and so on. The example I will be discussing involves both operating systems. To avoid confusion over which port I am talking about, I will use COM1 on Windows and /dev/ttyS0 on Linux to map these names to the same IO ports and IRQs. COM2 will equate to /dev/ttyS1 and the pattern will be maintained for all of the serial ports I use.
Name Under Windows | COM 1 | /dev/ttyS0 | 3F8| 4
Name Under Linux | COM 2 | /dev/ttyS1 | 2F8 | 3
IO Address | COM 3 | /dev/ttyS2 | 3E8| 4
Interrupt Request (IRQ) | COM 4 | /dev/ttyS3 | 2E8 | 3
Setup & Requirements:
My computer has four serial ports which Windows defines as COM1, COM2, COM3, and COM4. The project requires that I attain access to COM3 from the Kubuntu guest installed under a VirtualBox virtual machine. I chose to use COM3 to avoid confusion, but any port can be accessed by using this method.
VirtualBox Configuration:
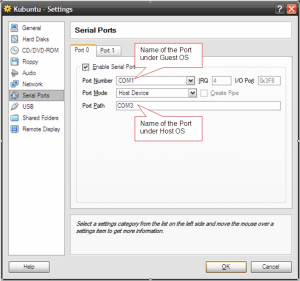
Now we have to configure VirtualBox to connect serial port of the guest operating system to the host’s physical COM port. This is easy to do if you are aware of what to ignore when in VirtualBox’s serial port configuration dialog. When you first open the serial port configuration dialog box on the virtual machine, you will be presented with the Porto tab. We will be ignoring the IRQ, IO PORT, and Create Pipe fields.
- On the Porto Tab select the Enable Serial Port checkbox. This needs to be done before any other settings can be changed.
- Port Number: This field refers to the port number of the guest operating system. We want to map it to /dev/ttyS0, so COM1 should be selected. Remember, this does not refer to the machine’s physical ports.
- Port Mode: This parameter needs to be set to “Host Device” so we can connect a virtual port to a physical one.
- Port Path: The “Host Device” port mode field uses the physical device port number on the physical host. As previously mentioned, we will be connecting to COM3 so use that value here.
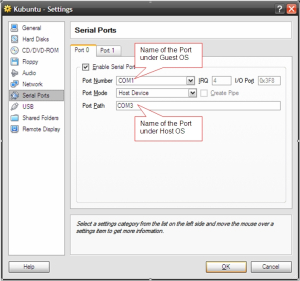
The screenshot below displays the Virtual Box Configuration.
All you need to do is to set these three fields to your designated values and you are finished. Now it’s time to verify that the configuration works as intended. The Kubuntu virtual machine will map COM1, or the serial port with an I/O port of 0x3f8 and IRQ of 4 to /dev/ttyS0.
Verification Under Guest OS:
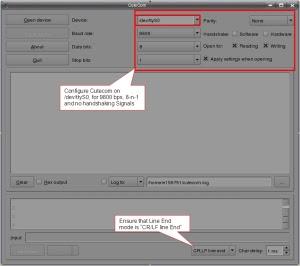
We need to use a serial port terminal on the guest operating system to verify our configuration. I have selected Cutecom to fill this role. We can perform the verification using two different methods.
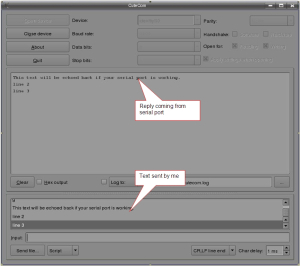
Short Pin 2 and 3 of the physical serial port. Doing this will short the serial port’s Rx and Tx pins. The result is that any data sent through the terminal will be echoed back to it.
Connect a serial device to the port and verify its operation using commands or an application that supports the equipment.
We will use the first method since it does not require any additional equipment and can be done by any user. We short the RX and Tx pins for the physical serial port and configure Cutecom to make sure it is using /dev/ttyS0. Use the screenshot below as a guide to other settings.
Working Serial Ports Under the Guest OS
Final Thoughts:
Though this test was conducted with Kubuntu, it applies to any Linux distribution.
The selected physical port is not available to the host when the VM that is using the port is active.
Both the Port Number and Port Path fields need to be set to COM1 in VirtualBox to map COM1 to /dev/ttyS0.
When Windows is the guest operating system, you can use Hyper Terminal and the port name defined in VirtualBox’s Port Number field.


