Maker Pro
Maker Pro

Can this be repaired by a complete novice please? Basic circuit repair?

Hello All.

A new member looking for help as my daughter's favourite garden ornament is no longer working.

We have a solar powered lighthouse (Aldi), but like most cheaper items water will always get in.

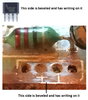
I have attached some images to show one of the components has broken off from the circuit board.

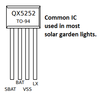
Is it possible to buy a replacement translator, I think it is called and soldered back in place please?

If so what is the component, so I can purchase one and attempt to solder it back.

All the translators I have seen have three 'prongs' but as far as I can make out mine only had two.

But me not knowing a jot about circuitry, is probably completely wrong.

A solar panel is wired to a switch, in the wiring is the panel which has the broken component then onto another board that has the magnetic motor and cogs that will turn the reflective part around the LED.

Please, if anyone can help out, I would be very grateful and of course my daughter will be happy again.


02a.jpg


03a.jpg


01a.jpg


04a.jpg


All the electronic parts are replaceable.
The circuit board itself seems to have suffered, so that is more difficult.
.
Repair from this state would take a bit of work, which might be difficult to explain, remotely.
Is replacement an option?

Does this have a brand or model on it somewhere?
The transistors will have letters/numbers on them. These may tell you what type they are.
Any remaining readable wording?
.
 

bertus

Moderator
Hello,

It looks like there are 4 holes for the part.
It could be the part is a kind if SMPS led driver.
Are the any numbers readable on the part?

Bertus
 
Screen Shot 2021-08-08 at 18.34.24.png Thank you so much for all your replies of valueable info.

The broken component doe have QX 52525.

There is one for sale on eBay.

So would it be just a case of placing the prongs into the four holes and a touch of solder, please?Screen Shot 2021-08-08 at 18.34.24.png

 
Apologies as I left out 'thank you' from my last comment. Sounds rude otherwise.

I have just ordered two QX 52525's, one as a back up, should I c*ck up the soldering.

Just be sure, when I get them, does the flat side face inwards and the graduated face, face outwards from the circuit board please?

Is there anything else I should look at to hopefully make all this work again please?

Thanks for your help and I will report back when I get them and solder them. ;)
 
Have you got a very fine hand held drill, like a 'Dremel' or similar? Those tiny (1mm and less) drill bits, burrs, and soft, fine rotary wire cup brushes would be very helpful for very carefully tidying up the board and removing corrosion before resoldering. Careful not to detach any copper track from the board.

Much easier to solder if all is firm, clean and bright. If not you might get away with small 'poker/scraper' type tools like a watchmakers flat screwdriver, scalpel etc.

I would use a small soldering iron and fine rosin flux cored solder. Avoid plumbers etc solder as it will rot the board over time. Holding the legs of the part with needle nose pliers, between the part itself and the pcb, whilst soldering each leg might help soak excess heat away from the component itself saving it from heat damage. If you're good with soldering, have a good thermostatically controlled iron and you can complete each joint in under about a second or so you might not be so much at risk of hurting the part with too much heat.

You can get specially made little aluminium heatsink tweezers that clip on between the part and the board but I find small needlenose pliers ok.

Just try and keep the legs short all the same, don't have the component sprouting from the board like a garden seedling with one inch legs.

Looking on a site which seems to archive past Aldi specialbuys, I did see a discontinued (2015) solar powered lighthouse, and noticed it specifies a rechargeable AA 1.2V 600mAh Ni-MH Battery - just wondering if that Duracell you have in there should be changed for a rechargeable. See http://offers.kd2.org/en/ie/aldi/pJFz/ - does it look like yours?

Good luck
 
Last edited:
Thank you so much Flippineck for the fine detailed instructions. I am a complete novice to soldering. I have done it only a few times before.

As for the battery, I was only using the Duracell as a tester because any charge left from the actual rechargeable battery has been drained.

The QX 52525's have just turned up today, so when I get chance I will attempt the operation using all your worldly advice.

Thank you to you all who have helped.

Like Arnie stated.... I will be back! :p
 
Find an old junk transistor radio or something & have a go desoldering / resoldering parts first - doesn't matter what to what - just for practice. Really helps at first. If you've really no experience at all you'll burn some pads right off the board the first few times and fry some semiconductors good and proper lol
 
Really anything'll do to practice on. Even just small bits of old copper, bits of wire, whatever.. just to get the feel of it. First joint you ever try teaches you 50% of soldering, 2nd try gives you the next 25%, 3rd try the next 12.5% etc sort of like the law of diminishing returns.. any practice at all is like gold really.

Once you've 'got it' it's not too hard to do.

I'm very middle aged now and been soldering for both hobby and work on and off since I was 10; still not as good as some folks! but remember my first ever project trying to build a beat frequency offset metal detector out of a late 70's issue of Electronics Today International magazine. I burnt the board and parts to a crisp the first time round but that learning process meant, the second attempt at building it eventually succeeded.

Best advice I could give would be, everything must be really nice and clean and shiny, right down to fresh bare copper or tin, no corrosion or tarnish or the solder won't stick. As soon as the solder won't stick, you end up hanging around on the joint trying to _make_ it stick, and that just compounds the error, the surface of everything hot starts to oxidise and build up crud, and it all goes to hell in a handcart. If you don't get a little 'wash' of melted flux weep out of the end of the solder onto the joint on the first hit with the iron, followed rapidly by the solder itself melting and flowing beautifully onto both the iron's tip and the joint within a second or so, give up right then, reclean the joint and iron, and try again. There'll be some good how-to vids on youtube if you need.
 
Thanks.

I have soldered a few 3.5mm audio jacks for my headphones and they seemed to be okay.

I bought a tub of Termo Pasty solder paste from eBay.
 
Top