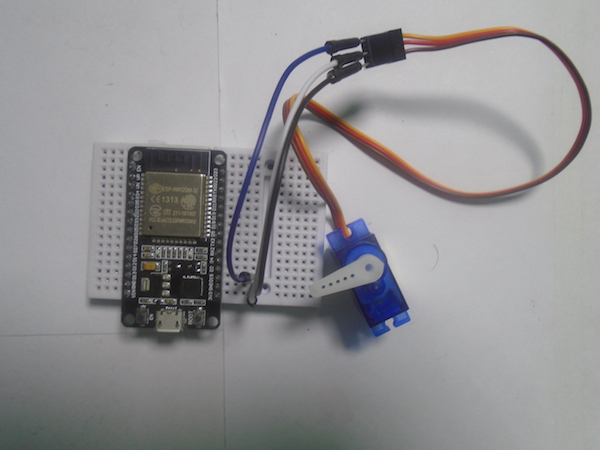
Using an ESP32, we are going to control a Servo motor from a webpage, which is much easier than using an Arduino.
WiFiClient client = server.available();   //Checking if any client request is available or not
  if (client)
  {
    boolean currentLineIsBlank = true;
    String buffer = "";
    while (client.connected()){
      if (client.available()) {           // if there is some client data available
        char c = client.read();
        buffer+=c;                        // read a byte
        if (c == '\n' && currentLineIsBlank) {  // check for newline character
          client.println("HTTP/1.1 200 OK");
          client.println("Content-Type: text/html");
          client.println();
          client.print("<HTML><title>ESP32</title>");
          client.print("<body><h1>ESP32 Servo Control </h1>");
          client.print("<a href=\"/?moveleft\"\"><button>Left</button></a>");
          client.print("<a href=\"/?moveright\"\"><button>Right</button></a>");
          client.print("</body></HTML>");
          break;      // break out of the while loop:
const char* wifi_name = "Tenda_31BC98"; // Your Wifi network name here
const char* wifi_pass = "barcelona";    // Your Wifi network password here
WiFiServer server(80);                   // Server will be at port 80
In this project, we are going to control a servo motor from a webpage using the ESP32. Controlling the servo motor from Arduino is very easy, but to control it using ESP32 is a bit difficult because the ESP32 doesn’t have the analogwrite() function. So, with the help of a library for the servo motor, we will be able to control the motor.
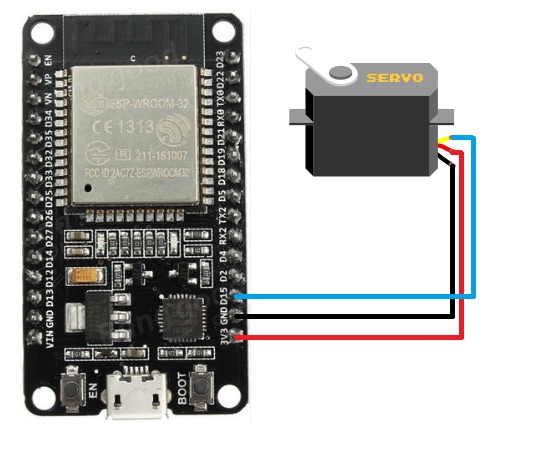
Circuit Diagram
The yellow wire of the servo motor is the signal wire; connect it to pin D15 of ESP32. The red wire is the power wire; connect it to the 3.3V of ESP32. The black wire is the ground wire; connect it to the ground of the ESP32.
Code
#include <WiFi.h>
#include <esp32-hal-ledc.h>

const char* wifi_name = "Tenda_31BC98"; // Your Wifi network name here
const char* wifi_pass = "barcelona";    // Your Wifi network password here
WiFiServer server(80);                   // Server will be at port 80

int servo_pos = 4000;

void setup()
{
  Serial.begin(115200);
  ledcSetup(1, 50, 16); // channel 1, 50 Hz, 16-bit width
  ledcAttachPin(15, 1);   // GPIO 15 assigned to channel 1
  ledcWrite(1, servo_pos); // Moved the servo to 90 degree

  Serial.print("Connecting to ");
  Serial.print(wifi_name);
  WiFi.begin(wifi_name, wifi_pass);       // Connecting to the wifi network

  while (WiFi.status() != WL_CONNECTED)   // Waiting for the responce of wifi network
  {
    delay(500);
    Serial.print(".");
  }
  Serial.println("");
  Serial.println("Connection Successful");
  Serial.print("IP address: ");
  Serial.println(WiFi.localIP());         // Getting the IP address
  Serial.println("Type the above IP address into browser search bar");
  server.begin();                          // Starting the server
}

void loop()
{
  WiFiClient client = server.available();   //Checking if any client request is available or not
  if (client)
  {
    boolean currentLineIsBlank = true;
    String buffer = "";
    while (client.connected()){
      if (client.available()) {           // if there is some client data available
        char c = client.read();
        buffer+=c;                        // read a byte
        if (c == '\n' && currentLineIsBlank) {  // check for newline character
          client.println("HTTP/1.1 200 OK");
          client.println("Content-Type: text/html");
          client.println();
          client.print("<HTML><title>ESP32</title>");
          client.print("<body><h1>ESP32 Servo Control </h1>");
          client.print("<a href=\"/?moveleft\"\"><button>Left</button></a>");
          client.print("<a href=\"/?moveright\"\"><button>Right</button></a>");
          client.print("</body></HTML>");
          break;      // break out of the while loop:
        }
        if (c == '\n') {
          currentLineIsBlank = true;
          buffer="";
        }
        else
          if (c == '\r') {
          if(buffer.indexOf("GET /?moveright")>=0)
          {
            if (servo_pos > 8000)
            {
              servo_pos = 8000;
            }
            servo_pos = servo_pos += 1000;
            ledcWrite(1, servo_pos);
            delay(100);
          }

          if(buffer.indexOf("GET /?moveleft")>=0)
            {
              if (servo_pos < 0)
              {
                servo_pos = 0;
              }
            servo_pos = servo_pos -= 1000;
            ledcWrite(1, servo_pos);
            delay(100);
            }
        }
        else
        {
          currentLineIsBlank = false;
        }
      }
    }
    client.stop();
  }
}
Code Explanation
First of all, we included the libraries for the Wi-Fi and the servo motor. For Arduino, we used the “analogwrite()” command for the PWM, but for ESP32, the “analogwrite()” command does not work. So we used the library that will allow us to get the PWM output from the ESP32 pins.
#include <WiFi.h>
#include <esp32-hal-ledc.h>
Then we stored the Wi-Fi name and password so we can connect to it later on. After that, we selected the port 80 where the server will be created.
const char* wifi_name = "Tenda_31BC98"; // Your Wifi network name here
const char* wifi_pass = "barcelona";    // Your Wifi network password here
WiFiServer server(80);                   // Server will be at port 80
In the setup function, we used the library functions to define the pin we have attached the servo motor to and moved the servo motor to 90 degrees, which we have set as the initial position.
ledcSetup(1, 50, 16); // channel 1, 50 Hz, 16-bit width
ledcAttachPin(15, 1);   // GPIO 15 assigned to channel 1
ledcWrite(1, servo_pos); // Moved the servo to 90 degree
Then we connected the ESP32 to the Wi-Fi network using the information we provided above. If the connection to the Wi-Fi network will be successful, then “Connection Successful” will show on the serial monitor, and if the connection to the Wi-Fi network is unsuccessful, it will keep on trying until it connects to the Wi-Fi network.
Serial.print("Connecting to ");
  Serial.print(wifi_name);
  WiFi.begin(wifi_name, wifi_pass);       // Connecting to the wifi network
  while (WiFi.status() != WL_CONNECTED)   // Waiting for the response of wifi network
  {
    delay(500);
    Serial.print(".");
  }
  Serial.println("");
  Serial.println("Connection Successful");
The below command will show the IP address on the serial monitor. This is the IP address at which our server will be created.
Serial.println(WiFi.localIP()); // Getting the IP address
The below command will start the server.
In the loop function, first we checked if any client request is available or not. If any client request is available, we will read this request and store this in the character. We will respond to this client request by sending the HTML commands, which will create the webpage from where we will control the servo motor.
WiFiClient client = server.available();   //Checking if any client request is available or not
  if (client)
  {
    boolean currentLineIsBlank = true;
    String buffer = "";
    while (client.connected()){
      if (client.available()) {           // if there is some client data available
        char c = client.read();
        buffer+=c;                        // read a byte
        if (c == '\n' && currentLineIsBlank) {  // check for newline character
          client.println("HTTP/1.1 200 OK");
          client.println("Content-Type: text/html");
          client.println();
          client.print("<HTML><title>ESP32</title>");
          client.print("<body><h1>ESP32 Servo Control </h1>");
          client.print("<a href=\"/?moveleft\"\"><button>Left</button></a>");
          client.print("<a href=\"/?moveright\"\"><button>Right</button></a>");
          client.print("</body></HTML>");
          break;      // break out of the while loop:
On pressing the left or right button on the webpage, the webpage will send the information to the webserver the servo will be moved to.
if(buffer.indexOf("GET /?moveright")>=0)
          {
            if (servo_pos > 8000)
            {
              servo_pos = 8000;
            }
            servo_pos = servo_pos += 1000;
            ledcWrite(1, servo_pos);
            delay(100);
          }

          if(buffer.indexOf("GET /?moveleft")>=0)
            {
              if (servo_pos < 0)
              {
                servo_pos = 0;
              }
            servo_pos = servo_pos -= 1000;
            ledcWrite(1, servo_pos);
            delay(100);