In this post, we are going to create a webserver using an ESP32 by connecting it to Wi-Fi and obtaining an IP address.
In this post, we are going to create a webserver using ESP32. We will connect the ESP32 to the Wi-Fi network, and then ESP32 will show you an IP address at which the server will be created. Now when you will type this IP address in the browser, the browser will send a request to the webserver for connection. After the connection is established, the webserver will return a webpage.
Getting Started
The connection between the client and the webserver is established using the HTTP protocol. An HTTP protocol looks like this: HTTP/1.1 200 OK\r\nContent-Type: text/html\r\n\r\n".
The “HTTP/1.1 200 OK” means that the server has accepted the request and has responded with “200 OK” which is the status code followed by “\r\n” which are the constraint of HTTP protocol.
“Content-Type: text/html\r\n” means that the response content type is HTML format, followed by “\r\n”
At the end of HTTP protocol, the webserver will return a webpage showing “Hello world”.
Code
#include <WiFi.h>

const char* wifi_name = "Tenda_31BC98"; //Your Wifi name
const char* wifi_pass = "barcelona";    //Your Wifi password
WiFiServer server(80);                  //Port 80

void setup()
{
    Serial.begin(115200);

    // Let's connect to wifi network
    Serial.print("Connecting to ");
    Serial.print(wifi_name);
    WiFi.begin(wifi_name, wifi_pass);       //Connecting to wifi network

    while (WiFi.status() != WL_CONNECTED) { //Waiting for the responce of wifi network
        delay(500);
        Serial.print(".");
    }
    Serial.println("");
    Serial.println("Connection Successful");
    Serial.print("IP address: ");
    Serial.println(WiFi.localIP());         //Getting the IP address at which our webserver will be created
    Serial.println("Put the above IP address into a browser search bar");
    server.begin();                         //Starting the server
}

void loop()
{
 WiFiClient client = server.available();   //Checking for incoming clients

  if (client)
  {
    Serial.println("new client");
    String currentLine = "";                   //Storing the incoming data in the string
    while (client.connected())
    {
      if (client.available())                 //if there is some client data available
      {
        char c = client.read();                //read a byte
        Serial.print(c);
          if (c == '\n')                      //check for newline character,
          {
           if (currentLine.length() == 0)      //if line is blank it means its the end of the client HTTP request
           {
            client.print("<title>ESP32 Webserver</title>");
            client.print("<body><h1>Hello World </h1>");

            break;                            //Going out of the while loop
           }
           else
           {
            currentLine = "";                //if you got a newline, then clear currentLine
           }
         }
         else if (c != '\r')
         {
          currentLine += c;                 //if you got anything else but a carriage return character,
         }
      }
    }
 }
    delay(2000);
}
Code Explanation
First of all, we included the Wi-Fi library, which will help us create the webserver. Then we stored the Wi-Fi name and password so we can connect to this Wi-Fi network. After that, we defined the port we are going to send the data to.
const char* wifi_name = "Tenda_31BC98"; //Your Wifi name
const char* wifi_pass = "barcelona";    //Your Wifi password
WiFiServer server(80);                  //Port 80
In the setup function, we connected the ESP32 to our Wi-Fi network using the Wi-Fi information we provided above. If the connection to the Wi-Fi network is successful, then “Connection successful” will be shown on the Serial monitor. Otherwise, it will keep on trying until it will connect to the Wi-Fi network.
Serial.print("Connecting to ");
    Serial.print(wifi_name);
    WiFi.begin(wifi_name, wifi_pass);       //Connecting to wifi network

    while (WiFi.status() != WL_CONNECTED) { //Waiting for the responce of wifi network
        delay(500);
        Serial.print(".");
    }
    Serial.println("");
    Serial.println("Connection Successful");
The below command will get the IP address and we will show it on the Serial monitor.
Serial.println(WiFi.localIP());
Then we started the server so we can get and send the data to the browser.
server.begin();
In the loop function, we checked if any client has sent an http request or not. If any client request is available, it will be stored in the character and shown on the serial monitor. At the end of the request, we will send the HTML commands, which will print “Hello world” on the webpage.
WiFiClient client = server.available();   //Checking for incoming clients

  if (client)
  {
    Serial.println("new client");
    String currentLine = "";                   //Storing the incoming data in the string
    while (client.connected())
    {
      if (client.available())                 //if there is some client data available
      {
        char c = client.read();                //read a byte
        Serial.print(c);
          if (c == '\n')                      //check for newline character,
          {
           if (currentLine.length() == 0)      //if line is blank it means it’s the end of the client HTTP request
           {
            client.print("<title>ESP32 Webserver</title>");
            client.print("<body><h1>Hello World </h1>");

            break;                            //Going out of the while loop
           }
How to Run the Code
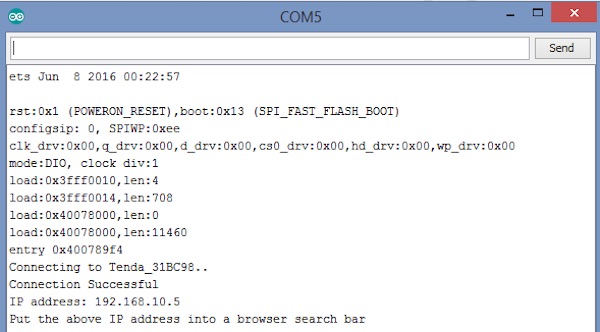
Change the Wi-Fi name and password in the code with your Wi-Fi name and password. Then upload the code and open the serial monitor. The serial monitor will show you the IP address as shown in the below image. Type this IP address in your browser.
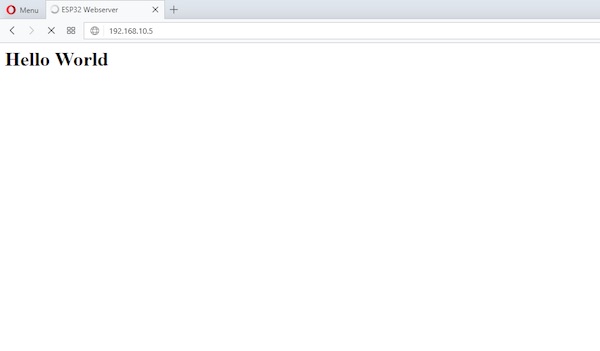
After typing the IP address, the webpage will be shown like below.