Learn how to use an ESP32 to make a weather station and create a webpage to track its findings!
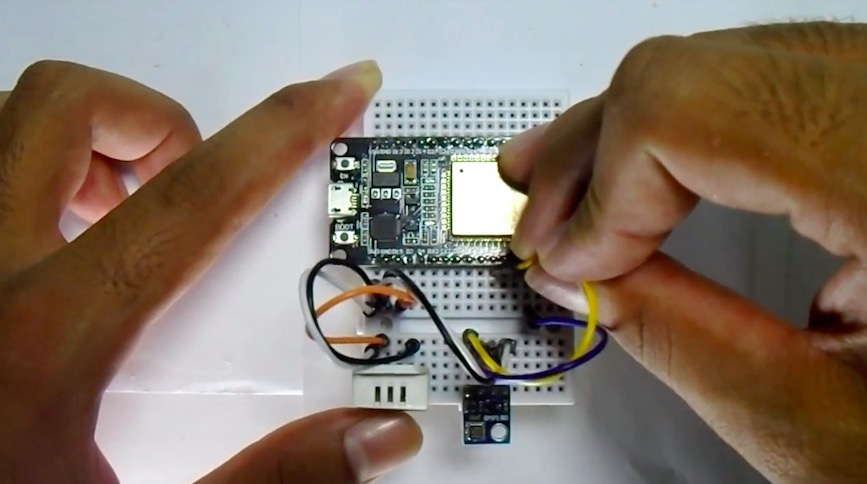
In this project, we are going to create a weather station using an ESP32. We will read from the DHT22 and BMP180 sensors and then, using the ESP32, we will create the webpage where we will show the values.
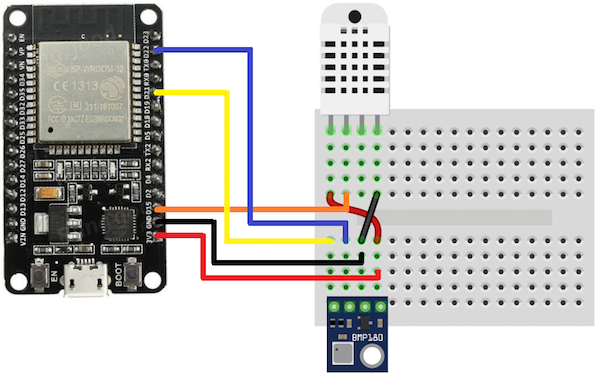
Circuit Diagram
First of all, connect the DHT22 with ESP32. The connections for the DHT22 with ESP32 are as follows:
- Pin 1 of DHT22 which is the VCC pin to 3.3V of ESP32
- Pin 2 of DHT22 which is the data pin to D15 of ESP32
- Pin 4 of DHT22 which is the GND pin to GND of ESP32
Then connect the BMP180 pressure sensor to the ESP32. The connections are as follows:
- Vin of BMP180 to 3.3V of ESP32
- GND of BMP180 to GND of ESP32
- SCL of BMP180 to pin 22 of ESP32 (Pin 22 of ESP32 is the SCL pin)
- SDA of BMP180 to pin 21 of ESP32 (Pin 21 of ESP32 is the SDA pin)
Pins 22 and 21 of the ESP32 are for I2C communication.
Weather Station Project Code
#include <WiFi.h>
#include <Wire.h>
#include <DHT.h>
#include <Adafruit_BMP085.h>

#define DHTPIN 15
#define DHTTYPE DHT22
DHT dht(DHTPIN, DHTTYPE);
Adafruit_BMP085 bmp;

char pressure_value[4];
const char* wifi_name = "Tenda_31BC98"; //Your Wifi name
const char* wifi_pass = "barcelona";    //Your Wifi password
WiFiServer server(80);                  //Port 80

void setup()
{
  Serial.begin(115200);
  dht.begin();
  bmp.begin();

  // Let's connect to wifi network
  Serial.print("Connecting to ");
  Serial.print(wifi_name);
  WiFi.begin(wifi_name, wifi_pass);   //Connecting to wifi network

 while (WiFi.status() != WL_CONNECTED) //Waiting for the responce of wifi network
 {
    delay(500);
    Serial.print(".");
 }
    Serial.println("");
    Serial.println("Connection Successful");
    Serial.print("IP address: ");
    Serial.println(WiFi.localIP());   //Getting the IP address at which our webserver will be created
    Serial.println("Type the above IP address into a browser search bar");
    server.begin();                   //Starting the server
}

void loop()
{
  String pressure = String(bmp.readPressure());
  // convert the reading to a char array
  pressure.toCharArray(pressure_value, 4);

  float hum = dht.readHumidity();
  float temp = dht.readTemperature();
  float fah = dht.readTemperature(true);
  float heat_index = dht.computeHeatIndex(fah, hum);
  float heat_indexC = dht.convertFtoC(heat_index);

  WiFiClient client = server.available();   //Checking for incoming clients

  if (client)
  {
    Serial.println("new client");
    String currentLine = "";                   //Storing the incoming data in the string
    while (client.connected())
    {
      if (client.available())                  //if there is some client data available
      {
        char c = client.read();                // read a byte
          if (c == '\n')                       // check for newline character,
          {
          if (currentLine.length() == 0)      //if line is blank it means its the end of the client HTTP request
          {
            client.print("<html><title> ESP32 Weather Station</title></html>");
            client.print("<body bgcolor=\"#E6E6FA\"><h1 style=\"text-align: center; color: blue\"> ESP32 Weather Station </h1>");
            client.print("<p style=\"text-align: center; font-size:150% \">Temperature in C: ");
            client.print(temp);
            client.print("<br/>Temperature in fah: ");
            client.print(fah);
            client.print("<br/>Humidity is: ");
            client.print(hum);
            client.print("<br/>Heat Index in C: ");
            client.print(heat_indexC);
            client.print("<br/>Heat Index in fah: ");
            client.print(heat_index);
            client.print("<br/>Pressure is: ");
            client.print(pressure_value);
            client.print("hpa");
            client.print("</p></body>");

            break;  // break out of the while loop:
          }
          else
          {    // if you got a newline, then clear currentLine:
            currentLine = "";
          }
         }
         else if (c != '\r')
         {  // if you got anything else but a carriage return character,
          currentLine += c;       // add it to the end of the currentLine
         }
        }
      }
    }
  }
Weather Station Project Code Explanation
First, you need to make sure you have all of the libraries required for this project. Once you do, we can define the pin at which we have connected the DHT22 temperature and humidity sensor. After that, we can create these instances:
#include <WiFi.h>
#include <Wire.h>
#include <DHT.h>
#include <Adafruit_BMP085.h>
#define DHTPIN 15
#define DHTTYPE DHT22
DHT dht(DHTPIN, DHTTYPE);
Adafruit_BMP085 bmp;
Now we store the Wi-Fi name and password so that we can connect to it later. We then define the port at which we will create the server.
const char* wifi_name = "Tenda_31BC98"; //Your Wifi name
const char* wifi_pass = "barcelona"; //Your Wifi password
WiFiServer server(80); //Port 80
In the setup function, we connected the ESP32 to our Wi-Fi network using the Wi-Fi information we provided above. If the connection to the Wi-Fi network is successful, then ‘connection successful’ will be shown on the serial monitor. Otherwise, it will keep trying until it connects to the Wi-Fi network.
Serial.print("Connecting to ");
Serial.print(wifi_name);
WiFi.begin(wifi_name, wifi_pass); //Connecting to wifi network
while (WiFi.status() != WL_CONNECTED) { //Waiting for the response of wifi network
delay(500);
Serial.print(".");
}
Serial.println("");
Serial.println("Connection Successful");
The below command will cause the IP address to show on the serial monitor.
Serial.println(WiFi.localIP());
Then we start the server so that we can receive and send data to the browser.
server.begin();
In the loop function, we are able to read the values from the sensors and stored in variables so that we can show them on the webpage.
String pressure = String(bmp.readPressure());
pressure.toCharArray(pressure_value, 4);
float hum = dht.readHumidity();
float temp = dht.readTemperature();
float fah = dht.readTemperature(true);
float heat_index = dht.computeHeatIndex(fah, hum);
float heat_indexC = dht.convertFtoC(heat_index);
Then we check whether any client has sent an HTTP request or not. If any client request is available, then it will be stored in the character and shown on the serial monitor. At the end of the request, we will send the HTML commands, which will print the sensor data on the webpage.
WiFiClient client = server.available(); //Checking for incoming clients
if (client)
{
Serial.println("new client");
String currentLine = ""; //Storing the incoming data in the string
while (client.connected())
{
if (client.available()) //if there is some client data available
{
char c = client.read(); // read a byte
if (c == '\n') // check for newline character,
{
if (currentLine.length() == 0) //if line is blank it means it’s the end of the client HTTP request
{
client.print("<html><title> ESP32 Webserver</title></html>");
client.print("<body bgcolor=\"#E6E6FA\"><h1 style=\"text-align: center; color: blue\"> ESP32 Weather Station </h1>");
client.print("<p style=\"text-align: center; font-size:150% \">Temperature in C: ");
client.print(temp);
client.print("<br/>Temperature in fah: ");
client.print(fah);
client.print("<br/>Humidity is: ");
client.print(hum);
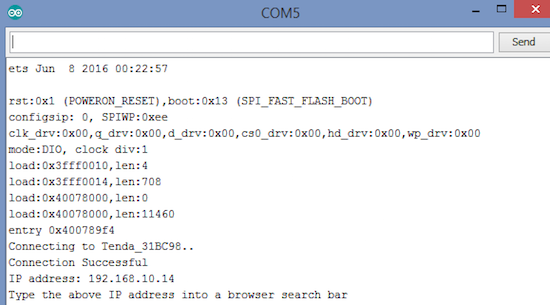
How to Run Your Weather Station
First, replace the Wi-Fi name and password information in the code with your own. Then upload the code and open the serial monitor. The serial monitor will show you the IP address as shown in the below image.
Type this IP address in your browser.
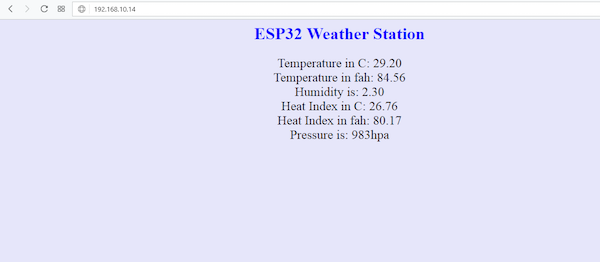
After typing the IP address, the webpage will be shown like below.
Now you have sensor data uploading from your weather station to a webpage.
To see this project take shape from beginning to end, check out the video below!
If you have improvements or additional functionalities you’d like to add to this project, try forking it!