Learn how to create a webpage to control a relay module with an ESP32.
In this project, we are going to control the relay module with ESP32. We will connect our ESP32 to a Wi-Fi network and then create a webpage through an IP address and port which is shown on the serial monitor. Using the webpage, we will send the commands to the ESP32 to turn the relay module ON or OFF.
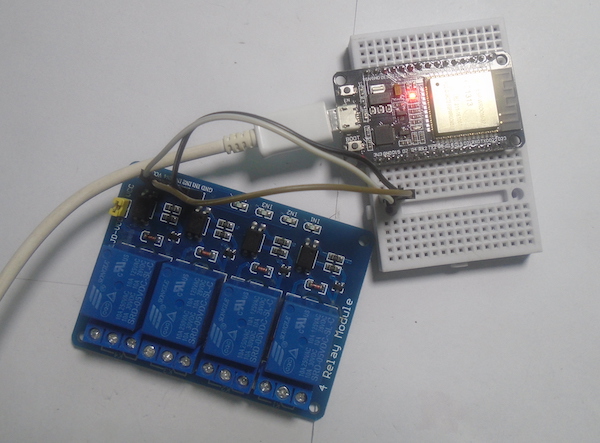
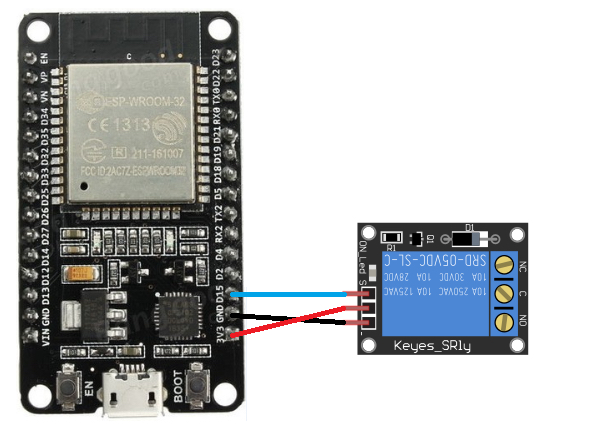
Circuit Diagram
How your setup will look when everything is connected.
Code Explanation and Walkthrough
Let's walk through the different aspects of the code and what each section of code is responsible for doing. The full code without breaks can be found at the end of this article.
First of all, we include the Wi-Fi library so that we can connect to the internet. Then we store the Wi-Fi name and password so that we can connect to this network. After that, we define the port where we are creating the web server.
#include <WiFi.h>
const char* wifi_name = "Tenda_31BC98"; // Your Wifi network name here
const char* wifi_pass = "barcelona";    // Your Wifi network password here
WiFiServer server(80);    // Server will be at port 80
In the setup function, we connected to the Wi-Fi network using the information provided above. If the connection to the Wi-Fi network is successful, then ‘Connection Successful’ shows on the serial monitor. if the connection to the Wi-Fi network is unsuccessful, then it will continue trying until it connects to the Wi-Fi network.
WiFi.begin(wifi_name, wifi_pass);     // Connecting to the wifi network
  while (WiFi.status() != WL_CONNECTED) // Waiting for the response of wifi network
  {
    delay(500);
    Serial.print(".");
  }
    Serial.println("");
  Serial.println("Connection Successful");
The command below will show the IP address on the serial monitor. This is the IP address that our server will be created on/through.
Serial.println(WiFi.localIP()); // Getting the IP address
The command below will start the server.
server.begin(); // Starting the server
In the loop function, we first checked that if any client request is available. If any client requests are available, then we read the request and store it in the character. We respond to the client request by sending HTML commands that create the webpage from which we can control the relay.
WiFiClient client = server.available();     //Checking if any client request is available or not
  if (client)
  {
    boolean currentLineIsBlank = true;
    String buffer = "";
    while (client.connected())
    {
      if (client.available())                    // if there is some client data available
      {
        char c = client.read();
        buffer+=c;                              // read a byte
        if (c == '\n' && currentLineIsBlank)    // check for newline character,
        {
          client.println("HTTP/1.1 200 OK");
          client.println("Content-Type: text/html");
          client.println();
          client.print("<HTML><title>ESP32</title>");
          client.print("<body><h1>ESP32 Standalone Relay Control </h1>");
          client.print("<p>Relay Control</p>");
          client.print("<a href=\"/?relayon\"\"><button>ON</button></a>");
          client.print("<a href=\"/?relayoff\"\"><button>OFF</button></a>");
          client.print("</body></HTML>");
          break;        // break out of the while loop:
Project Video
Watch this project take shape in the video below!
Full Project Code
#include <WiFi.h>

const char* wifi_name = "Tenda_31BC98"; // Your Wifi network name here
const char* wifi_pass = "barcelona";    // Your Wifi network password here
WiFiServer server(80);    // Server will be at port 80

int relay_pin = 2;

void setup()
{
  Serial.begin (115200);
  pinMode (relay_pin, OUTPUT);

  Serial.print ("Connecting to ");
  Serial.print (wifi_name);
  WiFi.begin (wifi_name, wifi_pass);     // Connecting to the wifi network

  while (WiFi.status() != WL_CONNECTED) // Waiting for the response of wifi network
  {
    delay (500);
    Serial.print (".");
  }
  Serial.println("");
  Serial.println("Connection Successful");
  Serial.print("IP address: ");
  Serial.println(WiFi.localIP());           // Getting the IP address
  Serial.println("Type the above IP address into browser search bar");
  server.begin();                           // Starting the server
}

void loop()
{
  WiFiClient client = server.available();     //Checking if any client request is available or not
  if (client)
  {
    boolean currentLineIsBlank = true;
    String buffer = "";
    while (client.connected())
    {
      if (client.available())                    // if there is some client data available
      {
        char c = client.read();
        buffer+=c;                              // read a byte
        if (c == '\n' && currentLineIsBlank)    // check for newline character,
        {
          client.println("HTTP/1.1 200 OK");
          client.println("Content-Type: text/html");
          client.println();
          client.print("<HTML><title>ESP32</title>");
          client.print("<body><h1>ESP32 Standalone Relay Control </h1>");
          client.print("<p>Relay Control</p>");
          client.print("<a href=\"/?relayon\"\"><button>ON</button></a>");
          client.print("<a href=\"/?relayoff\"\"><button>OFF</button></a>");
          client.print("</body></HTML>");
          break;        // break out of the while loop:
        }
        if (c == '\n') {
          currentLineIsBlank = true;
          buffer="";
        }
        else
          if (c == '\r') {
          if(buffer.indexOf("GET /?relayon")>=0)
            digitalWrite(relay_pin, LOW);
          if(buffer.indexOf("GET /?relayoff")>=0)
            digitalWrite(relay_pin, HIGH);
        }
        else {
          currentLineIsBlank = false;
        }
      }
    }
    client.stop();
  }
}