This article takes you through the process of upgrading your projects from ESP8266 to ESP32 using Arduino IDE.
So, you make the decision to update your projects to the ESP32 from the discontinued ESP8266. Perhaps you need Bluetooth connectivity or touch sensing capabilities. Maybe you just need more GPIO pins. No matter why you chose to upgrade, the process is not complicated at all and this article walks you through the steps.
If you are still unsure upgrading is the best decision for you, check out Should You Upgrade from ESP8266 to ESP32? for some helpful factors to consider.
In order to upgrade, we will be looking at the pinout changes in the hardware to make sure you rewire your project correctly. Then, we will configure the Arduino IDE to be able to upload sketches to ESP32.
ESP8266 vs. ESP32 Pinout Comparison
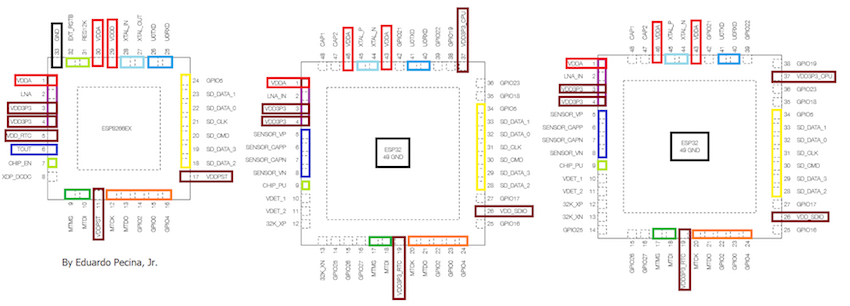
Here is a brief comparison of the two chips. Different colors are used to illustrate the corresponding pin locations.
ESP8266(left), ESP32 QFN 6*6(center), and ESP32 QFN 5*5(right). Colors added by the author.
Notable Hardware Changes
In the diagram above, you can see the pins on the ESP8266 and their corresponding pins on both versions of the ESP32.
It is important to note that some pins are named differently, while others provide different functions altogether. For example, all of the maroon colored boxes are for analog power pins. On the ESP8266 they support 2.5 V ~ 3.6 V while the ESP32 versions support 2.3 V ~ 3.6 V. This is a minor variation you may wish to account for in your upgraded project. The ground pin in black (GND) has also been moved to the center of the chip instead of having its own pin on the outside.
Though not specified in the image, some pin functions available on the ESP32 are not on the ESP8266. GPIO pins 25 and 26, for instance, may be used as digital-to-analog converters, while the following pins can be used as capacitive touch sensors:
- GPIO4
- GPIO0
- GPIO2
- GPIO27
- MTDO
- MTCK
- MTDI
- MTMS
- 32K_XN
- 32K_XP
Shown in the image as lime green rectangles, the ESP8266’s chip hardware-reset pins CHIP_IN and EXT_RSTB have been replaced with CHIP_PU on the ESP32, while the serial pin has become redundant since many other pins have SPI functions.
The XDP_DCDC (deep-sleep wake up) pin has also been eliminated. This is because any RTC-GPIO pins can be used for waking up the chip from deep-sleep instead.
The SD pins (shown in yellow), as well as some GPIOs, have remained relatively unchanged with regards to their hardware positioning, though the ESP32 provides a plethora of added functions.
Depending on your dev board, the pins may be in different locations, but a quick look at its schematic will give you the equivalent pins.
For a full description of every pin and the peripherals, please reference the ESP8266 datasheet (PDF) and the ESP32 datasheet (PDF).
How to Update the Software in Arduino IDE
As you have likely already done for your ESP8266 project, you need to install board management software to be able to program your ESP32 in the Arduino IDE. Please double check to make sure you are using version 1.8 or later of the Arduino IDE.
**Note: Arduino Web Editor does not support ESP32 or ESP8266 at the time of writing.
Start the Arduino IDE and open File. Scroll down and select Preferences.
Enter “https://dl.espressif.com/dl/package_esp32_index.json” into the Additional Board Manager URLs field. If you already have other URLs there, remember to separate them with commas. Open Boards Manager from the Tools > Board menu and install the ESP32 platform.
Select your ESP32 board from the Tools > Board menu and your sketches are ready to upload! If you would like to do this manually or with another IDE, check out Espressif’s GitHub page.
The ESP32 has many advantages over the ESP8266 in speed, power-saving modes, and peripherals. As long as you follow the pinout and update the software, your former ESP8266 project should be ready to roll with this more powerful chip in no time.