Learn how to use Arduino IDE to program your ESP32 and see how to set up the ESP32 with a multi-sensor module.
In this article, I'll show you how to set up an ESP32 with Arduino IDE and we'll do a practice project by connecting the ESP32 to a small but powerful multi-sensor module: the AmbiMate MS4. The AmbiMate MS4 integrates into projects to offer a sensor for motion, light, temperature, and humidity.
We will use the MS4 sensor with an ESP32 to explore the method of real-time monitoring through your board's serial monitor using Arduino IDE.
Materials List
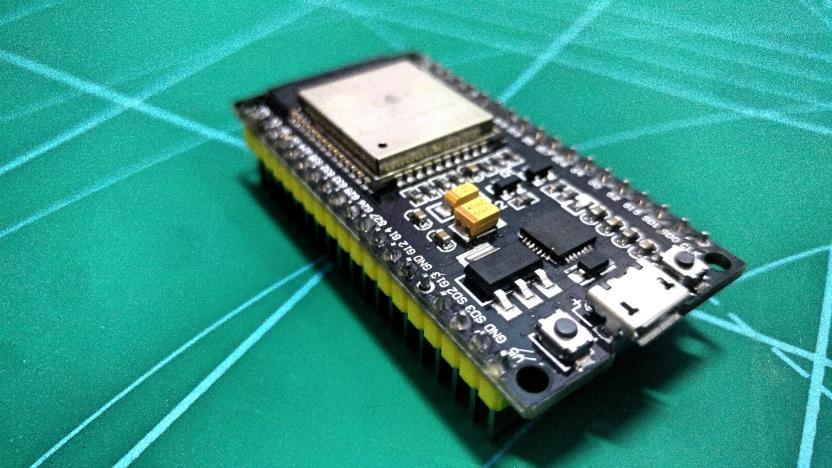
- ESP32
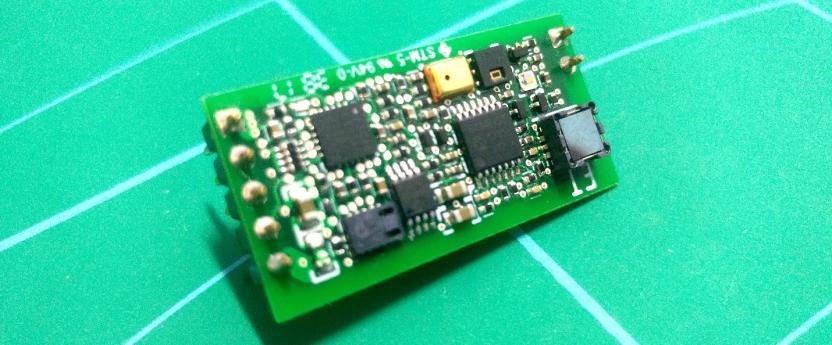
- AmbiMate MS4 multi-sensor module
- Breadboard and jumper wires
- USB connector
- Arduino IDE (software)
What is the AmbiMate MS4?
The AmbiMate Sensor Module MS4 Series integrates a set of sensors for building automation and connected home applications onto PCB components. It provides a set of application-specific sensors on the ready-to-connect PCB assembly for easy integration into the host product.
Sensors include motion, light, temperature, humidity, VSO (volatile organic compound), CO2, and sound detection. The ability to monitor air quality is added by capturing VOC concentrations. There are many MS4 series sensors available — I recommend you choose the one with an embedded microphone to enhance motion detection or to be able to listen to sound events.
All MS4 Series sensor modules have the flexibility to share a common seven-position connection. This allows designers to lay out a single PCB package to accommodate all available sensor configurations in production.
MS4 Applications
- Indoor Lighting
- Energy Management
- Building Automation
- Work Space Comfort
- Zonal Environmental Controls
- Home Automations
- Air Quality Measuring System
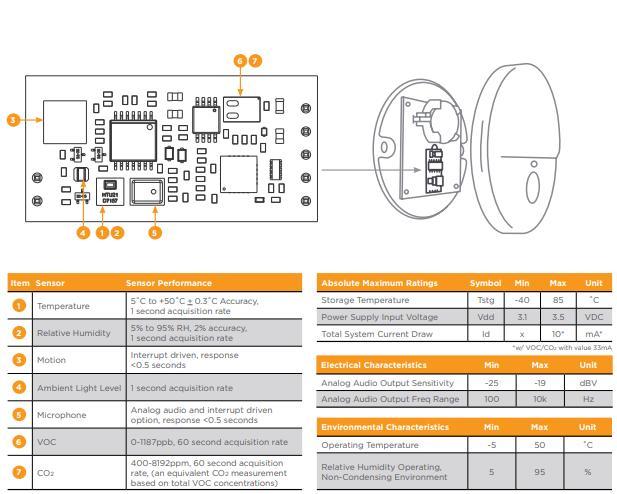
MS4 Specifications
In MS4 Version 1-2314291-2 there are nine sensors for:
- Motion (PIR)
- Temperature
- Humidity
- Light
- Motion (PIR)
- Temperature
- Sound (microphone)
- VOC
- CO2
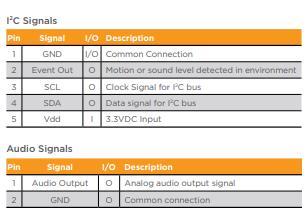
MS4 Pinout
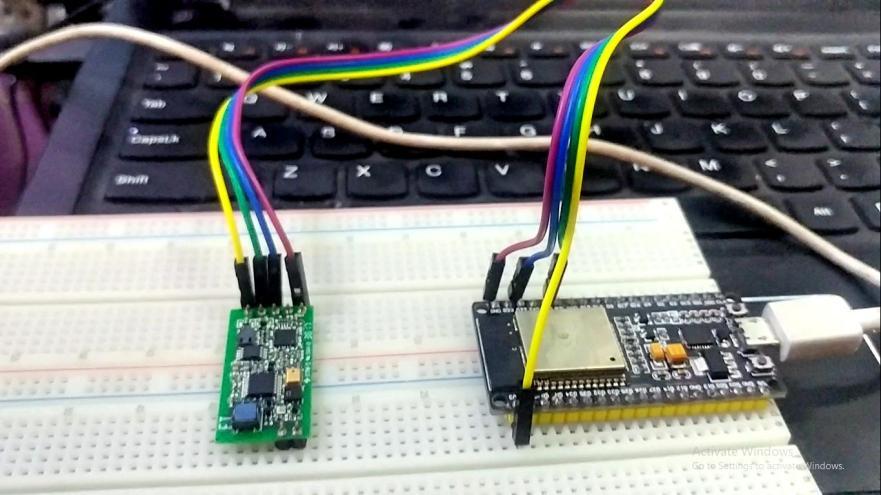
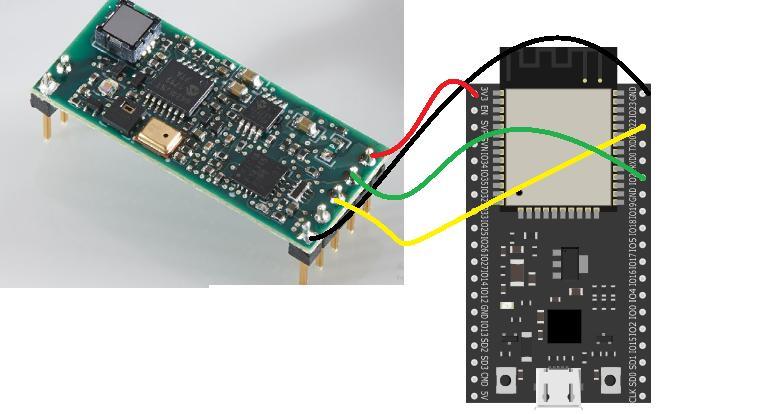
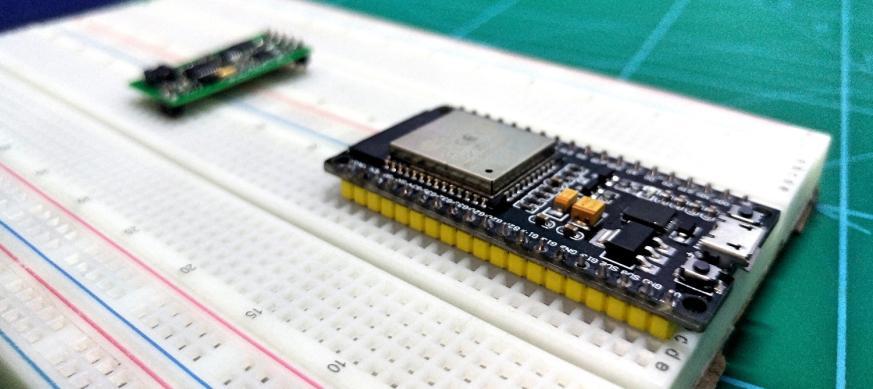
Wiring the ESP32 to the MS4
Connect the MS4 to the ESP32 as follows:
Setting Up ESP32 with Arduino IDE
Follow the steps illustrated through the screenshots below to program the ESP32 using the Arduino IDE.
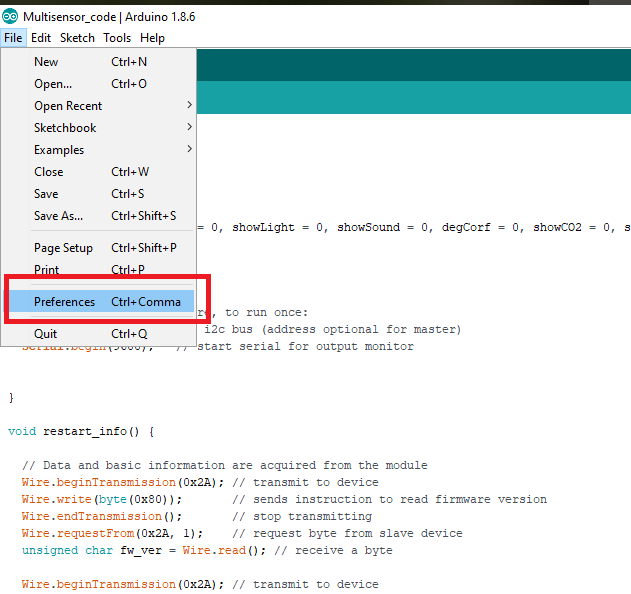
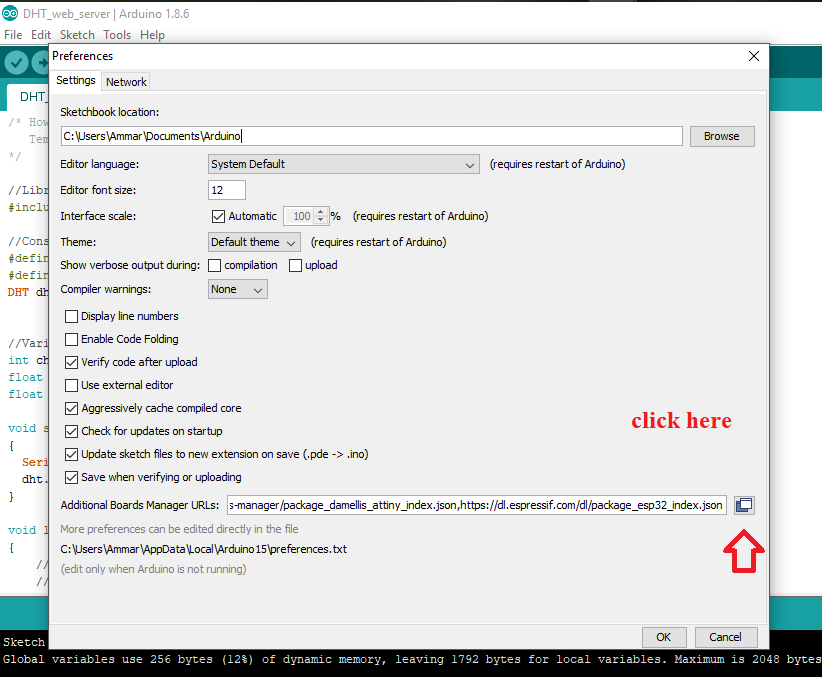
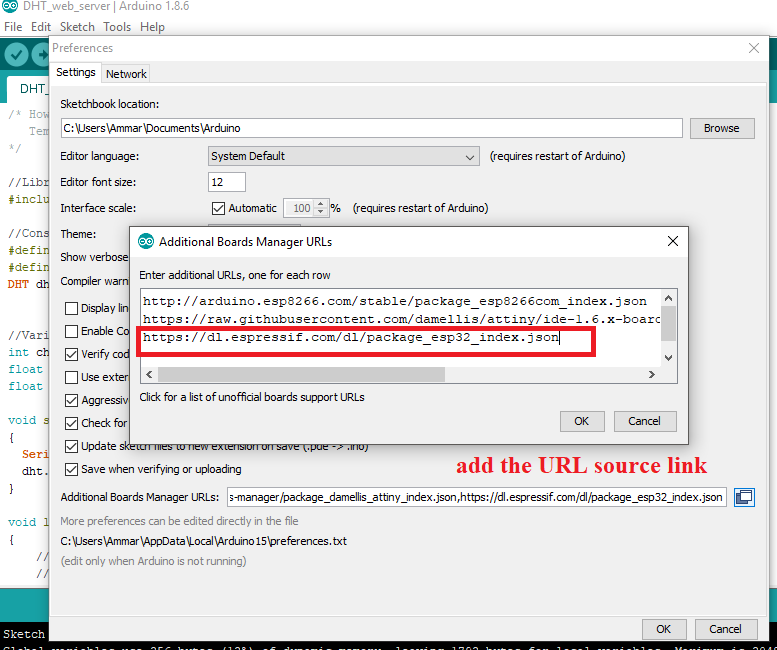
Click on File > Preferences
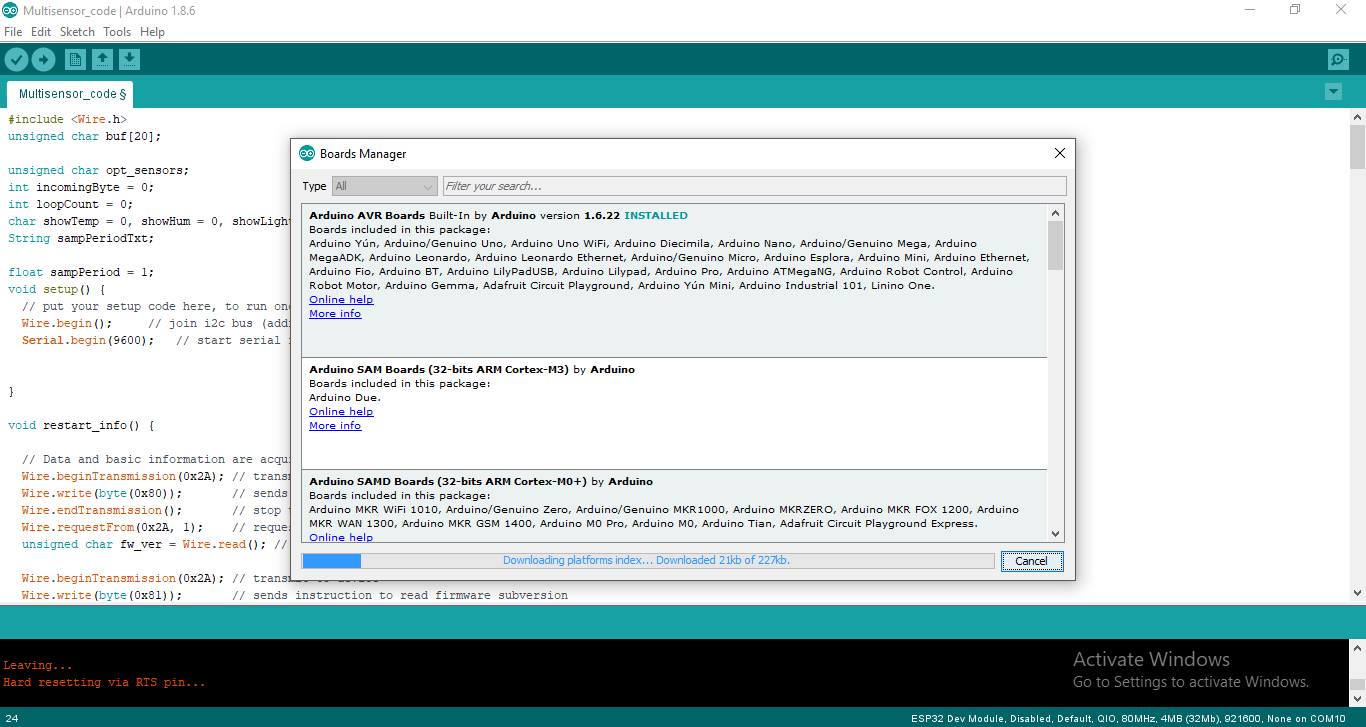
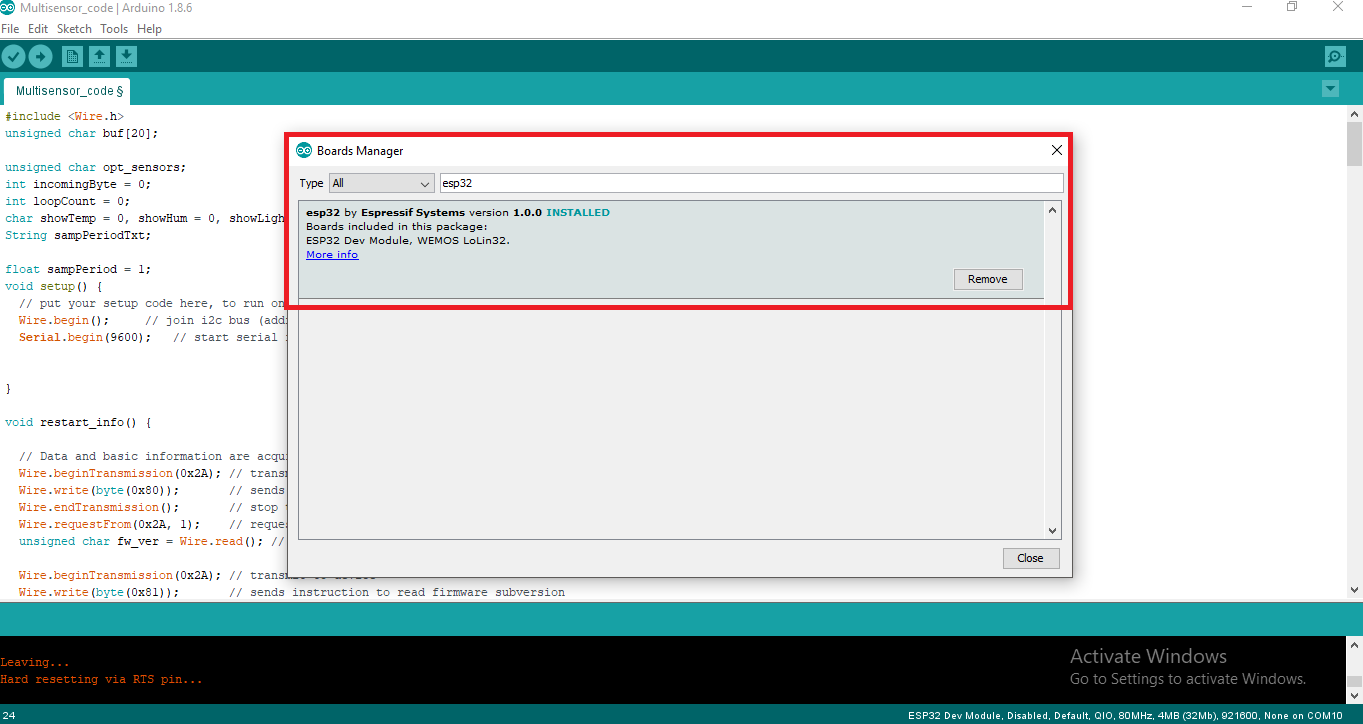
Search for ESP32 and install the package.
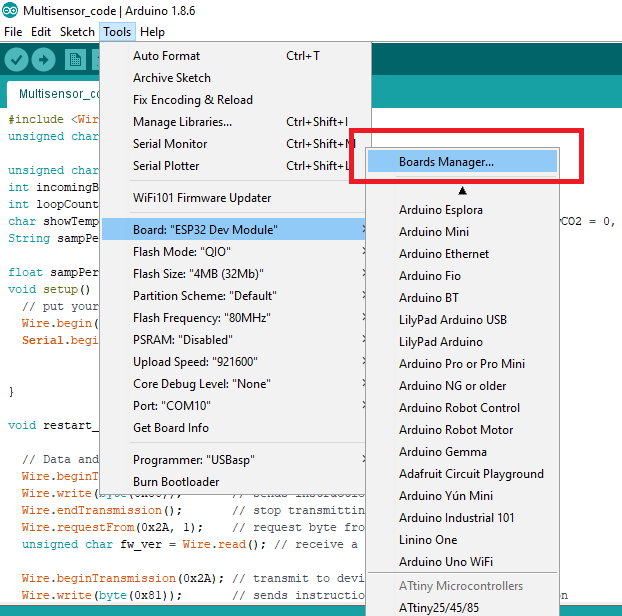
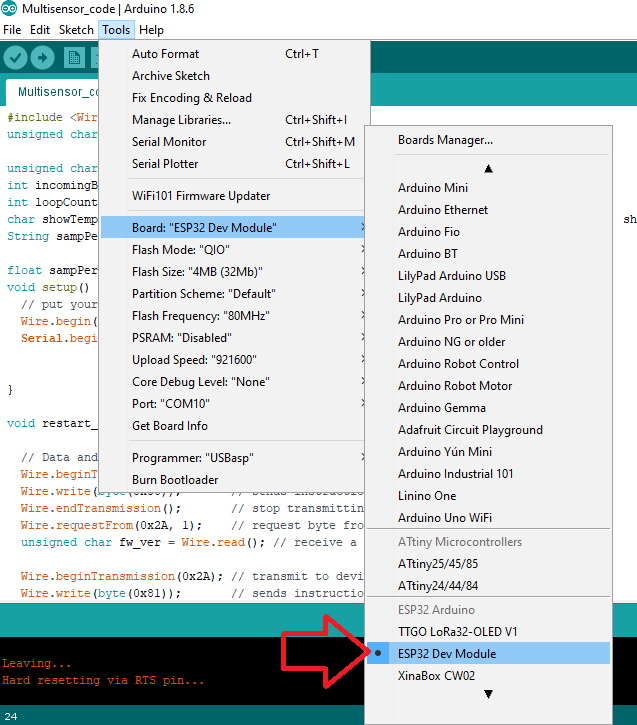
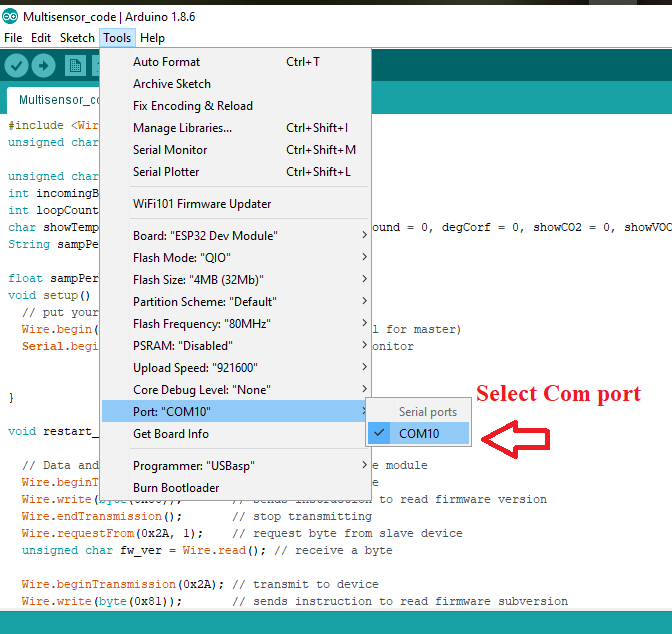
Again, go to Tools and select your ESP32 board and COM Port.
Upload Source Code
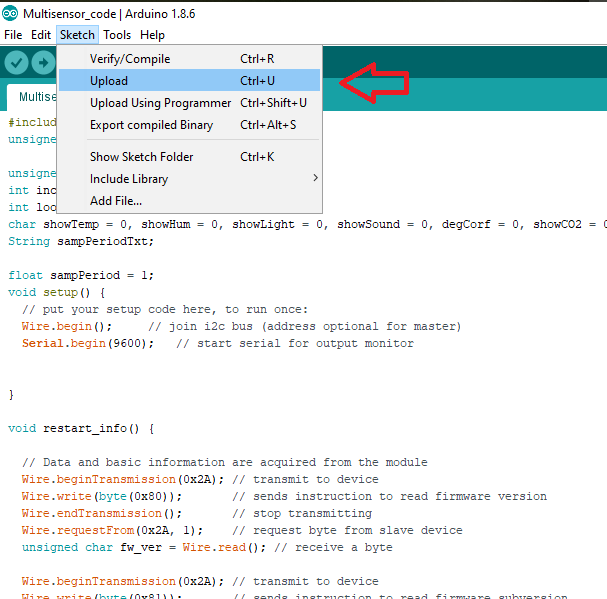
Copy the source code below, paste it into the Arduino IDE, and upload it. You might have to long press the boot button on the ESP32 board during uploading.
#include <Wire.h>
unsigned char buf[20];
unsigned char opt_sensors;
int incomingByte = 0;
int loopCount = 0;
char showTemp = 0, showHum = 0, showLight = 0, showSound = 0, degCorf = 0, showCO2 = 0, showVOC = 0, showPwr = 0, showEvents = 0;
String sampPeriodTxt;

float sampPeriod = 1;
void setup() {
  // put your setup code here, to run once:
  Wire.begin();         // join i2c bus (address optional for master)
  Serial.begin(9600);      // start serial for output monitor


}

void restart_info() {

  // Data and basic information are acquired from the module
  Wire.beginTransmission(0x2A); // transmit to device
  Wire.write(byte(0x80));       // sends instruction to read firmware version
  Wire.endTransmission();       // stop transmitting
  Wire.requestFrom(0x2A, 1);    // request byte from slave device
  unsigned char fw_ver = Wire.read(); // receive a byte

  Wire.beginTransmission(0x2A); // transmit to device
  Wire.write(byte(0x81));       // sends instruction to read firmware subversion
  Wire.endTransmission();       // stop transmitting
  Wire.requestFrom(0x2A, 1);    // request byte from slave device
  unsigned char fw_sub_ver = Wire.read(); // receive a byte

  Wire.beginTransmission(0x2A); // transmit to device
  Wire.write(byte(0x82));       // sends instruction to read optional sensors byte
  Wire.endTransmission();       // stop transmitting
  Wire.requestFrom(0x2A, 1);    // request byte from slave device
  opt_sensors = Wire.read();     // receive a byte

  delay(1000);

  //If device contains additional CO2 and audio sensor, it is indicated here
  Serial.print("AmbiMate sensors: 4 core");
  if (opt_sensors & 0x01)
    Serial.print(" + CO2");
  if (opt_sensors & 0x04)
    Serial.print(" + Audio");
  Serial.println(" ");

  Serial.print("AmbiMate Firmware version ");
  Serial.print(fw_ver);
  Serial.print(".");
  Serial.println(fw_sub_ver);

  Serial.print("Select which sensors to receive data from:\n");
  Serial.print("Temperature [Y/N]: ");
  while (Serial.available() == 0);
  showTemp = Serial.read();
  Serial.println(showTemp);

  Serial.print("deg C or F [C/F]: ");
  while (Serial.available() == 0);
  degCorf = Serial.read();
  Serial.println(degCorf);

  Serial.print("Humidity [Y/N]: ");
  while (Serial.available() == 0);
  showHum = Serial.read();
  Serial.println(showHum);

  Serial.print("Ambient Light [Y/N]: ");
  while (Serial.available() == 0);
  showLight = Serial.read();
  Serial.println(showLight);

  if (opt_sensors & 0x04)
  {
    Serial.print("Audio [Y/N]: ");
    while (Serial.available() == 0);
    showSound = Serial.read();
    Serial.println(showSound);
  }

  if (opt_sensors & 0x01)
  {
    Serial.print("eCO2 [Y/N]: ");
    while (Serial.available() == 0);
    showCO2 = Serial.read();
    Serial.println(showCO2);

    Serial.print("VOC [Y/N]: ");
    while (Serial.available() == 0);
    showVOC = Serial.read();
    Serial.println(showVOC);
  }

  Serial.print("Power [Y/N]: ");
  while (Serial.available() == 0);
  showPwr = Serial.read();
  Serial.println(showPwr);

  Serial.print("PIR and Motion Events [Y/N]: ");
  while (Serial.available() == 0);
  showEvents = Serial.read();
  Serial.println(showEvents);

  Serial.print("\n");
  Serial.print("Sample Interval[Secs]: ");
  while (Serial.available() == 0);
  sampPeriodTxt = "";
  while (Serial.available() > 0)
  {
     int inChar = Serial.read();
     sampPeriodTxt += (char)inChar;
  }
  Serial.println(sampPeriodTxt);
  sampPeriod = sampPeriodTxt.toFloat();
  if (sampPeriod < 0.5)
  {
    sampPeriod = 0.5;
    Serial.print("Input exceeds limits, Sample period set to minimum, 0.5 seconds\n");
  }
  sampPeriod = sampPeriod * 1000;   // convert to mSecs
}

//Top line of headings are printed using the following
void printLabels(void) {

  Serial.println(" ");
  Serial.println(" ");
  // Construct the first line of the headings
  if ((showTemp == 'Y') || (showTemp == 'y'))
    Serial.print("Temperature\t");
  if ((showHum == 'Y') || (showHum == 'y'))
    Serial.print("Humidity\t");
  if ((showLight == 'Y') || (showLight == 'y'))
    Serial.print("Light\t");
  if (opt_sensors & 0x04)
  {
    if ((showSound == 'Y') || (showSound == 'y'))
      Serial.print("Audio\t");
  }
  if (opt_sensors & 0x01)
  {
    if ((showCO2 == 'Y') || (showCO2 == 'y'))
      Serial.print("eCO2\t");
    if ((showVOC == 'Y') || (showVOC == 'y'))
      Serial.print("VOC\t");
  }
  if ((showPwr == 'Y') || (showPwr == 'y'))
    Serial.print("Power\t");
  if ((showEvents == 'Y') || (showEvents == 'y'))
    Serial.print("Event\n");
  else
    Serial.print("\n");

  // Construct the second line of the headings
  if ((showTemp == 'Y') || (showTemp == 'y'))
  {
    if ((degCorf == 'F') || (degCorf == 'f'))
      Serial.print("deg F\t\t");
    else
      Serial.print("deg C\t\t");
  }
  if ((showHum == 'Y') || (showHum == 'y'))
    Serial.print("%\t\t");
  if ((showLight == 'Y') || (showLight == 'y'))
    Serial.print("Lux\t");
  if (opt_sensors & 0x04)
  {
    if ((showSound == 'Y') || (showSound == 'y'))
      Serial.print("dB\t");
  }
  if (opt_sensors & 0x01)
  {
    if ((showCO2 == 'Y') || (showCO2 == 'y'))
      Serial.print("PPM\t");
    if ((showVOC == 'Y') || (showVOC == 'y'))
      Serial.print("PPB\t");
  }
  if ((showPwr == 'Y') || (showPwr == 'y'))
    Serial.print("volts");
  Serial.print("\n");
}

//Loop starts here
void loop() {
  if (loopCount == 0)
  {
    restart_info();
    loopCount = 1;
  }
  if (loopCount == 1)
  {
    printLabels();
    loopCount = 2;
  }
  // All sensors except the CO2 sensor are scanned in response to this command
  Wire.beginTransmission(0x2A); // transmit to device
  // Device address is specified in datasheet
  Wire.write(byte(0xC0));       // sends instruction to read sensors in next byte
  Wire.write(0xFF);             // 0xFF indicates to read all connected sensors
  Wire.endTransmission();       // stop transmitting
  // Delay to make sure all sensors are scanned by the AmbiMate
  delay(100);

  Wire.beginTransmission(0x2A); // transmit to device
  Wire.write(byte(0x00));       // sends instruction to read sensors in next byte
  Wire.endTransmission();       // stop transmitting
  Wire.requestFrom(0x2A, 15);    // request 6 bytes from slave device

  // Acquire the Raw Data
  unsigned int i = 0;
  while (Wire.available()) { // slave may send less than requested
    buf[i] = Wire.read(); // receive a byte as character and store in buffer
    i++;
  }

  // convert the raw data to engineering units, see application spec for more information
  unsigned int status = buf[0];
  float temperatureC = (buf[1] * 256.0 + buf[2]) / 10.0;
  float temperatureF = ((temperatureC * 9.0) / 5.0) + 32.0;
  float Humidity = (buf[3] * 256.0 + buf[4]) / 10.0;
  unsigned int light = (buf[5] * 256.0 + buf[6]);
  unsigned int audio = (buf[7] * 256.0 + buf[8]);
  float batVolts = ((buf[9] * 256.0 + buf[10]) / 1024.0) * (3.3 / 0.330);
  unsigned int co2_ppm = (buf[11] * 256.0 + buf[12]);
  unsigned int voc_ppm = (buf[13] * 256.0 + buf[14]);

  if ((showTemp == 'Y') || (showTemp == 'y'))
  {
    if ((degCorf == 'F') || (degCorf == 'f'))
      Serial.print(temperatureF, 1);
    else
      Serial.print(temperatureC, 1);
    Serial.print("\t\t");
  }
  if ((showHum == 'Y') || (showHum == 'y'))
  {
    Serial.print(Humidity, 1);
    Serial.print("\t\t");
  }
  if ((showLight == 'Y') || (showLight == 'y'))
  {
    Serial.print(light);
    Serial.print("\t");
  }
  if (opt_sensors & 0x04)
  {
    if ((showSound == 'Y') || (showSound == 'y'))
    {
      Serial.print(audio);
      Serial.print("\t");
    }
  }
  if (opt_sensors & 0x01)
  {
    if ((showCO2 == 'Y') || (showCO2 == 'y'))
    {
      Serial.print(co2_ppm);
      Serial.print("\t");
    }
    if ((showVOC == 'Y') || (showVOC == 'y'))
    {
      Serial.print(voc_ppm);
      Serial.print("\t");
    }
  }
  if ((showPwr == 'Y') || (showPwr == 'y'))
  {
    Serial.print(batVolts);
    Serial.print("\t");
  }
  if ((showEvents == 'Y') || (showEvents == 'y'))
  {
    if (status & 0x80)
      Serial.print("  PIR_EVENT");
    if (status & 0x02)
      Serial.print("  AUDIO_EVENT");
    if (status & 0x01)
      Serial.print("  MOTION_EVENT");
  }
  Serial.print("\n");

  // all sensors except the CO2\VOC sensor are scanned at this rate.
  // CO2/VOC sensor is only updated in AmbiMate every 60 seconds
  delay(sampPeriod - 100);

  incomingByte = Serial.read();

  if ((incomingByte == 'R') || (incomingByte == 'r'))
  {
    //Serial.print("Got R\n");
    loopCount = 0;
  }
}
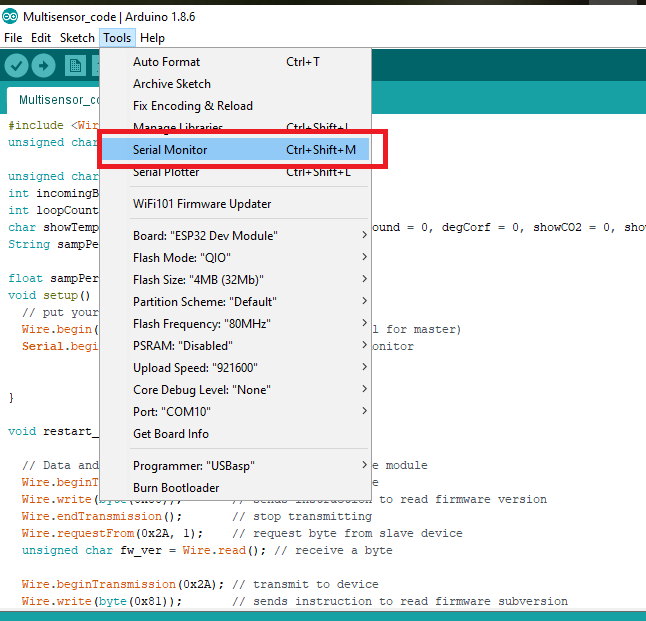
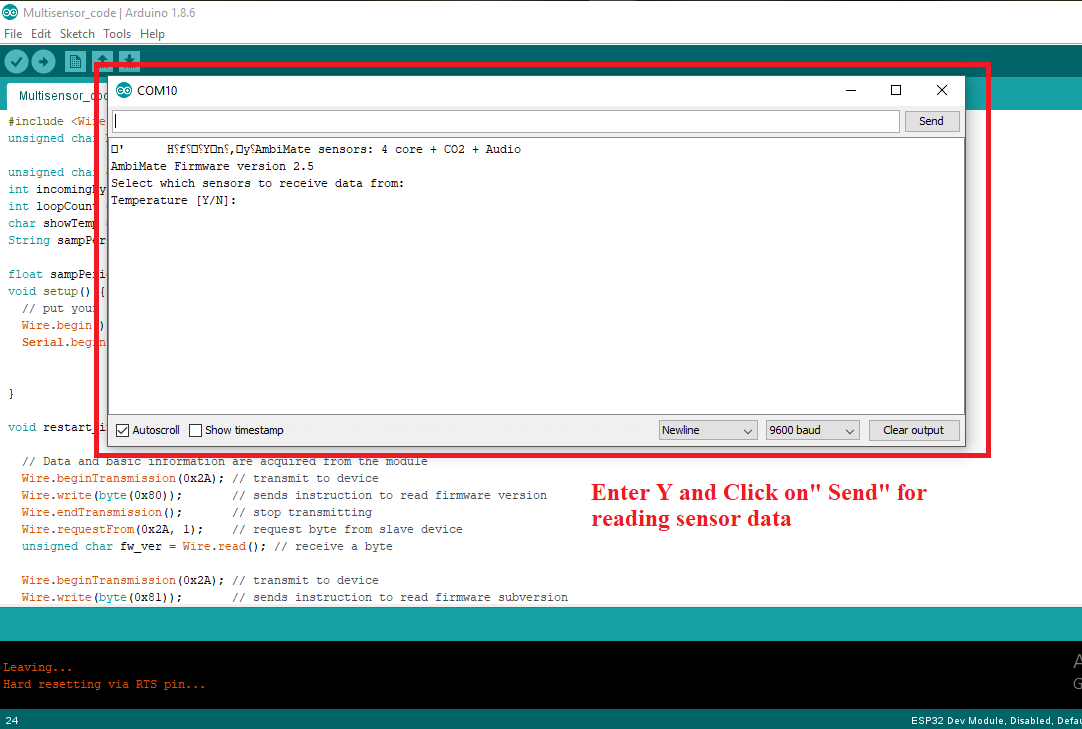
After uploading the code, click on Serial Monitor.
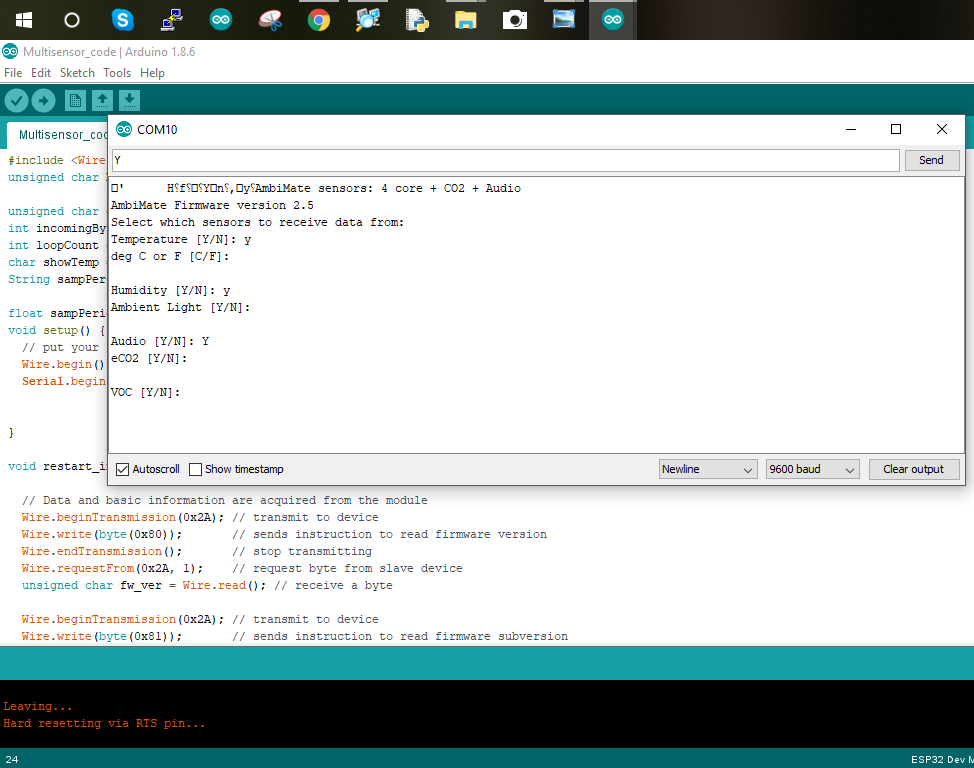
Choose which sensors you would like to enable by typing and sending ‘Y’ to select it.
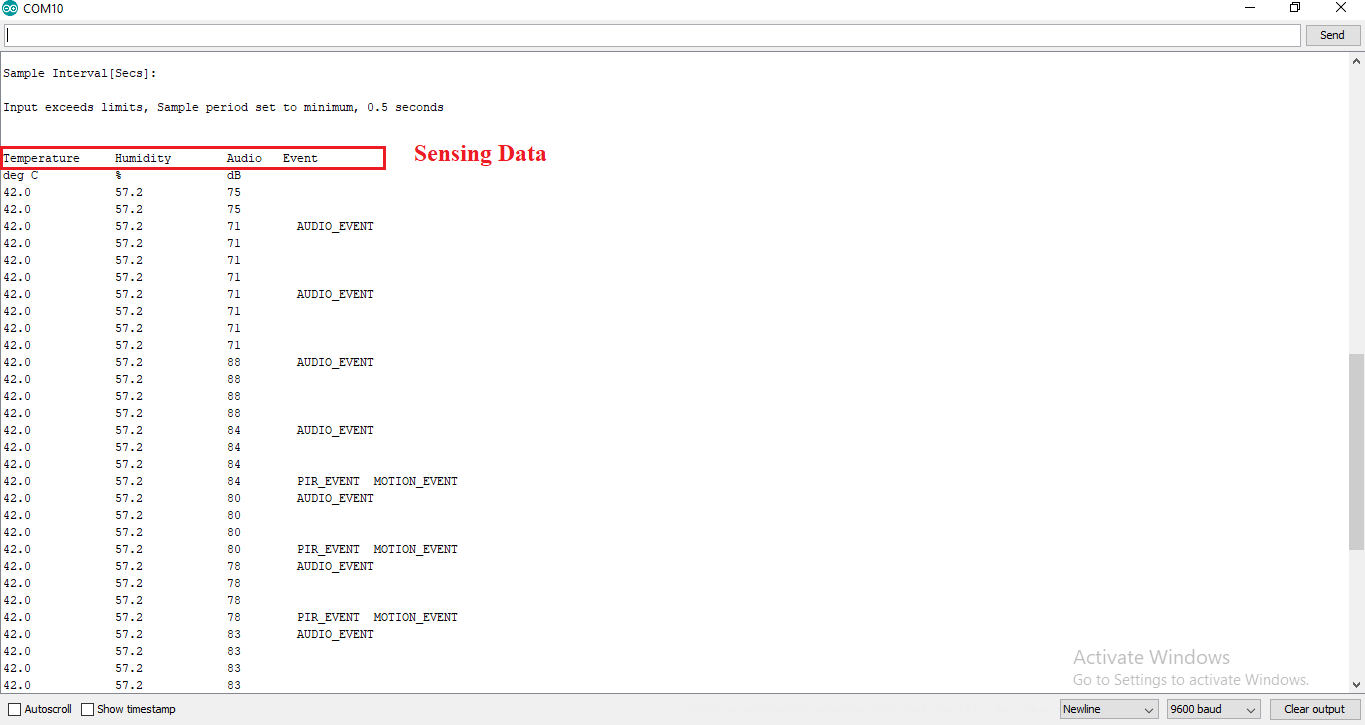
You will now be able to see the sensor data coming in.
I hope this super sensor module comes in handy for your future projects!