|
/************************************************************* |
|
Wemos Lolin32 Lite (ESP32) |
|
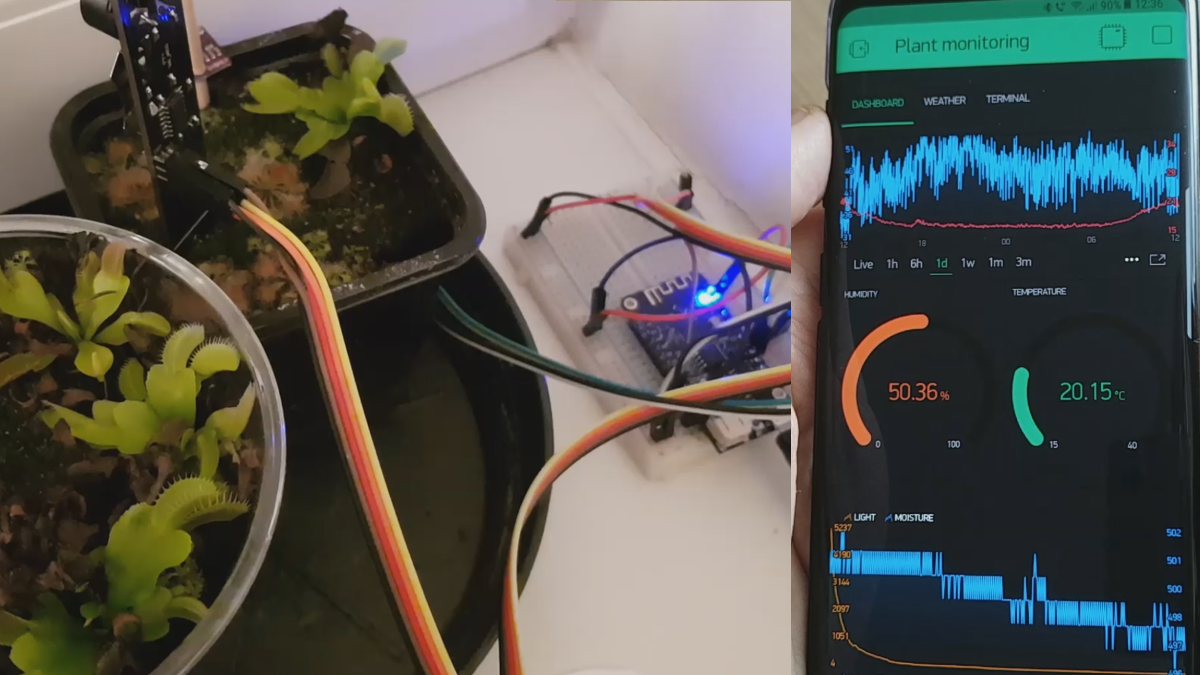
Plant monitoring example |
|
by Petr Lukas |
|
|
|
Simple device setup, which allows to monitor temperature, |
|
moisture, air pressure, light level and soil moisture |
|
|
|
************************************************************* |
|
BLYNK LIBRARY |
|
|
|
Download latest Blynk library here: |
|
https://github.com/blynkkk/blynk-library/releases/latest |
|
|
|
Downloads, docs, tutorials: http://www.blynk.cc |
|
Sketch generator: http://examples.blynk.cc |
|
Blynk community: http://community.blynk.cc |
|
Follow us: http://www.fb.com/blynkapp |
|
http://twitter.com/blynk_app |
|
|
|
************************************************************* |
|
BME280 LIBRARY |
|
|
|
Copyright (c) 2015, Embedded Adventures |
|
All rights reserved. |
|
|
|
Contact us at source [at] embeddedadventures.com |
|
www.embeddedadventures.com |
|
************************************************************* |
|
|
|
/* Comment this out to disable prints and save space */ |
|
#define BLYNK_PRINT Serial |
|
|
|
#include <Wire.h> |
|
|
|
// BME280 MOD-1022 weather multi-sensor Arduino demo |
|
// Written originally by Embedded Adventures |
|
#include <BME280_MOD-1022.h> |
|
|
|
#include <math.h> |
|
#include <WiFi.h> |
|
#include <WiFiClient.h> |
|
|
|
#include <BlynkSimpleEsp32.h> |
|
|
|
// You should get Auth Token in the Blynk App. |
|
// Go to the Project Settings (nut icon). |
|
char auth[] = "YOUR BLYNK AUTH TOKEN"; |
|
|
|
// Chirp! variables |
|
const int sleepTimeS = 10; // 10 secs |
|
int moisture, light, i; |
|
int RESET_PIN = 27; |
|
|
|
// Your WiFi credentials. |
|
// Set password to "" for open networks. |
|
char ssid[] = "YOUR SSID"; |
|
char pass[] = "YOUR PASSWORD"; |
|
|
|
BlynkTimer timer; |
|
WidgetTerminal terminal(V1); |
|
|
|
// You can send commands from Terminal to your hardware. Just use |
|
// the same Virtual Pin as your Terminal Widget |
|
BLYNK_WRITE(V1) |
|
{ |
|
if (String("hello") == param.asStr()){ |
|
terminal.println("Hello I'm your ESP32, control me from Blynk terminal ;)"); |
|
} |
|
|
|
if (String("cls") == param.asStr()){ |
|
for (int i = 0; i <= 24; i++) { |
|
terminal.println(""); // "clear screen" in app. |
|
} |
|
terminal.println(); |
|
} |
|
// Ensure everything is sent |
|
terminal.flush(); |
|
} |
|
|
|
// I2C PINs setup, for Lolin32 Lite we go to setup PIN 16 (SDA) and 4 (SCL) |
|
#define SDA_PIN 16 |
|
#define SCL_PIN 4 |
|
#define LED_PIN 22 |
|
|
|
float temp; |
|
float humi; |
|
float pres; |
|
|
|
float diff = 32.00; |
|
|
|
void measureBME280(){ |
|
digitalWrite(LED_PIN, LOW); |
|
terminal.println("Measuring data..."); |
|
// need to read the NVM compensation parameters |
|
|
|
BME280.readCompensationParams(); |
|
/* Filter coefficients - higher numbers slow down changes, such as slamming doors |
|
* Possible settings: |
|
* fc_off |
|
* fc_2 |
|
* fc_4 |
|
* fc_8 |
|
* fc_16 |
|
*/ |
|
|
|
BME280.writeFilterCoefficient(fc_off); |
|
|
|
/* Oversampling reduces the noise from the sensor osSkipped, |
|
* Possible settings: |
|
* os1x, |
|
* os2x, |
|
* os4x, |
|
* os8x, |
|
* os16x |
|
*/ |
|
BME280.writeOversamplingPressure(os16x); |
|
BME280.writeOversamplingTemperature(os2x); |
|
BME280.writeOversamplingHumidity(os1x); |
|
|
|
// example of a forced sample. After taking the measurement the chip goes back to sleep |
|
BME280.writeMode(smForced); |
|
|
|
BME280.readMeasurements(); |
|
|
|
|
|
temp = BME280.getTemperatureMostAccurate(); |
|
humi = BME280.getHumidityMostAccurate(); |
|
pres = BME280.getPressureMostAccurate(); |
|
|
|
temp = roundVal(temp); |
|
humi = roundVal(humi); |
|
pres = roundVal(pres+diff); |
|
|
|
// Send debug data to terminal |
|
|
|
terminal.print("TEMP:"); |
|
terminal.println(temp); |
|
terminal.print("HUMI:"); |
|
terminal.println(humi); |
|
terminal.print("PRES:"); |
|
terminal.println(pres); |
|
terminal.flush(); |
|
|
|
digitalWrite(LED_PIN, HIGH); |
|
} |
|
|
|
float roundVal(float val){ |
|
val = val*100; |
|
val = round(val); |
|
val = val/100; |
|
return val; |
|
} |
|
|
|
//=============== BLYNK FUNCTIONS =============== |
|
void sendData() |
|
{ |
|
// Send data from BME280 to Blynk server |
|
terminal.println("Transfering data..."); |
|
|
|
|
|
Blynk.virtualWrite(V3, temp); |
|
Blynk.virtualWrite(V4, humi); |
|
Blynk.virtualWrite(V5, pres); |
|
// Send data from Chirp! to Blynk server |
|
Blynk.virtualWrite(V6, light); |
|
Blynk.virtualWrite(V7, moisture); |
|
// Send data to Blynk terminal |
|
Blynk.virtualWrite(V0, temp,humi,pres,light,moisture); |
|
|
|
terminal.flush(); |
|
} |
|
|
|
//=============== RUN MEASUREMENT =============== |
|
void procesData(){ |
|
measureBME280(); |
|
Serial.print("Temp="); |
|
Serial.println(temp); |
|
Serial.print("Humidity="); |
|
Serial.println(humi); |
|
Serial.print("Pressure="); |
|
Serial.println(pres); |
|
|
|
measureChirp(); |
|
} |
|
|
|
//=============== CHIRP I2C FUNCTIONS =============== |
|
// Write to Chirp! register |
|
void writeI2CRegister8bit(int addr, int value) { |
|
Wire.beginTransmission(addr); |
|
Wire.write(value); |
|
Wire.endTransmission(); |
|
} |
|
|
|
// Read from Chirp! register |
|
unsigned int readI2CRegister16bit(int addr, int reg) { |
|
Wire.beginTransmission(addr); |
|
Wire.write(reg); |
|
Wire.endTransmission(); |
|
delay(1100); |
|
Wire.requestFrom(addr, 2); |
|
unsigned int t = Wire.read() << 8; |
|
t = t | Wire.read(); |
|
return t; |
|
} |
|
|
|
// Switches Chirp! to monitor mode |
|
bool switchChirp(){ |
|
i = 0; |
|
|
|
pinMode(RESET_PIN, OUTPUT); |
|
digitalWrite(RESET_PIN, LOW); |
|
delay(10); |
|
digitalWrite(RESET_PIN, HIGH); |
|
delay(100); |
|
|
|
while(i < 20){ |
|
if(light <= 0){ |
|
writeI2CRegister8bit(0x20, 3); |
|
delay(1000); |
|
light = readI2CRegister16bit(0x20, 4); |
|
delay(1000); |
|
Serial.println(light); |
|
} else { |
|
Serial.println(light); |
|
Serial.println("Chirp! device is now switched to monitor mode"); |
|
return true; |
|
} |
|
i++; |
|
delay(100); |
|
} |
|
|
|
if(light < 0){ |
|
return false; |
|
} |
|
} |
|
|
|
// Run measurement on Chirp! sensor load data to ligth and moisture variables |
|
void measureChirp(){ |
|
Serial.print("Moisture="); |
|
moisture = readI2CRegister16bit(0x20, 0); |
|
Serial.println(moisture); //read capacitance register |
|
|
|
if(moisture < 0) switchChirp(); |
|
|
|
writeI2CRegister8bit(0x20, 3); //request light measurement |
|
Serial.print("Light="); |
|
|
|
timer.setTimeout(10000, readLight); |
|
terminal.print("MOIS:"); |
|
terminal.println(moisture); |
|
terminal.flush(); |
|
} |
|
|
|
void readLight(){ |
|
light = readI2CRegister16bit(0x20, 4); |
|
Serial.println(light); |
|
terminal.print("LGHT:"); |
|
terminal.println(light); |
|
terminal.flush(); |
|
|
|
// After the light is returned data are sent to Blynk |
|
sendData(); |
|
} |
|
|
|
//=============== MAIN SETUP AND LOOP =============== |
|
void setup() |
|
{ |
|
pinMode(LED_PIN, OUTPUT); |
|
|
|
// Debug console |
|
terminal.println("Starting serial interface..."); |
|
Serial.begin(115200); |
|
|
|
terminal.println("Connecting to WiFi..."); |
|
Blynk.begin(auth, ssid, pass); |
|
|
|
terminal.println("ESP32 is in standby mode"); |
|
terminal.flush(); |
|
|
|
timer.setInterval(60000L, procesData); |
|
|
|
// BME280 setup |
|
Wire.begin(SDA_PIN, SCL_PIN); |
|
|
|
// Switch Chirp! to monitor mode |
|
if(!switchChirp()) Serial.println("Unable to switch to monitor mode"); |
|
|
|
// First measurement |
|
measureBME280(); |
|
measureChirp(); |
|
} |
|
|
|
void loop() |
|
{ |
|
Blynk.run(); |
|
timer.run(); |
|
// You can inject your own code or combine it with other sketches. |
|
// Check other examples on how to communicate with Blynk. Remember |
|
// to avoid delay() function! |
|
} |