Learn how to assemble a 12V solar panel from cells, which can then be used for some outdoor projects in the future!
The inspiration can come from anywhere — perhaps an especially power-hungry weather station or it’s FPV rover inspired. No matter their area of expertise, most tinkerers, makers, and engineers decide to experiment with power generation eventually.
Though there is a plethora of generator types, one of the most popular methods among hobbyists, both for its simplicity and its decreasing cost, is photovoltaic solar panel technology. Before purchasing either a fully manufactured PV solar panel or a set of PV solar cells to build one yourself, enjoy my good and bad experiences with both options to help you determine the best solution for your project.
Choosing Components
Before you invest in photovoltaic panels for your project, here are some factors to consider.
Do: Research Before You Purchase
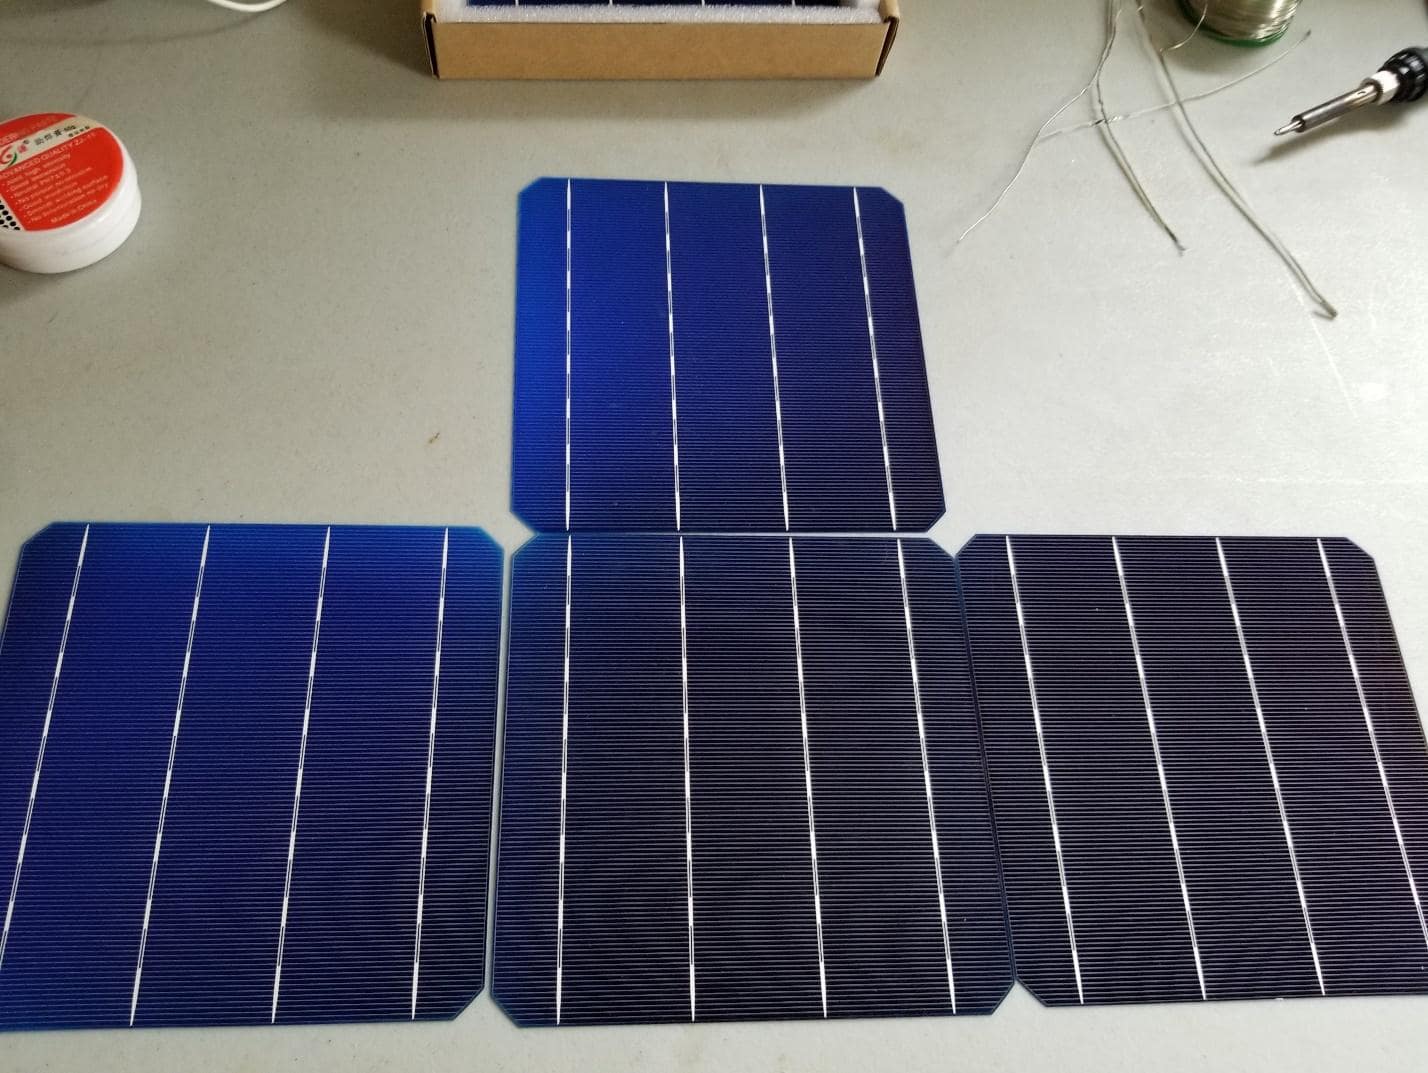
For both solar cells and solar panels, look into the seller and their product before purchasing. Many panels and cells sport similar appearances, but differ in power output. For a couple of dollars, your solar cells may only be rated for 2.5W instead of 5W.
Don’t: Assume You Can Easily Build a Solar Panel
Honestly, I believe building a solar panel from un-tabbed cells to be a whole project on its own. It involves long periods of precise soldering, metalworking, and glass or plastic cutting. If this is your first time experimenting with solar power, or you are not experienced with soldering, opt for a panel instead of individual cells.
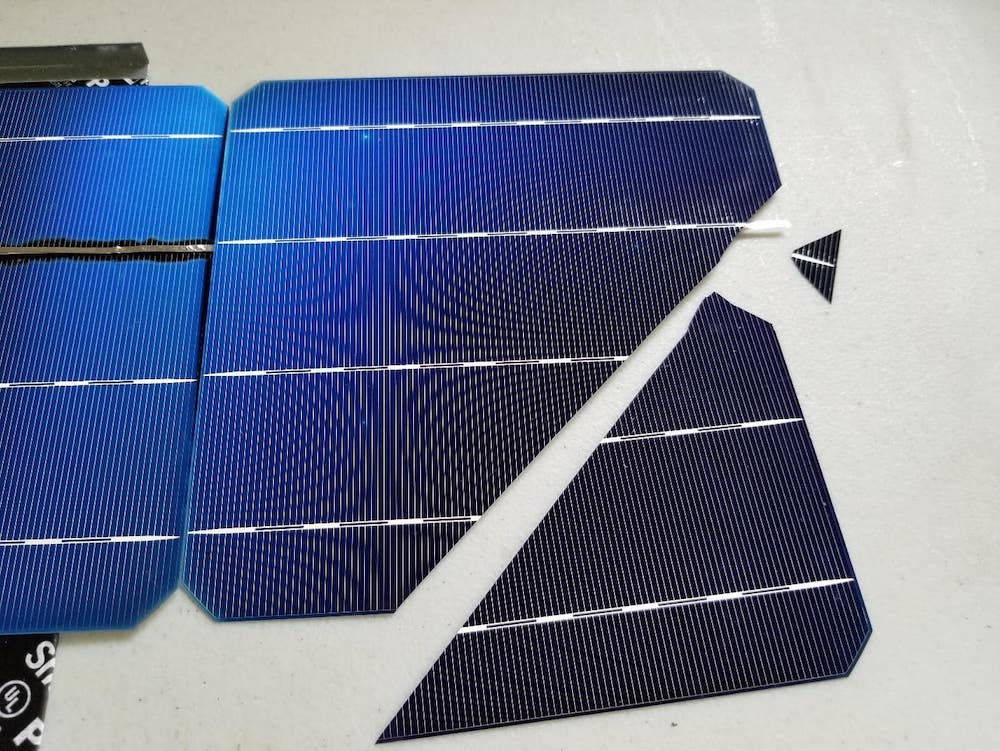
Do: Buy Cells Instead of a Panel if You Need a Custom Size or Shape
Imagine your project is a T-shaped robot, and you absolutely need the solar panel to be T-shaped. The best option is to either make do with a square panel, or make a T-shaped panel yourself.
Example of oddly shaped solar cell configuration
Though this is an extreme example, the best reason to buy cells over a pre-built solar panel if the flexibility of the structure as a whole. Your cells can be arranged almost any way you want and can fit your projects’ requirements closer than a standard panel.
Don’t: Buy Cells Instead of a Panel Just to Save Money
While buying cells does give you more power per dollar, the increased effort and availability of other materials should be taken into consideration. This solar panel generates 100W max compared to 5W max each from these cells.
After purchasing enough cells, tabbing wire, solder flux, the backing materials, and the cover materials, you could save $10-$20 if you make your own. That extra $20 might not be worth it if you need to work a few hours more for them. Especially if the solar panel is not the largest part of your project.
Assembly
After decided on panels or cells, here are other factors to consider before assembling your project. Note: Most of these will be geared towards solar cells as they are not as easy to install as panels.
Do: Remember That Solar Cells are Extremely Brittle
The best advice I can give you from this whole article: handle each cell as if it were a thin piece of glass covered with pebbles of varying sizes. If you move your hands too quickly in the wrong direction, air resistance will snap your cell in two. If you accidentally drop your cell, it will gently float down like a piece of paper until it hits the ground and cracks in five.
Picture of my heart breaking
Don’t: Forget to Clean Your Workbench
A few bits of sawdust under your solar cell may be the end of it. While you are soldering, there is only so much pressure the cells can take before they crack. Thoroughly clean off your workbench and make sure the surface you will be working on is free of lumps or similar imperfections.
Do: Use Flux When Soldering Tabs Onto Your Cells
When soldering a couple of wires or some other quick job, I sometimes forego the soldering paste. With solar cells though, I recommend actually utilizing it so that the cells spend less time under your soldering iron.
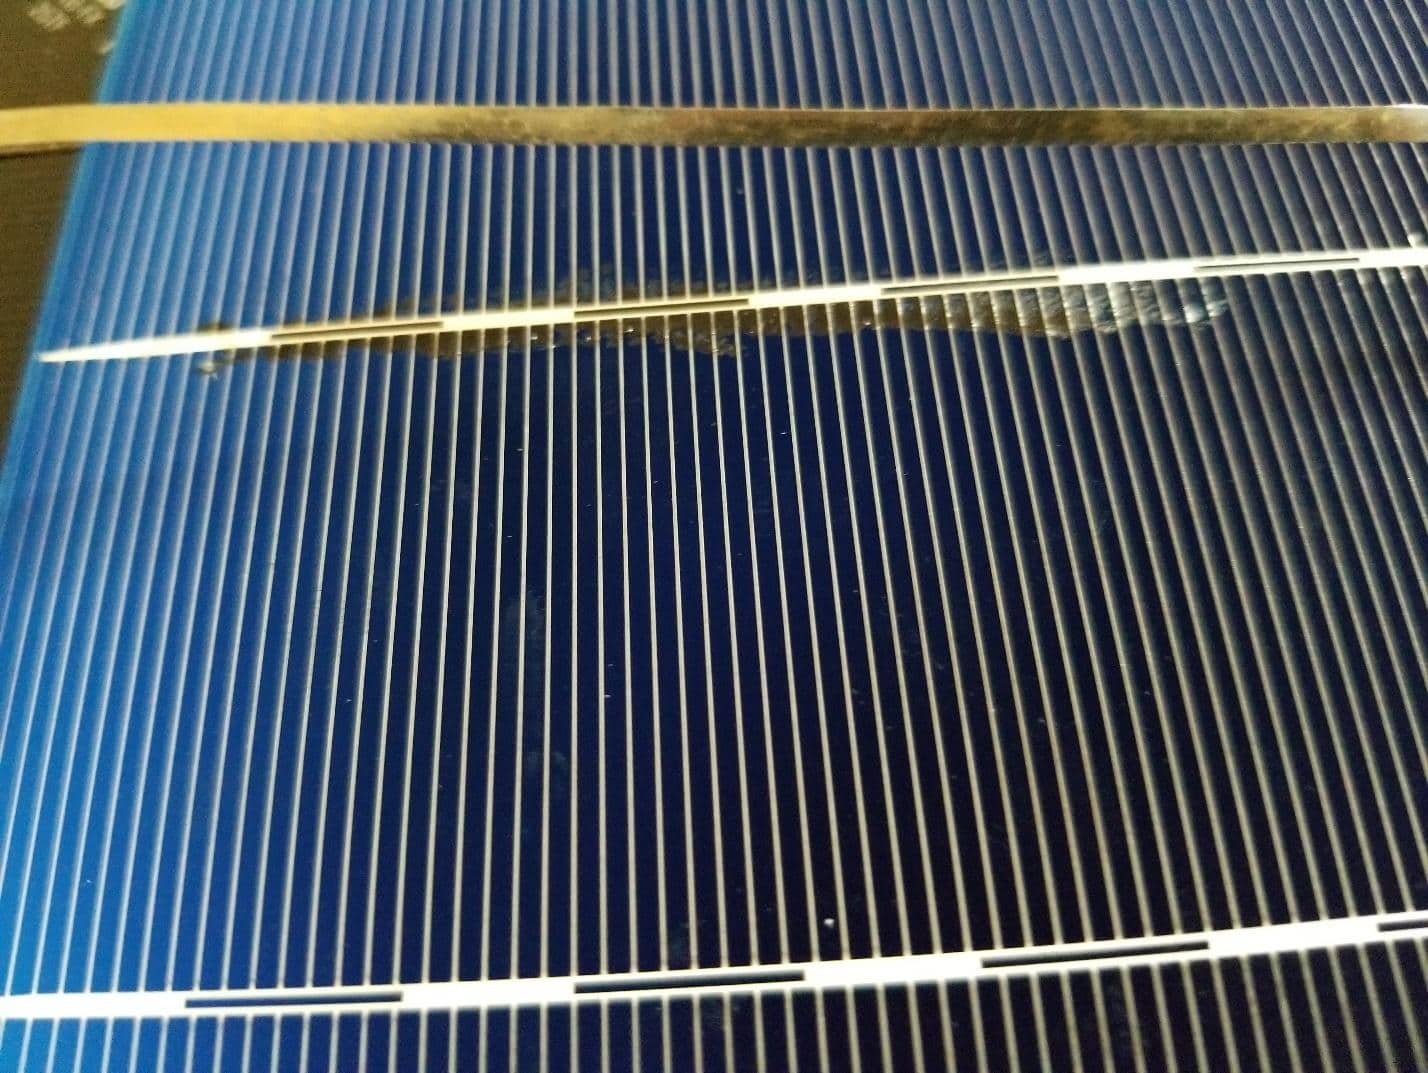
Don’t: Make Bad/Uneven Solder Joints
Doing a bad soldering job on the front of your panel will not only look ugly, it could potentially cause problems when you decide to cover your newly-assembled panel. Doing this on the back though, could be the end of your cells. The extra solder will push up your cells from the flat back cover and could damage them. That is what happened to mine.
Do: Solar Panel Placement is Everything
Location, location, location decides the fate of businesses and solar panel projects alike. That may be a bit of an exaggeration, but power output will vary depending on weather conditions, overhead obstruction, and other factors that cannot always be controlled. For that reason, focus on the correct placement of your solar panel from the start.
Keep in mind which direction the sun rises from, and trim any small branches that may block sunlight from reaching your panel. If your panel will go on a mobile project, look for ideal stopping positions so your project may be left charging.
Don’t: Forget Maintenance
Just because you managed to build a solar panel, or you bought one already assembled, and installed it does not mean your green energy adventure is over. Panels must be cleaned regularly to maintain their efficiency. Leaves, bird droppings, dirt, and other obstructions should be removed as soon as possible. Periodically check nearby trees’ limbs to prevent cracked panels.
A Quick Solar Panel Design
If you decide to purchase solar cells to make your own photovoltaic solar panel, here is a quick guide. Please note that this is not meant as a complete tutorial, but as a suggestion for your own panel builds. Also, wear appropriate protective gear when soldering, cutting metal, or other potentially harmful processes.
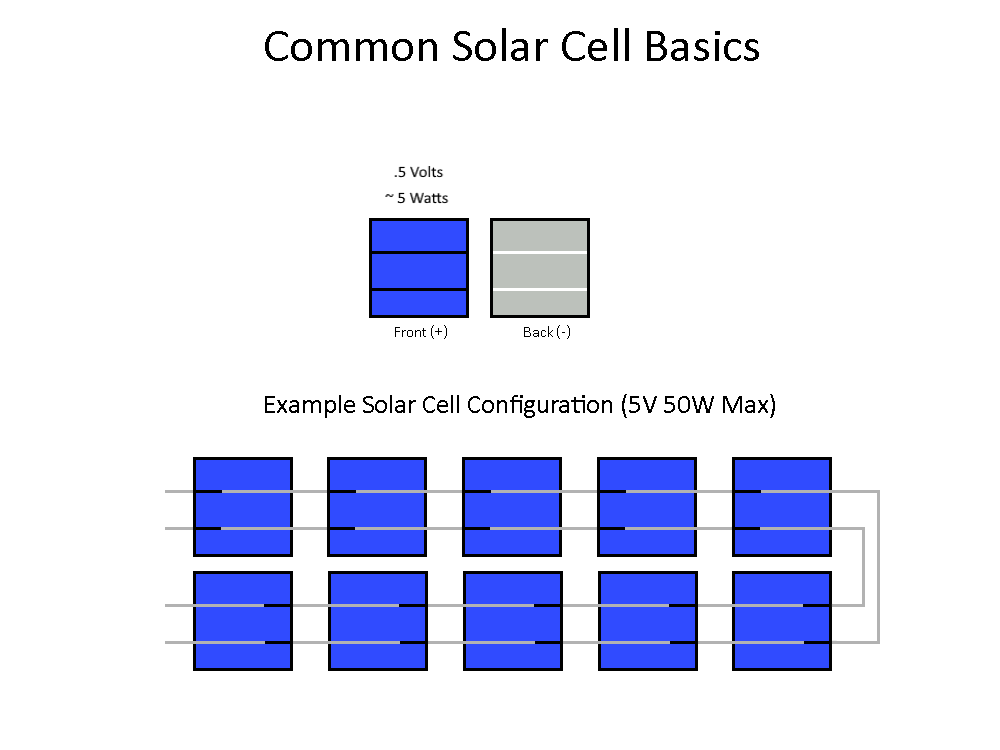
To join two solar cells in series, first, apply flux to the indicator lines on the front(blue) of one and the back(gray) of another. This is where you will solder your tabbing wire. The bottom of one panel and the top of the other will need tabbing wire as well, either to connect to other panels, or as the output. For parallel, do the same except solder front to front and back to back. Connect the other eight as shown in the image below.
Next, pick a solid backing material for your panel. I chose a piece of sheet metal that was thick enough to not bend, but not thick enough to be heavy. Each cell is 6”x6”, with the configuration above that means a 2.5’x1’ piece is the minimum size just for the cells. I recommend adding at least 5 inches to each measurement as a safety margin. Once cut to size, insulate it from your solar cells.
Cut a piece of plexiglass or other transparent material to the same size. This will be used to cover your panel. After adding spacers to ensure your cover is not sitting directly on the cells, secure it to the backing material with screws. This is where that 5-inch safety margin comes in handy.
After this, you should have a bare-bones solar panel! Hook up your voltmeter and it should read 5V. In the future, you may want to waterproof it, improve its materials, increase the size of it, or add a built-in voltage regulator. Oh, one last thing, please handle these with care.
Best of luck!