A function generator is used to generate all sorts of electrical waveforms. Learn to build an app-based one here!
There are a variety of mobile or online function generator apps capable of producing a range of tones and signals for sound synthesis and effects. With a mobile or online function generator app, an audio oscillator can easily be built. An audio oscillator is the fundamental building block of electronic music synthesizers.
In this hands-on tutorial, you will learn how to use a mobile or online function generator to build an audio oscillator and use an 8-pin power amplifier to amplify the function generator’s electrical waveform signals produced by the digital app. You will be able to hear the function generator’s electrical waveform signals through an 8Ohm speaker.
Required Hardware
- 7805 Linear Voltage Regulator: U1
- LM386 Power Amplifier Integrated Circuit: U2
- 8-ohm (Ω) Speaker: SPKR1
- 470µFD (microfarad) Electrolytic capacitor: C3
- 0.1uFD ceramic disc capacitors: C1 and C2
- 9V battery snap connector
- Mono male plug (3.5 x14 mm): PL1
- Function Generator App: mobile or online
- Solderless breadboard
- Jumper wires
Before discussing the tutorial project build, let’s review the basics of function generators.
Function Generator Basics
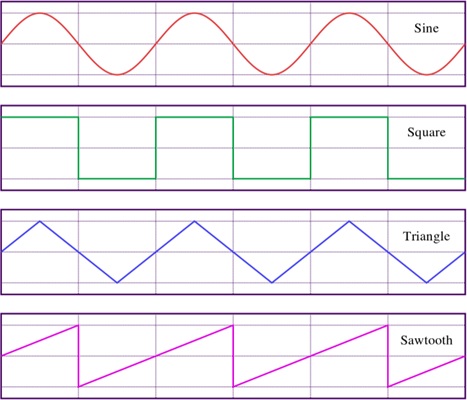
A function generator is a piece of electronic test equipment gear that can generate a variety of electrical waveforms. The common electrical waveforms produced by a function generator are sine, square, triangle, and sawtooth.
With a function generator, the electrical waveforms can be enabled to run in a repetitive or single-shot mode. The electrical waveforms produced within the function generator are produced using analog or digital circuitry. Generally, function generator electrical waveforms are created using an integrated circuit (IC).
Figure 1. Typical function generator electrical waveforms.
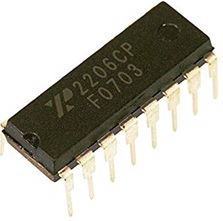
One IC typically used to create these electrical waveforms is the XR2206, shown in Figure 2.
Figure 2. The XR2206 Function Generator IC.
Function generators are used to provide an input stimulus for the circuit or system under test. Besides injecting electrical waveforms signals, function generators allow other important testing parameters to be analyze with the device under test (DUT). Such testing adjustment features include DC offset, arbitrary waveforms, predictable distortion, and noise sources. These special testing adjustment features allow further circuit and system analysis of the DUT being modified or diagnosed for device failure.
Now that the basics of a function generator have been discussed, let’s move onto building an app-based function generator audio oscillator.
Building the App-based Function Generator Audio Oscillator
You will need four basic components to build the audio oscillator:
- The function generator app (mobile or online)
- 7805 +5V linear voltage regulator (VR) IC
- LM386 power amplifier (PA) IC
- 8-Ohm speaker
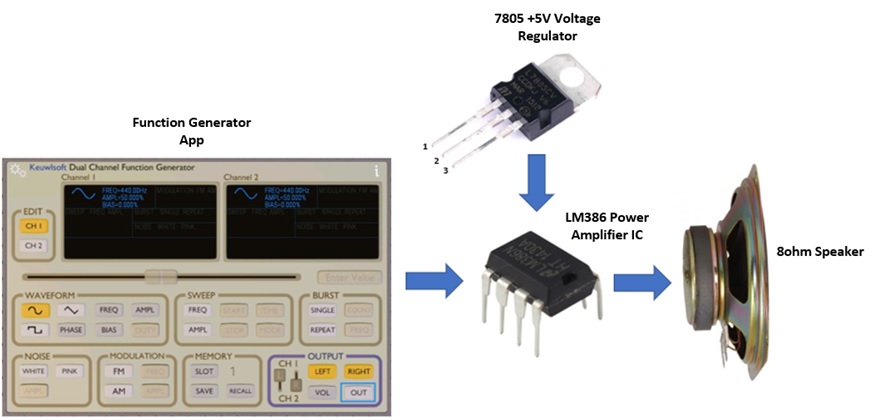
The components are arranged to complete the audio oscillator as shown in Figure 3.
Figure 3. Pictographic Block diagram of the App-based Function Generator Audio Oscillator.
You can download a variety of function generator mobile apps from Google’s Playstore or Apple’s App Store. An example of a mobile app shown in Figure 3 is Keuwlsoft’s Dual Function Generator software from the Google Playstore. This mobile app provides the basic electrical waveforms of sine, square, sawtooth, and triangle.
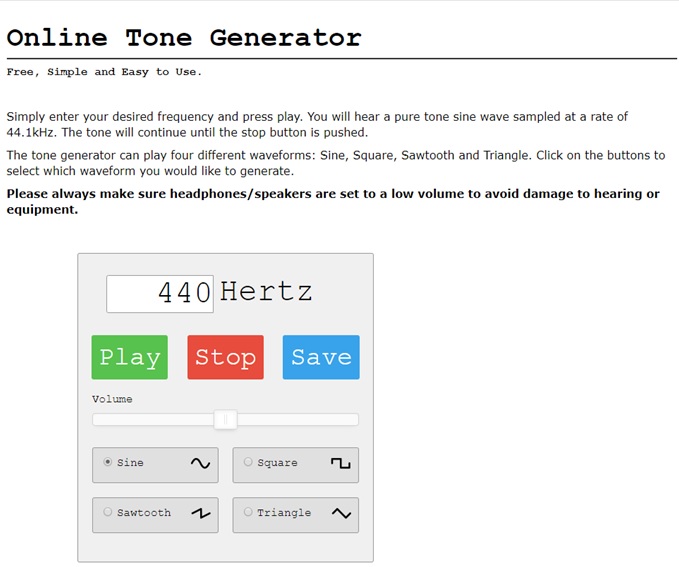
Besides a mobile app, you can also use online function generator apps with this tutorial project. One such online function generator is the Online Tone Generator app. The online tone generator is simple to use and provides all four electrical waveforms. In addition, you can download the selected tone, save it to a hard or thumb drive, and use it offline for additional frequency synthesis, tone generation projects, and sound experiments.
Figure 4. The simple and easy to use Online Tone Generator app
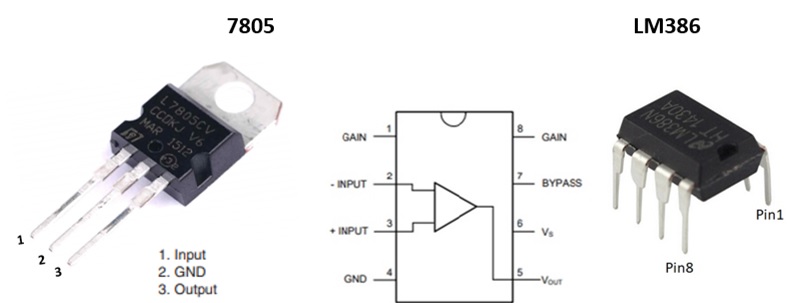
The next two components for the audio oscillator are the 7805 +5V linear VR and the LM386 PA IC. The 7805 VR IC is a common electronic component capable of taking input voltages ranging from +6V to +24VDC and regulating them down to +5V. With such a device, you can power your LM386 PA IC using a single +9VDC battery.
The final active component of the build is the LM386 PA IC. This low current high PA amplifies the function generator app’s electrical waveform signals and drives an 8-Ohm speaker. The 470 μFD electrolytic capacitor will couple or connect the audio signal to the 8-Ohm speaker. To assist in the build of the audio generator project, you can use the pinouts provided in Figure 5.
Figure 5. Electrical pinouts for the 7805 and LM386 electronic components.
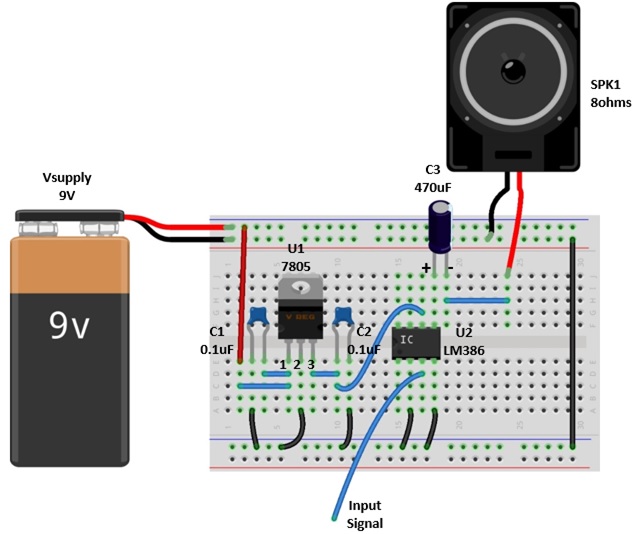
The Fritzing diagram allows you to wire the regulated power supply and PA circuit on a solderless breadboard. Insert the electronic components as shown in Figure 6 into the solderless breadboard.
Figure 6. The audio amplifier electrical wiring diagram.
The orientation for the components U1 (7805), U2 (LM386), and C3 (470uFD) are critical for proper circuit operation of the audio PA. Therefore, take care to place the components with the correct orientation as shown in the electrical wiring diagram. With the placement of the components completed, wire them together using the appropriate jumper lengths shown in the electrical wiring diagram.
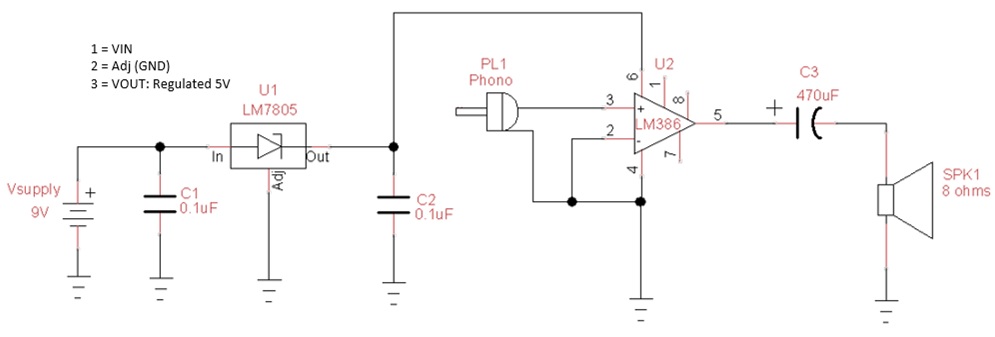
As an additional reference to aid in building the audio amplifier, an electronic circuit schematic diagram is provided in Figure 7.
Figure 7. The audio amplifier electronic circuit schematic diagram.
To attach your desktop PC, smartphone, or tablet to the audio amplifier, use the male mono plug. Attach two electrical wires of appropriate length to the male mono plug. One electrical wire is for the input signal and the other is wired to the ground of the audio amplifier. Then insert the male mono plug into the headphone jack of the desktop PC, smartphone, or tablet.
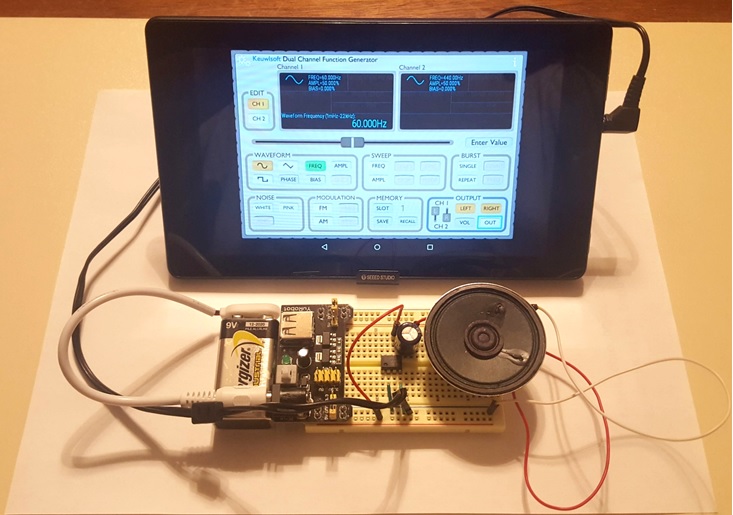
Figure 8 shows the complete project build of the app-based function generator audio oscillator.
Figure 8. The complete App-based Function Generator Audio Oscillator.
As an alternative to the 7805 +5V linear VR, you can use a small PCB power supply. Also, as a design challenge, see if you can add a potentiometer to the audio amplifier to act as a volume control. Happy sound synthesizing!