The article shows you how to get started with STM8S MCUs, including necessary hardware and program downloads.
PIC and AVR controllers are great for small projects, and even some products, but are not necessarily the best commercial choice for mass production. In these series of articles we will look at how to use STM8S microcontrollers including the use of the IDE and internal peripherals.
Why Use the STM8 Series?
When choosing a microcontroller for a project or product, it is essential that you pick the right one. PIC devices are great thanks to the continual production and support by Microchip while AVR devices contain a very powerful CPU (arguably more of a CISC than a RISC). However, simple prototypes may eventually turn into a commercial product, and when this happens, every penny counts. PIC controllers are typically cheaper than AVR devices, but sacrifice on power and throughput, while AVR devices may be more difficult to program on the go. This is where the STM8 series of microcontrollers comes in, being very cheap, powerful, and fast!
However, there is a downside to ST devices; they do not come in hobby-friendly packages, and many compilers/IDEs require purchased licenses. Thankfully, COSMIC (who produce the C compiler for STM devices), have fully released their compiler without any restrictions for the STM8 devices, while the STM32 devices are still restricted to 32K programming space (this is plenty for most projects anyway). So long as you register your free license once a year, you can program the STM8 without restriction!
So let’s get down to work with the STM8!
How to Install the IDE STVD
The first step in using STM8 devices is to download and install the IDE. Currently there are two IDEs that you can use: STVD and IAR. IAR is a more modern system that supports thousands of devices and may seem like the logical choice, however, I have chosen to use STVD instead. There are a couple of reasons for this:
- IAR is a large program and not one you want to run on older machines
- IAR is a heavily commercialized product and contains many restrictions
STVD is an older IDE and looks like it was based on Visual Studio 2005. Despite this, it runs fantastically on Windows 10 with all features working including the debugger! So to download STVD follow this link, click “Get Software”, scroll to the bottom of the window that pops up, click “Accept”, and when that window disappears, click “Download”.
Download the software section.
The STVD IDE is only 82–83MB, so the download should not take too long. While this is downloading, we will also need to download the COSMIC C compiler. To do that, click this link, register your details, and click submit.
At this point you should see a download link, so go ahead and now download the COSMIC C compiler. This file should be around 20MB.
A successful registration of COSMIC C compiler should show this page.
With both files downloaded, it's time to install the IDE and COSMIC C compiler. Start by extracting the install file from the STVD download, then run the installer, leaving all options as they are (e.g., installation path, etc.). With STVD installed, it’s time to install COSMIC C. While going through the options, make sure to keep to the default values and options, except for the User and Company Name!
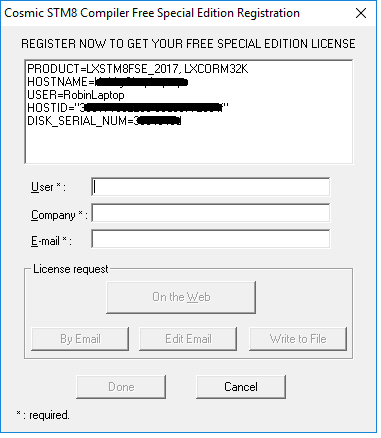
At the end of the installation it will ask about registering the compiler. Make sure this is clicked, and then when you click continue/finish, the following window should come up. Simply fill in your details and request the license file via email.
Starting a New Project
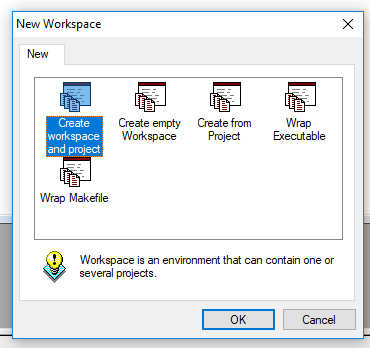
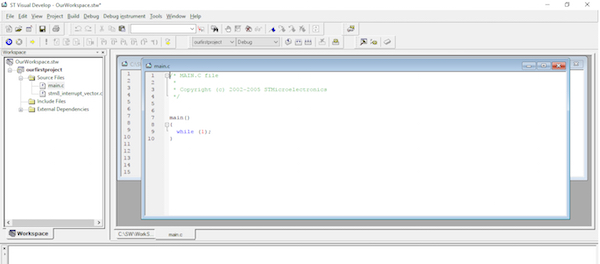
Now that everything we need has been installed, it’s time to launch the STVD IDE and create a new project. So start by loading the IDE, then click File > New Workspace. In the window that appears, click “Create workspace and project”.
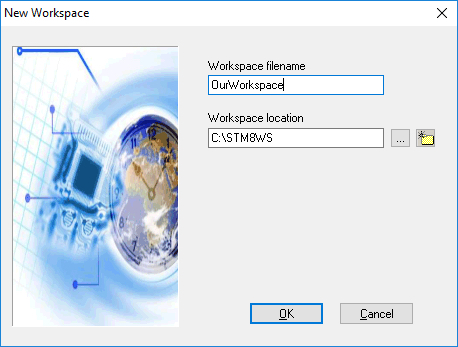
For our workspace name, we will save it in a folder in the C:\ called STEM8WS.
The next window will ask about our project name, etc., so for now we will call our project “OurFirstProject”, put in a folder called Project1 in the folder STM8WS, select COSMIC as the toolchain, and then provide a path to the compiler. Assuming that you altered nothing in the COSMIC C install, the toolchain root should be...
C:\Program Files (x86)\COSMIC\FSE_Compilers\CXSTM8
The next step involves selecting the device we are using. In this case we are using a simple STM8S103F3P, so we will select this from the list. Once this has been done, a new project should appear in the workspace navigator on the left, and from here you will need to load the main.c file.
For this tutorial, we will make an LED blink. So for now, enter the code below into STVD.
/* MAIN.C file
 *
 * Copyright (c) 2002-2005 STMicroelectronics
 */
#include "stm8s.h"

void simpleDelay(void);

main()
{
	GPIOB->DDR = 0xFF;

	while (1)
	{
		GPIOB->ODR = ~GPIOB->ODR;
		simpleDelay();
	}
}

void simpleDelay(void)
{
	unsigned int i, j;

	for(i = 0; i < 1000; i ++)
	{
		for(j=0; j < 40; j ++)
		{
		}
	}
}�
Connecting the ST-LINK V2
The next step involves connecting the ST-LINK V2 device to a USB port. Once connected and Windows has finished installing the device, you will need to run a special file found in the STVD installation folder that will allow STVD to work with it. Assuming that you changed no install directories, this file can be found here:
C:\Program Files (x86)\STMicroelectronics\st_toolset\stvd\dao\ST Toolset.msi
Once installed, the STVD IDE will be able to debug your STM8 projects directly, which allows for stepping through code, seeing variables, and disassemblies!
You will also need to connect your ST-LINK V2 programmer to the target board, which in this case is the STM8S103F3P. What makes the STM8 devices nice to program is the SWIM system, which is a single-wire programming method that only requires four wires: power, ground, reset, and program.
Testing the Program
Before we can test our program, we have to do one more thing that needs to be done to every STM8 project; we need to include a special STM8 header file. But this header file does not just need including, but requires a very slight alteration since you need to select the device in the header file. First, download this special header file:
https://github.com/EarToEarOak/DDS-Sine-Sweep/blob/master/src/stm8s.h
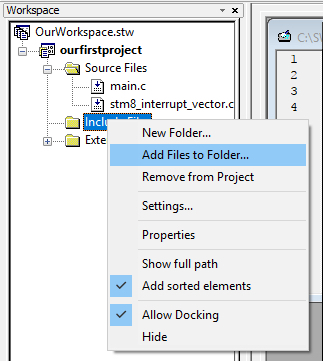
Once downloaded, COPY this file to your project folder, and then in the IDE right click the “Include” folder and then select “Add Files to Folder”. In the dialog that opens up, select the STM8S.h file that we downloaded.
Now open the STM8S.h file and uncomment the line that relates to your device (these lines are found between line 30 and 40). In this case, I uncomment the line that includes the STM8S103, since that is the device I am using. This file tells COSMIC what registers are available and where they are located. Once edited, save the include file.
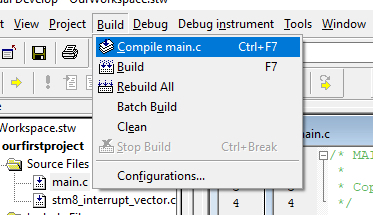
The next step requires you to save the main.c file that you changed earlier on in the STVD IDE and compile the code. To compile the program, click Build > Compile main.c.
Once compiled, build the project by clicking Build > Build. If all goes well, there should be 0 errors and 0 warnings.
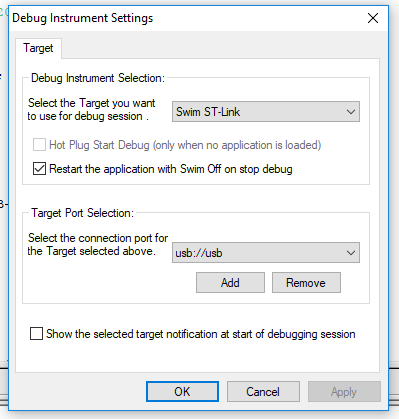
Now it's time to select the target, so click Debug Instrument > Target Settings, fill in the window with the details shown below, and click “Apply”.
Once done, click Debug > Start_Debugging, and STVD may ask about rebuilding. If it does, agree to the rebuild and the ST-LINK V2 should automatically start to download the code. If you get communication errors, try reconnecting the ST-LINK V2.
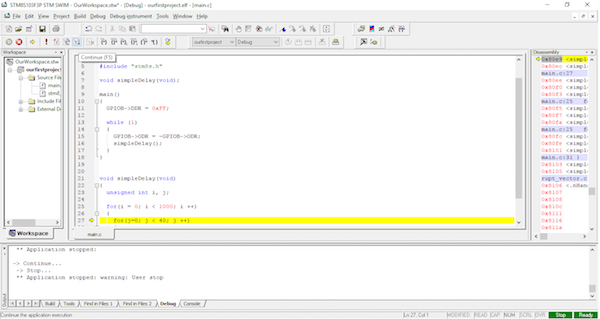
The last step involves running the program by clicking “Continue” on the debugging options. If all goes well, you should see your LED flashing (assuming that you have the same module as used in this tutorial). If you have used a different board, you will need to either connect an LED or probe one of the pins found on PORTB to see the flashing.
Conclusion
While setting up the IDE, COSMIC, and the programmer may not be the most fun activity, using the STM8 series of controllers is. Despite their insanely low cost, they provide many peripherals, have powerful cores, and come in all shapes and sizes (with the exception of hobby-friendly DIP packages). But that should not dissuade any hobbyist, since the modules are often cheaper than PICs or AVRs themselves!
Cover image courtesy of STMicro.
