Curious about ATtiny MCUs? Learn about them here and explore how they can be used to keep projects smaller and cheaper!
Arduino development boards are just about synonymous with beginner electronics, and for good reason. The boards are designed to make connecting other components extremely easy, they can be programmed using a helpful IDE using nothing but a USB cable, they are open-source, and they have a giant and active community that is always willing to help.
The boards are also well-designed. With a bit of common sense, there are not too many things you can do to brick or kill an Arduino board. When it comes to getting started with electronics, the Arduino platform is a great way to get your feet wet with circuit design and programming.
Arduino boards are an excellent option for beginners.
However, for more advanced projects or for developing products to sell to consumers, the drawbacks of the Arduino platform quickly become apparent.
This article explores three of the most popular ATtiny AVR microcontrollers that you can use to transition from Arduino-powered prototypes to more polished and optimized projects: the Attiny84, the ATtiny85, and the ATtiny2313. It also examines how these chips compare to the ATmega328 in the Arduino Uno.
Drawbacks of Using an Arduino
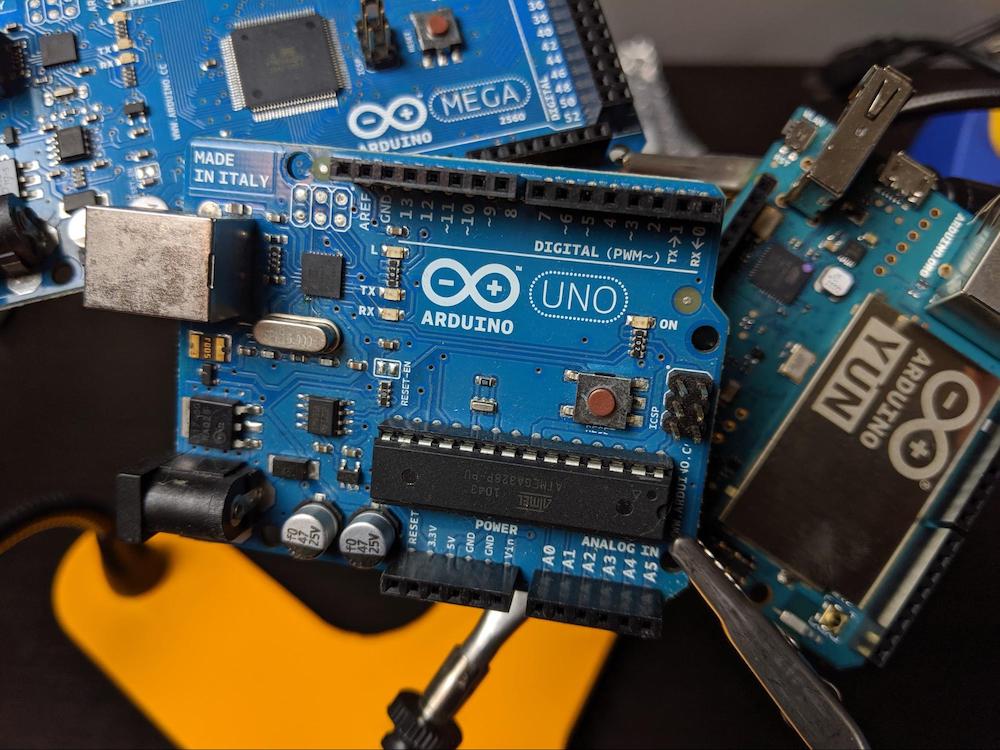
First, compared to the microcontroller IC itself, Arduino boards are very large. This makes it difficult to integrate or embed Arduino boards into projects. The typical way to build Arduinos into a larger project is by way of shields, which are boards that plug into the headers on top of the Arduino. But this arrangement makes for some very bulky assemblies that are often simply too large to fit elegantly into other parts of a project.
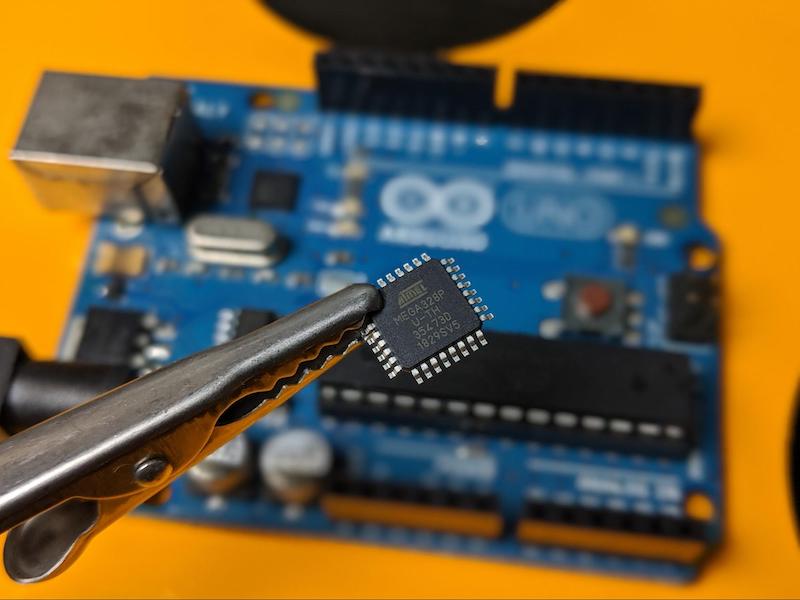
Atmel's ATmega328P: the brains behind the Arduino Uno.
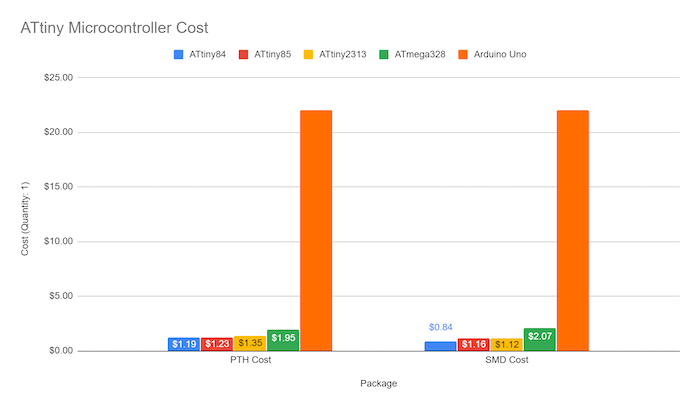
Second, Arduino boards are relatively expensive, compared to the cost of building a custom board with a microcontroller IC and associated passive components. Depending upon the model, Arduino boards go for $20 - $30, where the microcontrollers used in those boards cost under or around two dollars.
The stark cost difference between an ATtiny MCUs and Arduino.
Finally, in terms of specs, Arduino boards can often be overkill for the projects in which they are typically used. If you take a look at a sampling of common Arduino projects, you will notice that on many projects, the vast majority of the Arduino’s I/O pins are unused and the sketches running on the board do not come remotely close to filling the controller’s flash memory.
Oftentimes, you won't need all of your Arduino's I/O pins to build the project you want.
The Alternative: ATtiny AVR Microcontrollers
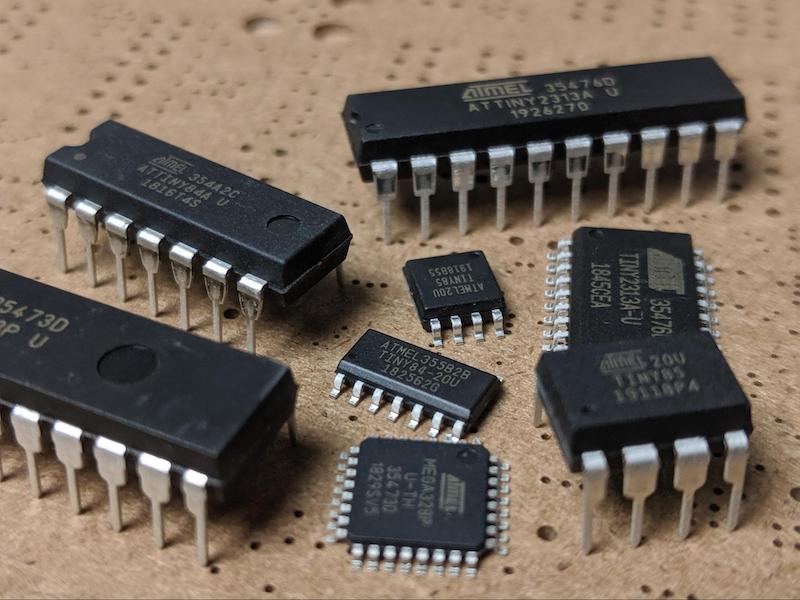
If you are embarking on a project and you want to use a cheaper, simpler, more compact alternative to something like an Arduino Uno, what is that alternative? One of the most popular options is to use AVR microcontrollers by Microchip Technology.
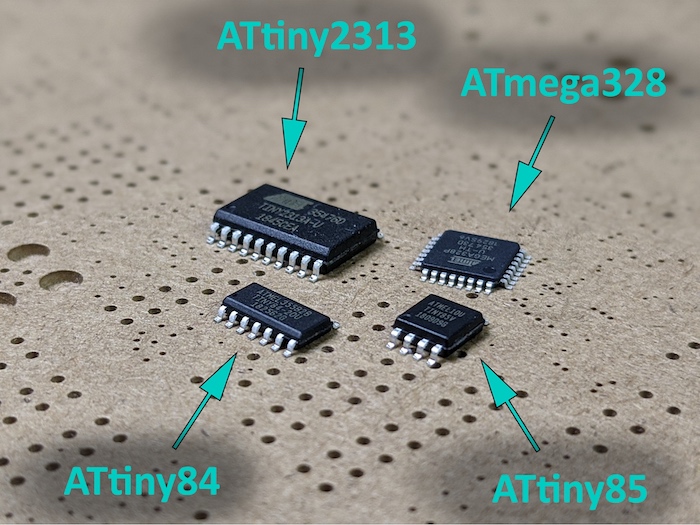
A selection of AVR microcontrollers.
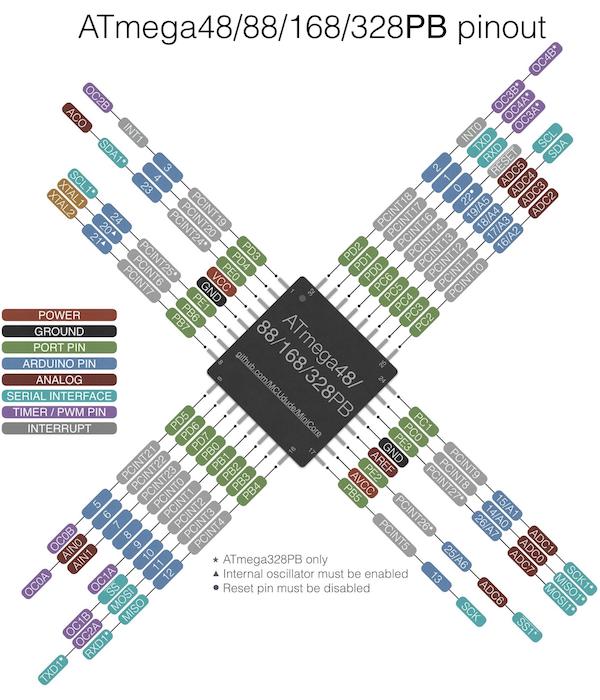
This family of microcontrollers has a lot in common with Arduino boards. In fact, the Arduino Uno is powered by one of them: the ATmega328P.
To program these microcontrollers chips, you can still use the Arduino IDE and many libraries available on the Arduino platform (more on programming the chips below). Like Arduino boards, the ATtiny microcontrollers have a varying number of I/O pins, they store programs directly on the chip, they operate on a 3.3V or 5V power input, and there is still a relatively big community to help you out with any difficulties you encounter.
Although there are a variety of AVR microcontroller options available, we are going to focus on the ATtiny84, ATtiny 85, and ATtiny2313, and compare them to the ATmega328 found in the Uno.
A Quick Comparison of ATtiny MCUs
| ATtiny84 | ATtiny85 | ATtiny2313 | ATmega328 |
|---|
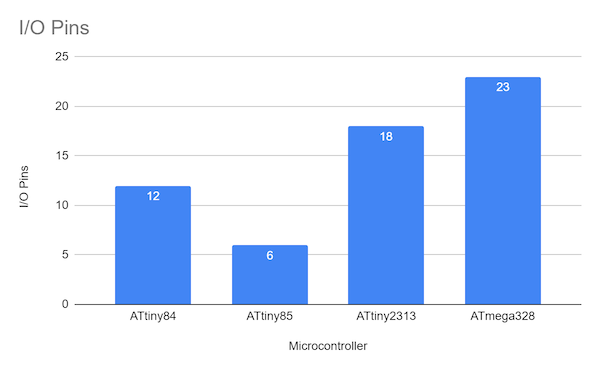
I/O Pins | 12 | 6 | 18 | 23 |
Flash Memory | 8Kb | 8Kb | 2Kb | 32Kb |
ADC Inputs | 8 | 4 | 0 | 6 on PTH; 8 on SMD |
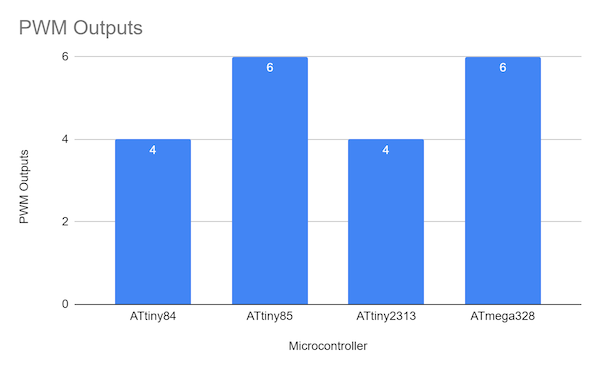
PWM Outputs | 4 | 6 | 4 | 6 |
The ATmega328 and ATtiny series of AVR microcontrollers.
Let's build on this quick comparison by diving into the various terms on the microcontrollers’ datasheets to understand what it all means.
I/O Pins
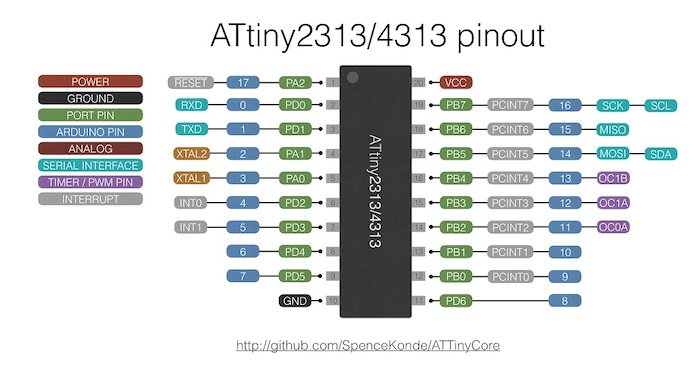
Each of the ATtiny AVR microcontrollers has a different number of I/O pins. These pins are used to connect external components to the microcontroller — either inputs like sensors, buttons, or serial connections, or outputs like LEDs, motors, buzzers, or a whole host of other stuff.
The number of I/O pins on each microcontroller option.
The number of available pins on each microcontroller will be one of the most important factors in choosing among them.
If, for example, you wanted to build a robot arm with four servos and a Bluetooth module, you could not use an ATtiny85, at least not without some additional components. The ATtiny85 has only six I/O pins, which is too few for a robot arm. However, if you are building a serial-controlled LED light of some kind, the ATtiny85 would be up for the task.
Flash Memory
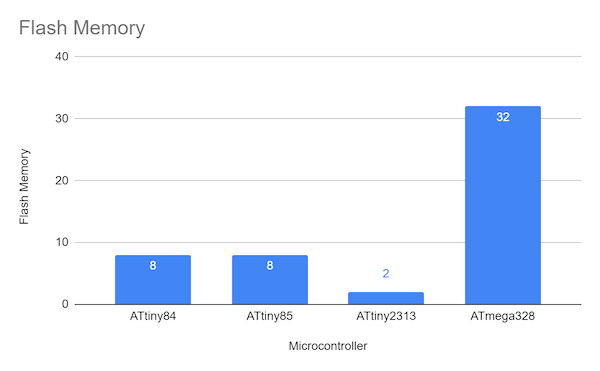
The amount of flash memory available on a microcontroller is probably not a factor you’ve given much thought to if you have only used Arduino boards in the past. Flash memory is where the microcontrollers store the sketches they run.
Arduinos all have quite a bit of flash memory available — the Arduino Uno has 32 Kb of flash memory and the Arduino Mega has a whopping 256 Kb. This might not sound like a lot compared to something like your smartphone, but unless you are writing an extremely complex sketch, even the storage available on the Arduino Uno will be more than enough to accommodate your code.
Even a highly complex project, like a walking robot with six legs and three servos per leg, driven by inverse kinematics and controlled by a Playstation 2 controller, with a whole bunch of math to make everything work, only uses 72% of the storage space on an Arduino Uno. You can see how much flash memory your sketch occupies at the bottom of the Arduino IDE.
However, flash memory does become a potential concern with the ATtiny microcontrollers. These have as little as 2 Kb of program memory. Therefore, when using these microcontrollers, it is important to optimize your sketches to minimize their size. Reducing the number of libraries used, minimizing the number of variables needed, using variables with the smallest possible data types, and strictly obeying the don’t-repeat-yourself principle are all important best practices for getting your code to fit on your AVR microcontroller.
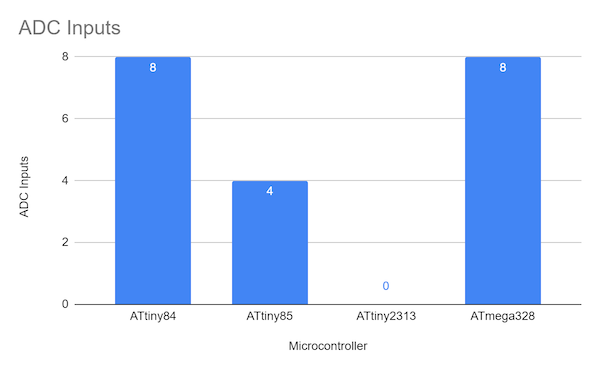
ADC Inputs
Next up on the spec sheet is ADC inputs. On an Arduino board, these are the pins labeled A0, A1, A2, et cetera.
ADC stands for analog-to-digital converter. The technology is designed to solve an important problem with communication between analog sensors and digital microprocessors.
Take a sensor like a thermistor as an example. A thermistor works by delivering a varying voltage depending upon the temperature of its environment. This is an analog signal. The sensor readings can range from zero to 1023.
However, the ATtiny microcontrollers, and the controllers on Arduino boards, are digital processors. They understand ones and zeros. So, an ADC translates analog readings into digital signals that the microcontroller can understand.
PWM Outputs
Pulse width modulation (PWM) is a technology that addresses a similar issue to the one described above for ADC inputs. ADC channels are used by microcontrollers to understand inputs from analog devices. PWM channels, on the other hand, are used as outputs from microcontrollers to control parts that run on analog signals.
Pulse width modulation (PWM) is a technology that addresses a similar issue to the one described above for ADC inputs. ADC channels are used by microcontrollers to understand inputs from analog devices. PWM channels, on the other hand, are used as outputs from microcontrollers to control parts that run on analog signals.
There are numerous examples of ways microcontrollers use PWM outputs to control devices in ways that would not be possible with digital signals alone:
- Adjust the brightness of an LED
- Drive motors at different speeds
- Control servos
- Generating audio signals
- Driving infrared LEDs for remotes
Other Notable Specs
So, the ATtiny84, ATtiny85, and the ATtiny2313, along with the ATmega328P, have a different number of I/O pins, different amounts of flash memory for program storage, and different numbers of ADC inputs and PWM outputs.
There are quite a few other ways the chips differ from each other that are shown in the complete comparison chart below, but the four covered above are the most important specifications for the majority of maker projects.
| ATtiny84 | ATtiny85 | ATtiny2313 | ATmega328 |
|---|
I/O Pins | 12 | 6 | 18 | 23 |
Flash Memory | 8Kb | 8Kb | 2Kb | 32Kb |
ADC Inputs | 8 | 4 | 0 | 8 |
PWM Outputs | 4 | 6 | 4 | 8 |
EEPROM | 512 bytes | 512 bytes | 128 bytes | 1Kb |
SRAM | 512 bytes | 512 bytes | 128 bytes | 2Kb |
Hardware Serial | No | No | No | Yes (1) |
Hardware I2C | No | No | No | Yes |
External Interrupts | 1 | 1 | 2 | 2 |
Ways to Incorporate ATtiny MCUs Into Projects
There are three main ways of incorporating ATtiny microcontrollers into your projects, prototypes, or products depending largely on how many you will be creating:
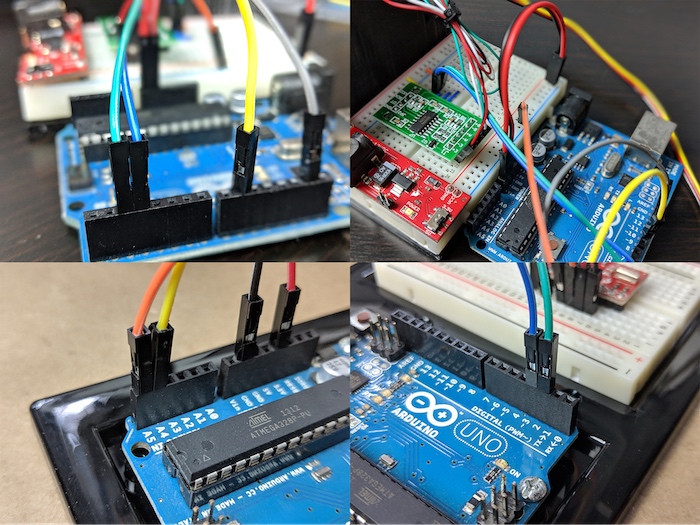
- For small-quantity projects or prototypes, microcontrollers can be programmed individually with an IC test socket. The IC test socket allows a connection to be made between the microcontroller and a programmer.
- For products ranging in scale from late-stage prototypes or full production quantities, microcontrollers can be programmed on the assembly line via ISP headers using an AVR programmer. This method is the most commonly used for manufacturing products incorporating microcontrollers.
- For products produced in large quantities or for projects or products in which there is no space available for an ISP header, microcontrollers can be pre-programmed and simply soldered to the PCB.
In upcoming articles, I will explore each of these programming methods at length.
ATtiny MCUs and Arduinos Both Have Their Place in Projects!
The Arduino family of microcontroller development boards is great for prototyping designs that may be for personal projects or for eventual sale to the public. However, Arduinos do have some key weaknesses, especially concerning physical size and cost, which makes them unsuited for use in more polished projects and certainly not for product production.
A popular alternative to Arduinos is the ATtiny series of AVR microcontrollers by Microchip Technology. These extremely small and inexpensive microcontrollers can still be programmed using the Arduino IDE and, much of the time, sketches developed for Arduino boards can be uploaded to ATtiny microcontrollers with little modification.