Learn how you can build more realistic animatronic creations with the Pololu Maestro servo controller board.
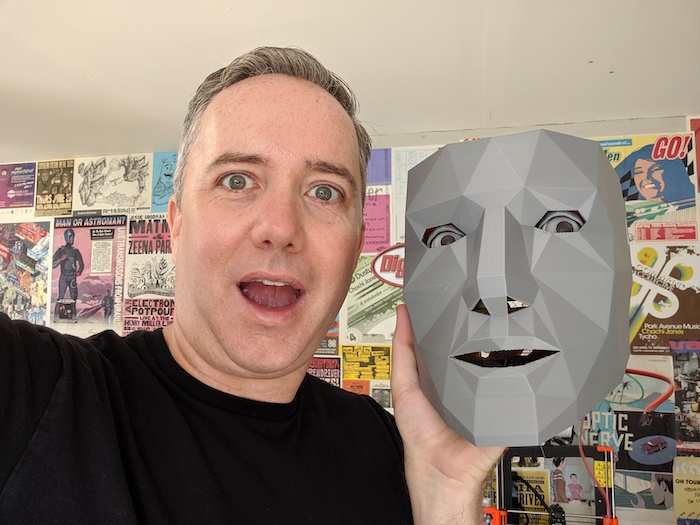
When I tell people that I’ve recently become obsessed with animatronics, I can instantly hear how nerdy that sounds. Sometimes I’ll follow it up with phrases like “Imagineering” or “Halloween props” just to give people an easier way to digest the term.
Because let’s be real, people love Disneyland rides where characters come to life, they love R2-D2, they love elaborate haunted house props — these are all forms of animatronics. It’s the art and science of puppeting mechanical characters.
Until recently, the “movie magic” world of animatronics was fairly opaque and expensive. Not only did it require knowledge and access to the once-obscure world of microcontrollers, servo motors, and multi-channel R/C systems, but you also had to be competent in custom fabrication, model making, puppeteering, and character design.
It’s an insane field to get into, and with the rise of CGI replacing most practical effects in movies, there’s less incentive than ever to pursue animatronics as some sort of career path. That said, as a hobby, there’s never been a better time to play with animatronics. The cost of the servos and user-friendly microcontroller boards required for a sufficiently complex character are well within reach. Plus, the proliferation of inexpensive tools for 3D modeling and desktop fabrication has made it easier than ever to build, share and adapt character designs.
But where to start, exactly? Like anything, it really all depends on where you want to go. In this guide, I’m going to share a little of my journey into animatronics and how I arrived at the Pololu line of Maestro project boards as a way to quickly and affordably get the results I was looking for.
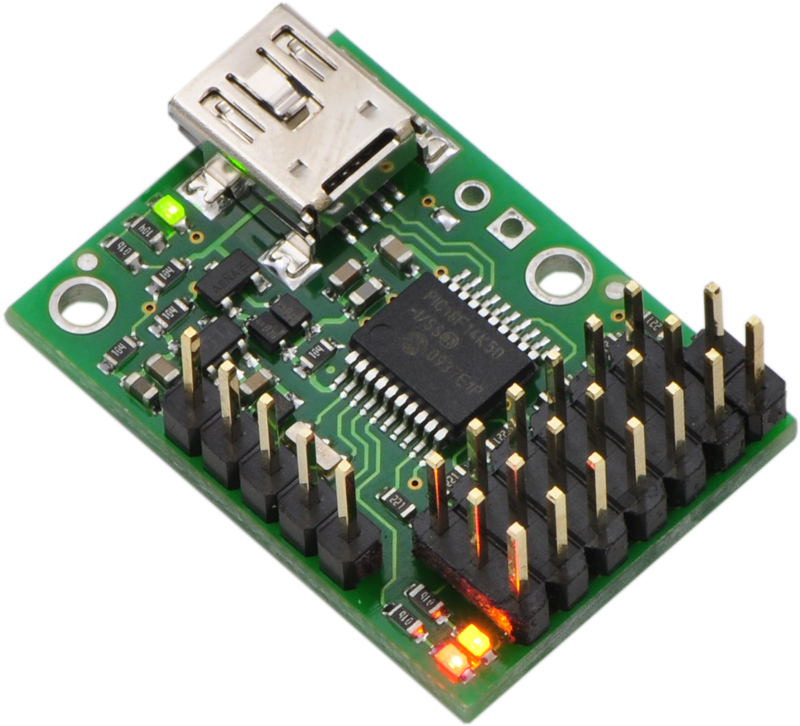
The Pololu Maestro project board.
Animating a Robot's Eyes With Servos
The eyes are one of the most captivating (and arguably creepy) elements necessary for breathing life into any character design. Whether your character is analog or digital, mechanical or sock puppet, the eyes are the window to its soul and as humans, we are wired to fixate on eye movement for all sorts of communication cues.
From an engineering perspective, eyes are also mechanically fascinating. On Thingiverse, you’ll find dozens of different approaches to creating a mechanical eye movement. The first design that really grabbed my attention was The Doorman project by Tjahzi.
The Doorman is comprised of a 3D printed mask that houses an Arduino and a motion sensor. When motion is detected (someone approaches), the eyelids lift up to reveal these intense eyes that shift left and right, up and down, seemingly scanning the area for suspicious characters.
As is often the case, there were a few components to the build that weren’t easy to come by (in this case, “universal joints” for the eye sockets) and made me hesitant to start the build. Fortunately, another Thingiverse user named Ricky Medrano created a remix of the project that made the joint unnecessary and also made use of some more affordable electronic components.
Ricky’s Doorman design was a great first step for me to understand animatronic eye mechanics. It was also the perfect way to experience some of the inherent limitations of Arduino-style, or code-based puppeteering.
Chances are, whenever you see an R2-D2 at a convention or Maker Faire, or the servo-controlled eyes of a Dark Crystal Gelfling blinking into a movie camera, you’re seeing an animatronic design that’s being puppeted manually using a remote control and a lot of practice. With direct control, you’re able to transmit so much more nuance, subtlety, and unpredictability into a character. The human element can shine through.
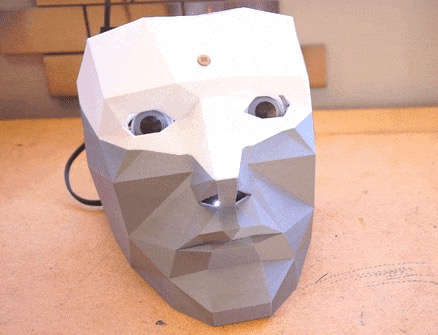
Smooth eye movement in The Doorman's build are the most important part of the project.
It may sound obvious, but it’s difficult to make programmed movements not look robotic and unnatural. Unfortunately, this kind of herky-jerky, unnatural movement is exactly what you get from a project like The Doorman.
There are ways around it, including Arduino libraries for servo control that allow you to define acceleration curves and create smoother, more fluid and realistic movements. But at the end of the day, you’re puppeting indirectly through the code and there’s only so far you can go with that.
How a Maestro Board Creates Natural Movement
If scripted animatronics look unnatural and R/C animatronics require the skillful hand of a puppet master, how can hobbyists like us get results we’ll be happy with?
The Maestro boards solve this problem by allowing you to directly puppet a scripted routine your creation in slow motion. Using their free software, you’re able to manually dial in snapshots of your routine, step-by-step, similar to a flipbook animation or a stop-motion film.
I first heard about the Maestro boards in this video interview with effects artist Jasper Anderson from Mr. Chicken's Prop Shop. His raven kit uses a Maestro board and several servos. When I heard him talk about the relative ease of creating animation sequences with the Maestro software, I knew I had to give it a try.
Having recently worked with the Doorman project, I 3D printed a second version of the same project, substituting the Pololu Maestro for the original Arduino components. The difference was immediately noticeable in terms of both scripting the animation and the nuance of the movement I was able to achieve.
Using a Maestro allows for smoother eye movements in The Doorman build.
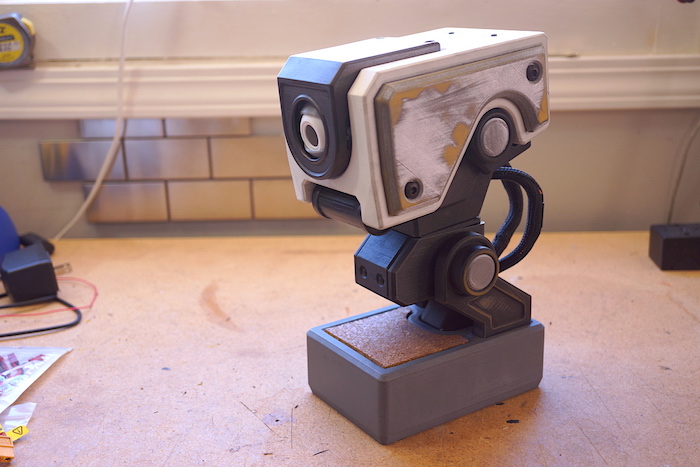
Feeling confident, I took on a more complicated build. The photo below is of a 3D printed animatronic robot head designed by Jonathan Odom on Instructables. You can read my full build diary on it over on Maker Project Lab.
I love this one, and it was originally designed to be puppeted manually. But using the Maestro, I can define a whole routine that it runs through the moment it’s turned on.
My animatronic challenge: a 3D-printed head with head and eye movement.
How the Maestro Works
Enough with the story telling, already! Let’s talk about how a Maestro-based project works. I cover most of this in the above video, but there’s no harm spelling it out here as well.
To get started you’ll first need a Maestro board from Pololu. The entry level Maestro board gives you 6-channels of control for around $20).
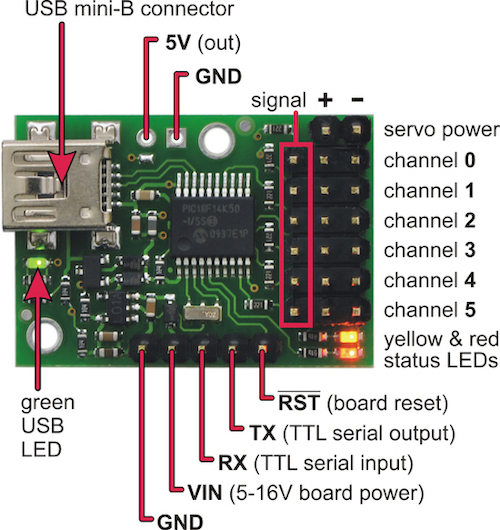
Pin guide for a six-channel Pololu Maestro
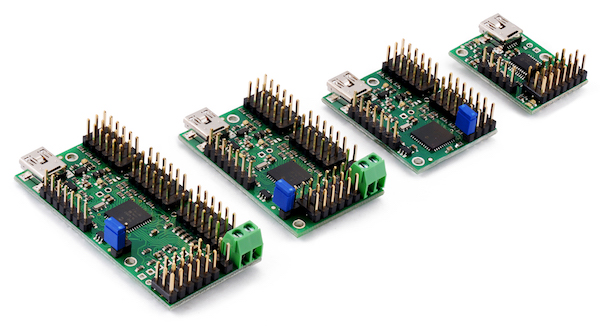
If you need more than that, there are 12, 18, and 24-channel versions you can get too. There are a handful of advanced features missing from the 6-channel board that are worth familiarizing yourself with if you have a specific task in mind. But if you’re like me and just want to move a bunch of common servos around, the entry level board does a fine job.
Maestros are available in 6-, 12-, 18-, and 24-channel versions.
with all these channels to use, you’ll need some servos. You can find 5-packs of basic SG90 hobby servos on Amazon for around $12. For something a little nicer (and quieter) I also liked these metal gear MG90 servos that are only $5 more.
You’ll need a mini USB cable to power and program the board during setup. These old-timer USB cables are harder to come by these days, but I’ll assume you can dig one up.
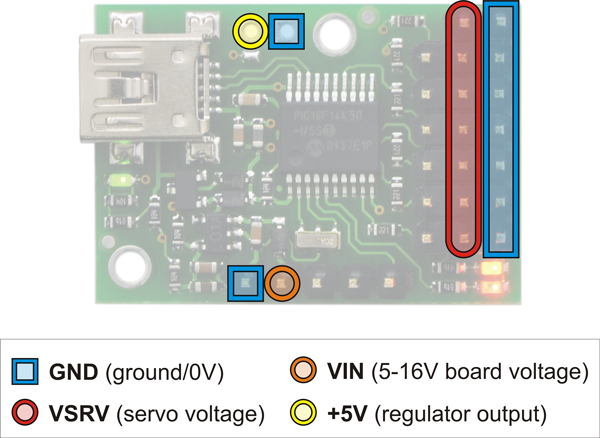
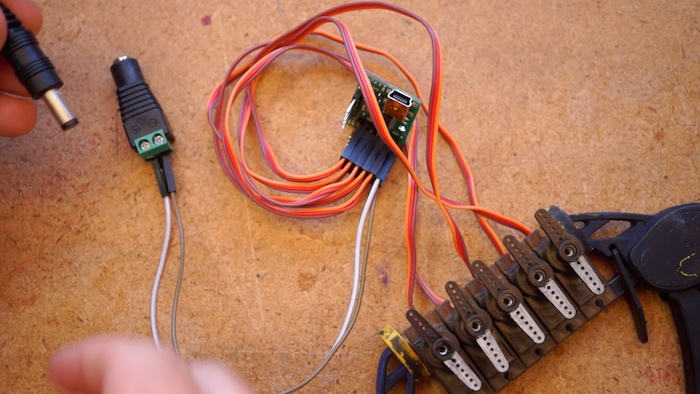
But what’s bound to confuse most people who are new to motor or servo breakout boards or shields is that you’ll also need a separate power supply to power the servos. By default, board power and servo power are handled separately.
Board power and servo power are separate.
Later on, if you find that your servos run just fine on the same 5V power the board needs, you can use a jumper to run everything from the same connection. But for some projects, your servos will need more power, and having them powered separately is necessary.
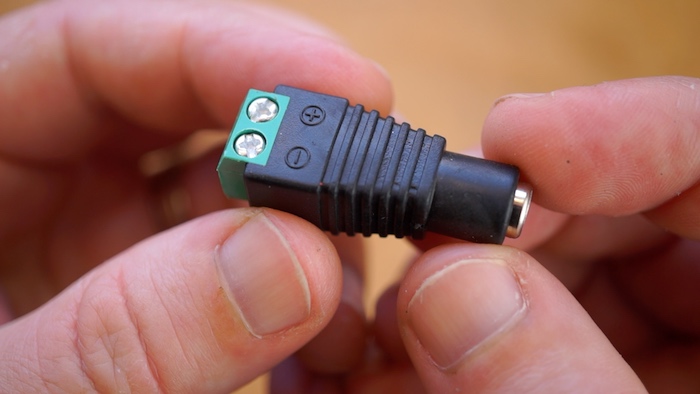
For my initial setup, I have a 5V power adapter connected to the servo power section of the board using a barrel jack with screw terminals on it. You can incorporate this jack right into your design, though for some projects you may want to go with a battery pack instead for portability.
I’ll power the board over USB for now since we’ll need to plug into a computer anyway to program this thing up.
When you connect up your servos, notice that the polarity of the connection is marked on the bottom of the board for a quick way to figure out which way to place the connection. They’re also numbered. These numbers match up with the channel number shown in the software editor.
Maestro Control Center
The best part of Pololu’s Maestro Control Center software (Windows and Linux only) is that it’s a relatively painless, straightforward way to create animated servo sequences on any Maestro board. The worst part of the Maestro Control Center software is that it’s the ONLY way to create animated servo sequences on any Maestro board.
The Pololu Maestro Control Center.
So, before throwing money at a Maestro board, make sure that you have a computer that can run the Maestro software. The board itself is unspectacular. It’s the software and its graphical editor interface that make all the difference.
You should also know that Pololu has a fantastic and thorough guide on installing and using the Maestro Control Center software on their site.
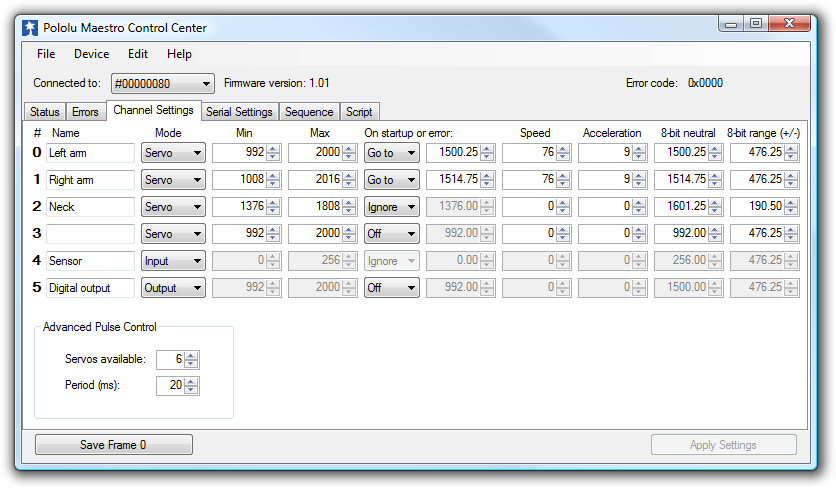
With the software open and your board connected and your servos powered on, your board should be automatically detected and configured for use. You can test things out by enabling each of your servos and adjust their position using the slider.
Learning the Moves
Let’s take a broad overview of the software and how you move through it to create a basic sequence. There are multiple tabs within the single window for the Maestro Control Center software. These tabs are ordered so that you move from one to the next naturally as part of the process for creating and uploading an animation sequence.
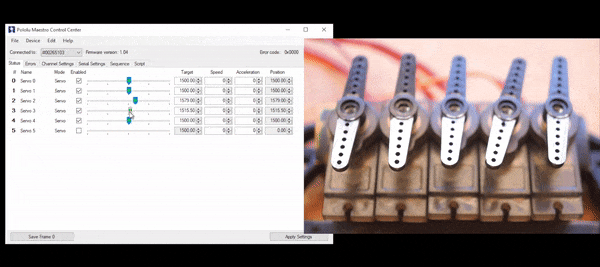
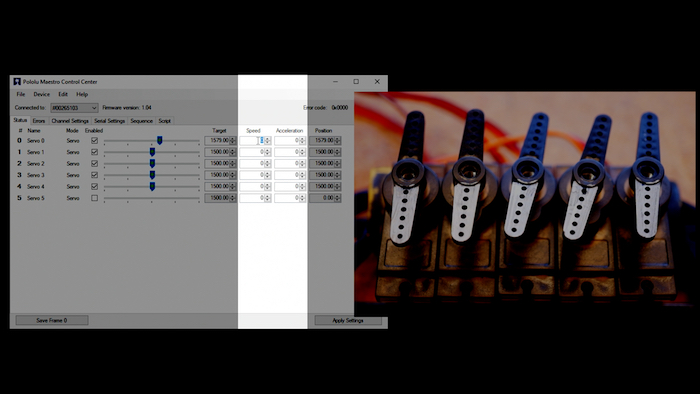
The first tab you see when you load the software is the Status tab. You’ll use the sliders in this tab to position the servos just how you want them. When you like how things look, you’ll hit the Save Frame button down in the corner so that you can recall this arrangement of servo positions as part of a sequence. Now you move them to the next position you want, save the frame, and on and on until you think you have the sequence about right.
How to save frames in the Maestro Control Center.
Think of this part of the process as creating a stop-motion video, frame-by-frame. In this way, the Save Frame button is like the shutter on your camera.
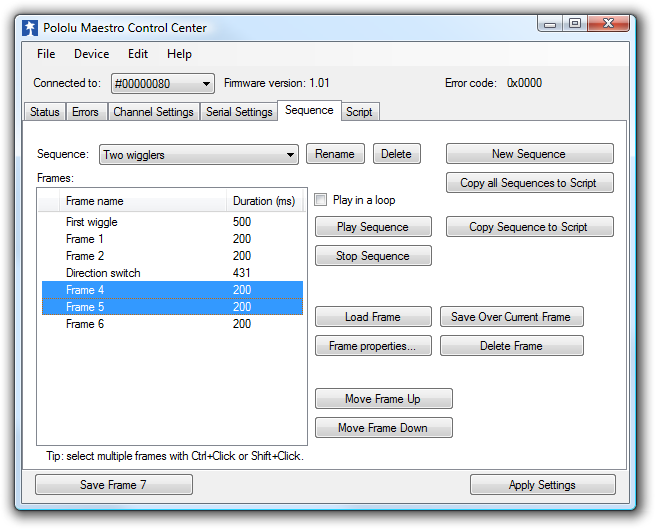
With all your frames shot, you jump over to the Sequence tab. Here you can playback the sequence you just made, add, delete, duplicate, or adjust frames. Tweak the timing, and set it to play in a loop, if you want.
If the Status tab is your stop-motion camera, you can think of the Sequence tab as the editing room. This is where you tighten-up the timing, make the blinks faster, the evil stare a little longer, and generally enhance the performance you gave in the Status tab.
Editing frames (movements) in the control center.
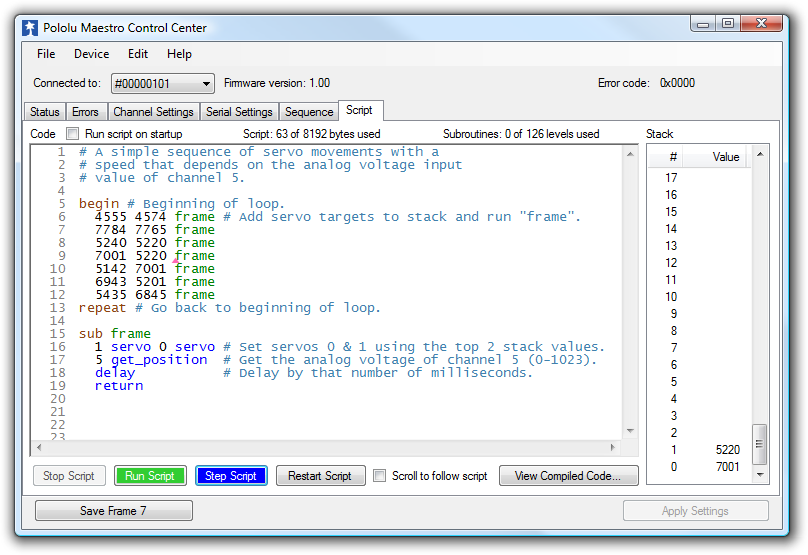
When you’re good here, you hit the Copy Sequence to Script button and it generates all the code for your sequence and loads it onto the board. You can see this code in the Script tab, where you can edit it directly if you’re feeling brave.
This Script tab also has a critical checkbox here at the top, so that your sequence will start as soon as the board powers on. This is optional because it’s also possible to set things up so that the sequence will start when a button is pressed or a sensor is triggered. You can learn more about how to do that in the Pololu guide Attaching Servos and Peripherals.
The Script tab in the control center.
Adding the Human Touch
Now, the result we get from this initial example isn’t that impressive. Using a basic setup like this provides a similar herky-jerky animation we’d get from a basic Arduino sequence. Now, I’m going to show you how to give your creation a more interesting, natural movement.
Back in the Status tab, notice the two columns for Speed and Acceleration. The Speed setting determines how fast the servo moves from one position to the next. The Acceleration setting creates a curve for how fast or slow the servo ramps up to this speed and ramps down to a stop.
The columns for adjusting speed and acceleration.
If that sounds a little confusing, just play with adjusting these values and notice how the blue dot of the servo’s current position slows down or speeds up to meet the green dot of the target position.
These little changes can have a big impact on creating realistic movement. Neck movements can be slow and smooth, eyelids can be fast and snappy, mouth movement can be jittery or simple. These servo settings can all be independent of one another, creating a kind of chaos and unpredictability that delivers a healthy dash or realism.
Once you have some settings you like, plug them in to the Channel Settings tab and hit apply. In this same window, you can narrow the range of movement, define the startup servo position, you can add custom names for each channel, and even switch channels to act as a button input or sensor input, or a PWM output for an LED.
There’s a lot you can do here, just remember to hit Apply Settings when you’re done. After that, you’ll script your movements just like we did the first time around, only now, each servo will have a personality all its own.
Going Further
And really, there’s a lot more you can do with these boards. They can work over serial control from a computer or Raspberry Pi, you can make them more interactive with buttons and sensors, and there are scripts you can find on Pololu that you can copy and paste into your code for more advanced control.
I hope you found this guide helpful and more than anything I hope that it motivates you to create your own animatronic projects and share them with the growing online community of amateur imagineers. Nothing is more satisfying than seeing your work come to life, and I’ve found the Maestro board to be one of the fastest, most affordable ways to create that experience.