Learn about PocketBeagle's background and specs and see step by step how to get it set up for your next project!
Over the past five years, compact single-board computers (SBCs) have made a significant impression on the embedded development community. Initially embraced by makers, the potential for fast-tracking an embedded system design using an SBC was quickly picked up by professional engineers.
With the need to design, build, and deliver more and more products to market each year, engineering teams could see the merit in using a ready-made, community-supported open source design.
Continuing the legacy of providing development tools and evaluation boards to engineers wishing to learn and prototype a vendor’s microcontroller, the SBC takes the concept one step further forward. By adding more peripherals, connectivity, and power management, shrinking the board size and, in some cases, adopting an industry-standard adapter board pinout, SBCs have become a popular starting point for makers and many engineering teams alike.
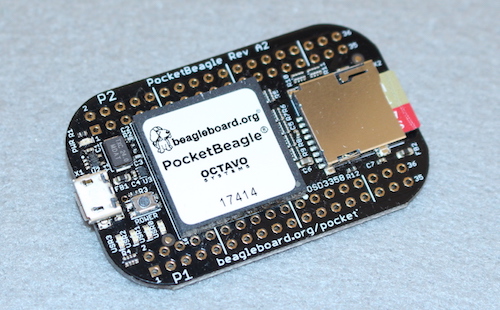
An example of such a board is the PocketBeagle, recently launched by the BeagleBone Foundation. This miniature, low-cost, Linux-based board, measuring just 55 mm x 35 mm x 5 mm, packs in a comprehensive list of features, and is based around the physically larger but very similar BeagleBone Black that has been in production since 2013.
Figure 1. The PocketBeagle.
PocketBeagle Specifications
The PocketBeagle uses an Octavo Systems OSD3358-SM system-in-package (SIP) that integrates a Texas Instruments Sitara AM3358 ARM Cortex-A8 microprocessor running at 1 GHz, 512 MB DDR3 RAM, 4 kB EEPROM and a TPS65217C PMIC all within a 21 mm x 21 mm package. The processor also hosts a NEON floating-point accelerator, an SGX530 graphics accelerator and two 32-bit 200 MHz programmable real-time units (PRUs). A total of 72 expansion pins are available that give access to 44 GPIOs, 8 analog inputs, 4 PWM outputs, USB/I2C/SPI/UART interfaces and power.
Figure 2. PocketBeagle's pinout
The board is powered from +5 VDC via a Micro USB connector. A Micro SD connector is used to store the Linux operating system. A 16 GB Micro SD card is recommended for this purpose, although you can manage with a 4 GB card if necessary.
Unlike the BeagleBone Black, the PocketBeagle is a headless SBC, so it is not equipped with any video display controller or HDMI capability, although for the types of applications the board would normally be destined for that is clearly not a problem. Also, it does not feature a wireless or wired networking interface. Again, in order to maintain its compact nature the addition of an Ethernet connector and associated components, or a wireless transceiver module, would not only increase its physical dimensions but also, particularly when it comes to adding Wi-Fi support, increase the power consumption profile noticeably.
While wireless connectivity is certainly a requirement of many applications, especially for industrial internet of things (IIoT) designs, the decision not to incorporate any wireless capability leaves the designer free to add the network protocol their design requires from the start. There is also concern among the engineering community that pre-certified wireless modules need more attention to implementing security features. Having the freedom to explore these requirements without having to decouple any existing hardware is an advantage.
Getting Started with the PocketBeagle
Hardware Requirements
- PocketBeagle
- Desktop Computer
- microSD card
Software Requirement
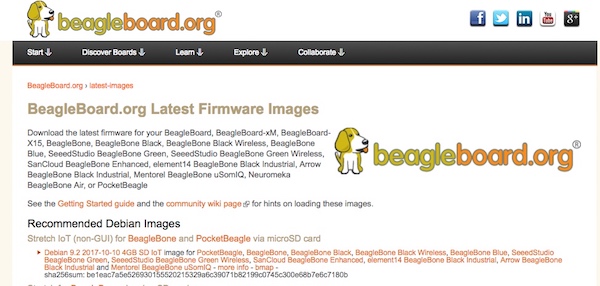
When it comes to software, the PocketBeagle is as well equipped as its hardware specification. Firstly, the BeagleBone Foundation provides installation-ready Debian distributions. The recommended image for the PocketBeagle is the Debian Stretch IoT headless (non-GUI) one. See Figure 3.
Figure 3. Downloading the Debian Stretch IoT image.
This package includes everything you need to get started using the board from the Linux OS, to the drivers for a number of different applications. It features a local instance of the popular Cloud9 integrated development environment complete with a Node.js/BoneScript library. It also has a Node-RED implementation for wiring together IoT applications.
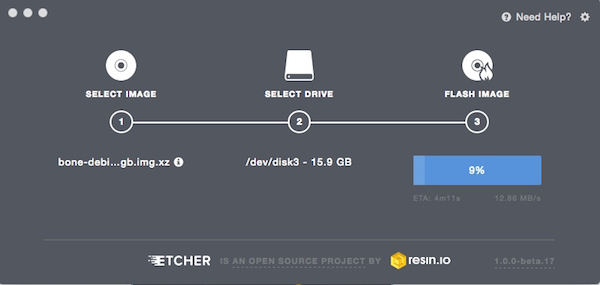
Download the Debian image and then use a tool such as Etcher to write it to a microSD card connected to your computer. See Figure 4.
Figure 4. Writing the Debian image to a microSD card using Etcher.
Once the above task has completed safely, remove the microSD card and place it in the PocketBeagle’s card slot before connecting the micro USB connector to one of your computer’s USB sockets. Initially, all four USR LEDs and the PWR LED will light up. Booting will then commence, indicated by the flashing of the USR0 and USR1 LEDs, after which you should see that a BEAGLEBONE USB device has been mounted to your file system.
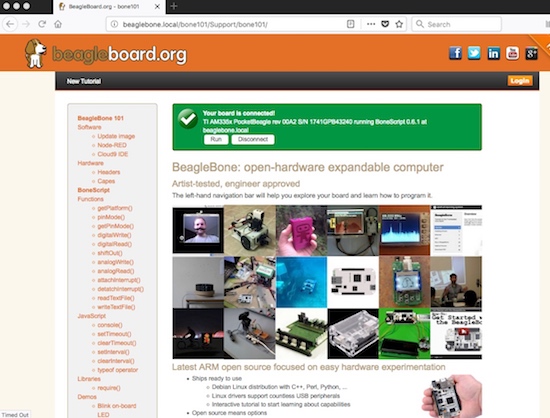
Double-click the START.htm file and you should see the ‘Start your Beagle’ web page displayed in your default browser. Scroll partway down to the ‘Step 3 – Browse to your Beagle’ heading and you should see a ‘Click here to launch’ link that indicates the PocketBeagle is running its local web server with an address of http://beaglebone.local. Follow the link and you should see the same as Figure 5 below.
Figure 5. What you will see when your BeagleBone has been successfully connected.
From this initial page, you can run a number of demos using BoneScript as well as access the local copies of Node-RED (port 1880) and Cloud9 (port 3000).
It is worth noting that thanks to the Linux distribution also including a Linux USB Ethernet/RNDIS Gadget device you should be able to access the PocketBeagle by pointing your browser to 192.168.7.2 (Windows) or 192.168.6.2 (Linux/Mac OS X). You won’t yet have access to the internet since a few more steps are required. However, it is worth taking time to explore the applications available.
Without a doubt, the provision of a local Cloud9 IDE is a real bonus. Figure 6 shows the IDE running in a browser window. Now part of Amazon’s AWS offerings, Cloud9 supports over 40 different languages, including popular ones such as JavaScript, Python, PHP and C. The bottom dark blue window gives you shell access to the PocketBeagle and also serves as the system console for running applications.
The Cloud9 installation also includes a host of code examples and libraries for use with optional hardware modules such as those provided by Seeed Studio.
Figure 6. "Hello, World" code running on Cloud9.
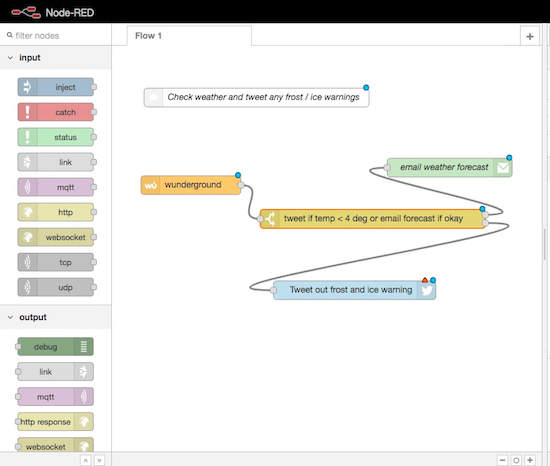
A far more visual approach is taken by Node-RED. This flow-based visual programming tool was originally developed by IBM’s Emerging Technology Services team and is now part of the JS Foundation. It provides a very easy way to link nodes, be they physical sensors on the PocketBeagle or an external web service, to create a flow of data that can be processed to another node or nodes. The simple demo shown in Figure 7 regularly reads data using an API from Weather Underground and sends a tweet if the temperature falls below 4 degrees C.
Figure 7. Node-RED demo created on PocketBeagle.
How to Get the PocketBeagle Linked to the Internet
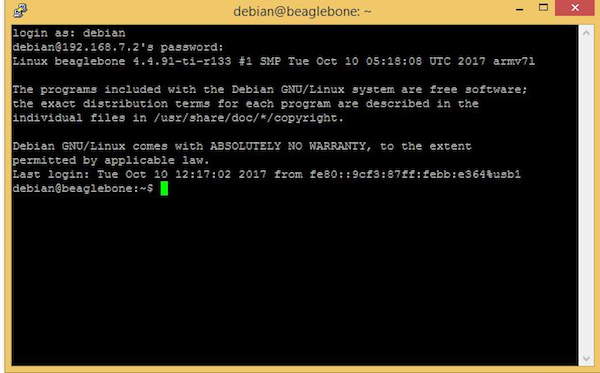
Assuming you have the PocketBeagle working and still connected to USB, you need to create an SSH terminal access to the board’s internet-over-USB address. In this example we’re using Windows, so the board’s address has already been found to be 192.168.7.2. We’re using the popular terminal application PuTTY in this example.
Figure 8 shows we’ve made an SSH connection to the PocketBeagle via PuTTY, and have successfully logged in to the board. Note that the default user is debian and the default password is temppwd.
Figure 8. SSH connection to the PocketBeagle on 192.168.7.2.
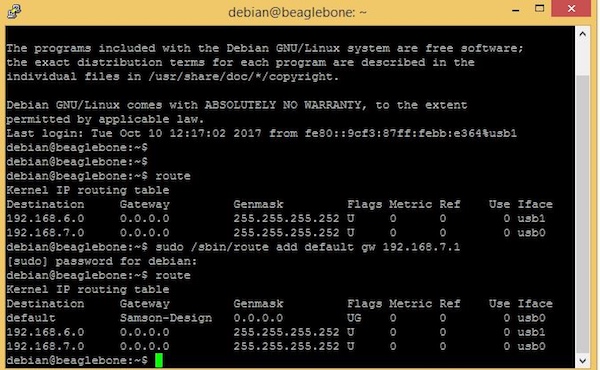
The next step involves setting the IP address of your computer’s internet-over-USB gateway. This will be 192.168.7.1. We need to add this to the routing table of the PocketBeagle. First, check that nothing has already been set by typing the command ‘route’. This is illustrated at the top of Figure 9.
Now type the command ‘sudo /sbin/route add default gw 192.168.7.1’. To check this entry has been made correctly check the routing table again by typing ‘route’. You should see the same as in Figure 9, with your computer’s system name appearing as a gateway.
Figure 9. Adding the default gateway to the routing table.
The next step involves sharing your computer’s internet connection with the PocketBeagle. In this example, we’re using a Windows computer with an Ethernet internet connection, but the same process works if your computer is using Wi-Fi.
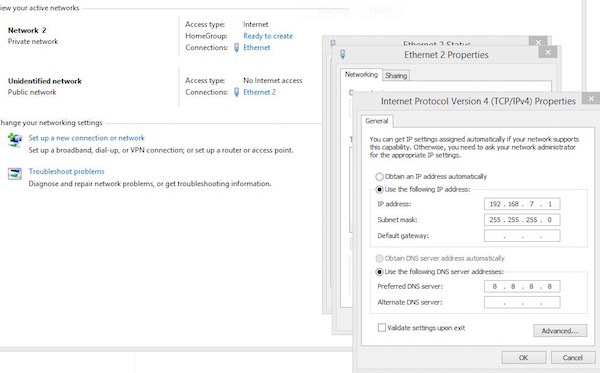
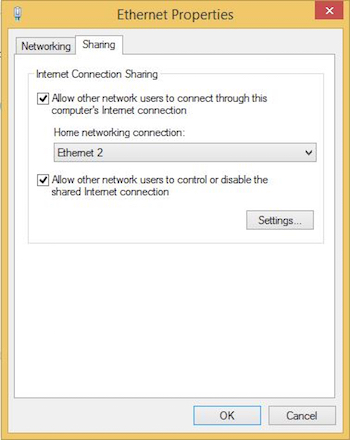
Navigate to your computer’s network settings control panel. You should see something similar to the main window illustrated in Figure 10. This shows the computer’s main internet connection as ‘Ethernet’ and the PocketBeagle connected without any internet connection as ‘Ethernet 2’.
Figure 10. Setting networking properties to share an Internet connection.
First click on ‘Ethernet’ and select the Sharing pane as displayed in Figure 11. Tick the Sharing boxes and select that you wish to share the connection with the PocketBeagle that is highlighted as Ethernet 2. Click OK the save these details.
Figure 11. Sharing your computer's Internet connection.
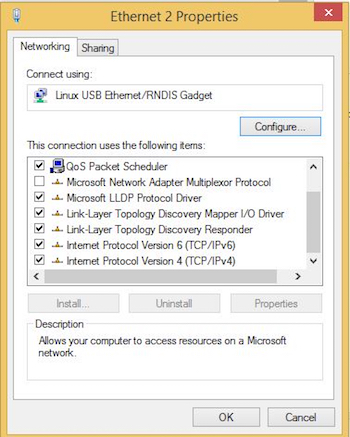
Now select the ‘Ethernet 2’ setting and look at the Networking items. You should see a list similar to that illustrated in Figure 12. Note that it should say ‘Connect using Linux USB Ethernet/RNDIS Gadget’, as shown.
Figure 12. Setting the parameters of the Ethernet 2 connection.
Select the item Internet Protocol Version 4 and click on Properties. This Windows pane is shown to the right of Figure 10. Set the IP address to 192.168.7.1 and use Google’s DNS server address of 8.8.8.8. Click OK to save. Once completed you should now notice that the status panel for the Ethernet 2 connection shows active IPv4 connectivity.
The above actions will have reset the network connection so you’ll need to restore that by restarting PuTTY and using the same address as before.
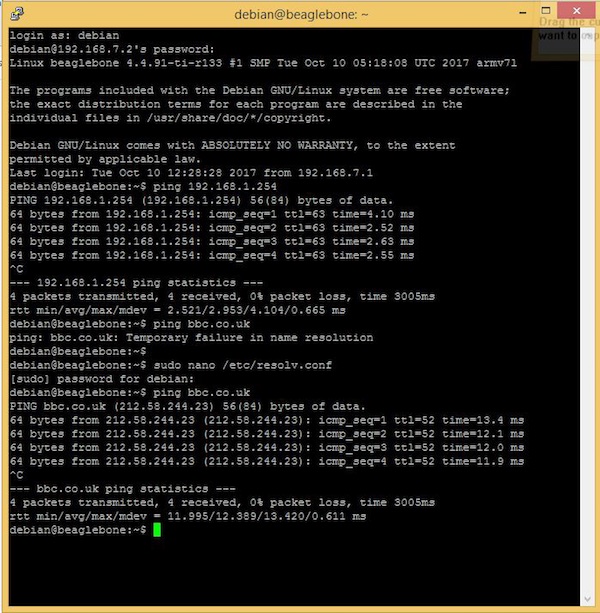
You should now have internet connectivity. You can test this by pinging a device within your local network. In the example illustrated in Figure 13, we ping the network router that is at 192.168.1.254. Success: we receive data back from our pings. While this has given us an internet connection, it hasn’t given any form of DNS name resolution. You can try this by pinging an external resource such as, in this example, bbc.co.uk. Simply add the line ‘nameserver 8.8.8.8’ using your preferred editor (nano in this example), and try again.
Figure 13. Adding DNS name resolution to the PocketBeagle.
You have now completed the setup of the PocketBeagle to the internet and you can proceed with your development projects.
Accessing PocketBeagle's Open-Source Designs
SBCs such as the PocketBeagle provide a resource-rich computing platform from which to commence your next embedded design. Key to this process is being safe in the knowledge that every part of this SBC is commercially available, and that the board design is open source too, with PCB CAD files published on the board’s GitHub site.
Our Industry Article program is an unpaid program that provides an avenue for industry partners to share projects and technical information with Maker Pro readers. Although each article is held to the same editorial standards as Maker Pro education articles, the viewpoints and opinions expressed in Industry Articles are those of the partner and not necessarily those of Maker Pro or its writers.