Learn about ROS, or Robot Operating System, a popular open-source middleware used in robotics!
Arduino boards are used to build small robots and have simple logic defined control. But with limited onboard computational power and software, often developers are unable to graduate to more complex robots. Often, as builders become more experienced, they look for robotics-specific software, as Arduino offers only part of the control.
This tutorial introduces a middleware software framework Robot Operating System (ROS) and walks you through the setup and use of ROS with Arduino to create more intelligent robotic systems.
What is ROS?
Robot Operating System (ROS) is one of the most popular and widely used robotics middleware software frameworks. It is an open-source platform that helps makers and developers alike to get started with robotics software without reinventing the wheel. ROS provides a standard communication architecture for seamless integration, use, development, and deployment of different components of a robotic system including control, perception, planning, and more. It is a language-agnostic platform with cross-platform communication support for different machines regardless of their site of deployment.
Probably the most used open-source microcontroller development board, Arduino offers an easy-to-use software-hardware interface and an ever-expanding user community. Arduino is mostly compatible with all digital and analog circuitry as well as external devices supporting serial communication interfaces like SPI, I2C, and UART.
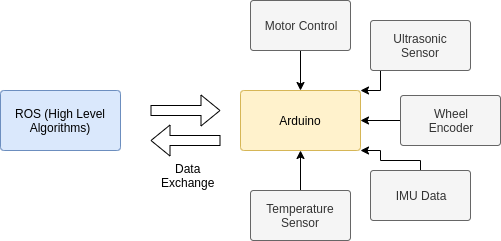
ROS-based software frameworks run the high-level algorithms and processes like robot models’ inference, filtering, motion strategy generation, controller algorithms, and more. An Arduino controller mounted on a robot is used to perform the low-level/embedded control and sensing. It includes any or all of motor control, temperature and ultrasonic sensors, IMUs and wheel encoders, and other devices.
ROS - Arduino Interaction Pipeline (Image Source - Original)
Communication Between ROS and Arduino
The ROS communication module operates on a customized TCPROS protocol within two paradigms: the many-to-many publisher-subscriber methodology, and the peer-to-peer faster services methodology. This tutorial uses the publisher/subscriber paradigm to communicate between the Arduino board and ROS running on the machine.
The rosserial ROS package uses Arduino’s universal asynchronous receiver/transmitter (UART) communication and converts the board to a ROS node that can publish ROS messages and subscribe to messages as well. The Arduino ROS node publisher can send data (from sensors or robot state) from the board to the machine running ROS while an Arduino ROS node subscriber can get instructions from the machine. The ros_lib Arduino library enables the Arduino board to communicate with ROS.
Setting Up the Infrastructure
Software Setup
1. Install ROS on the machine (laptop/PC). Elaborate steps available here.
Note: This is valid on ROS 1 running on a Linux machine
2. Install rosserial on the machine (distro could be kinetic/indigo/melodic).
sudo apt-get install ros-<distro>-rosserial
sudo apt-get install ros-<distro>-rosserial-arduino
3. Install the Arduino IDE on the machine from instructions mentioned here.
4. Install the ros_lib package in the IDE.
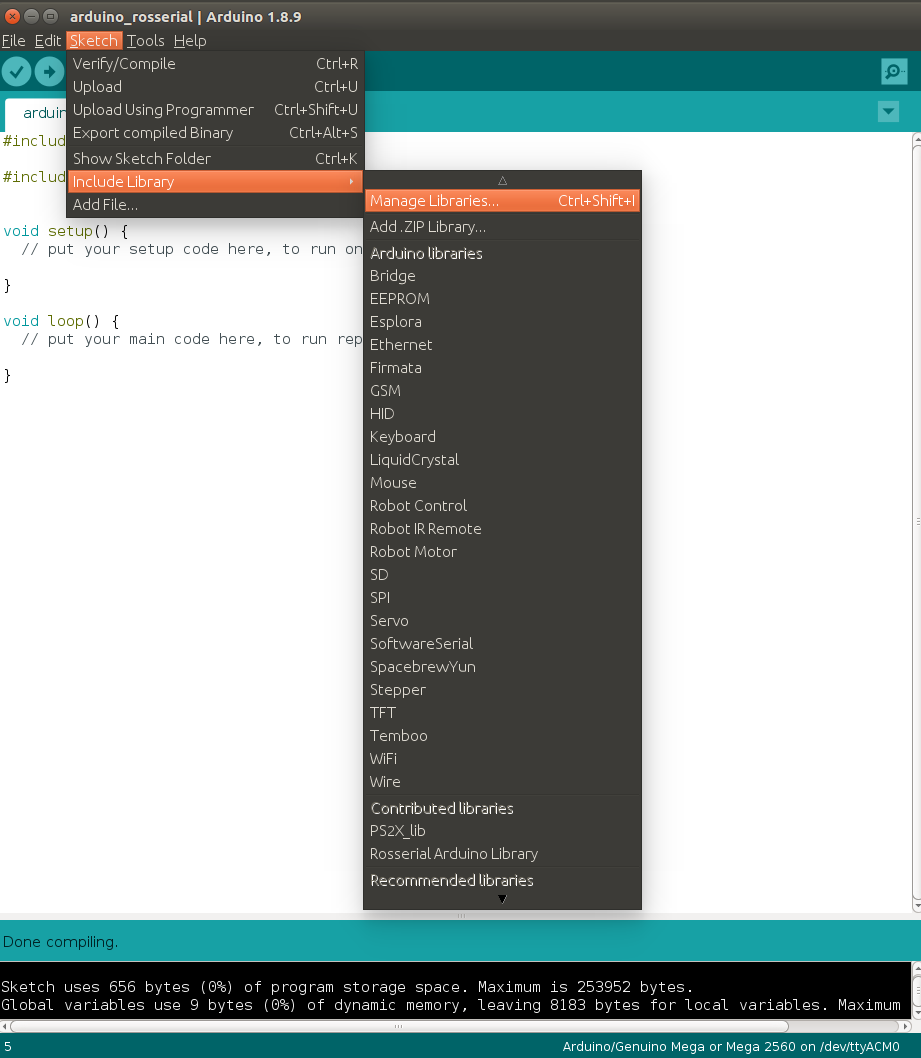
a. The easiest way to install the package is from the Arduino IDE itself. Navigate to Sketch > Include Library > Manage Library in the IDE and search for rosserial package
Dropdown menu to search for new Arduino packages
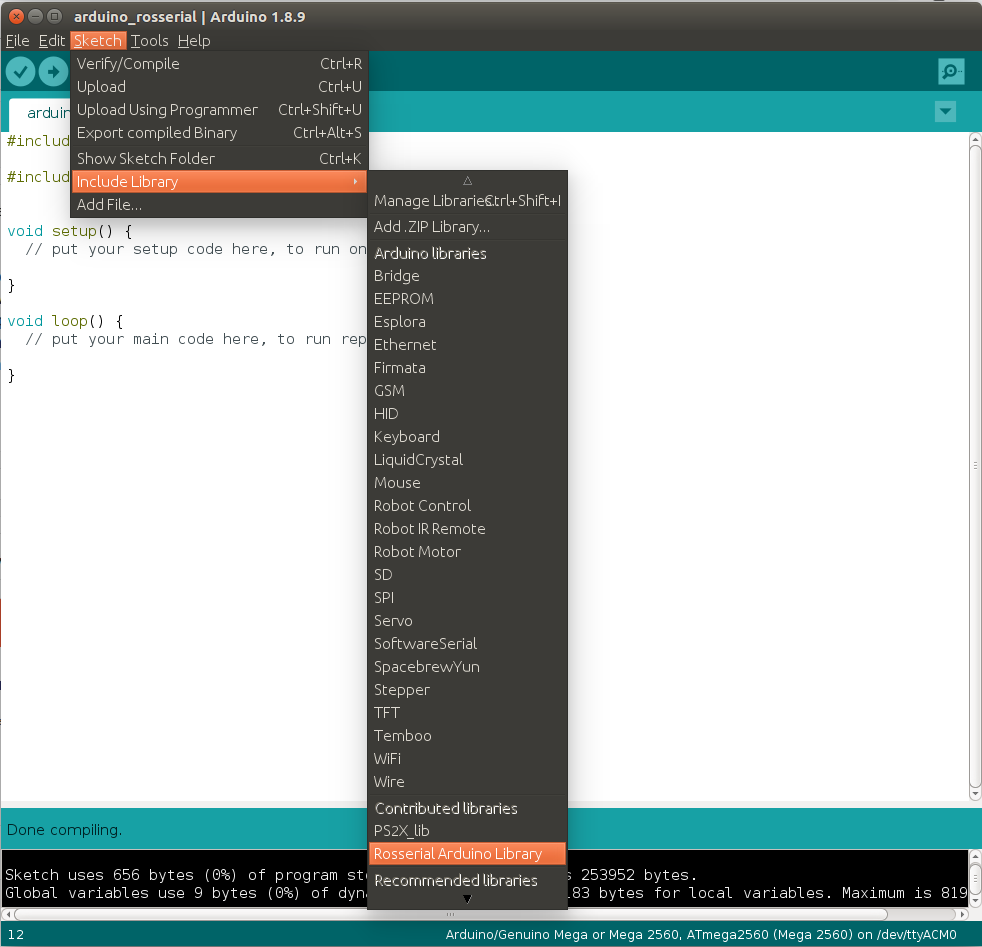
b. The Arduino IDE stores all the external libraries under the ~/Arduino/libraries folder location. It loads these libraries in the development environment and can be seen in the IDE. After installation, the Rosserial Arduino Library can be seen in the drop-down list.
External Libraries show up in the list
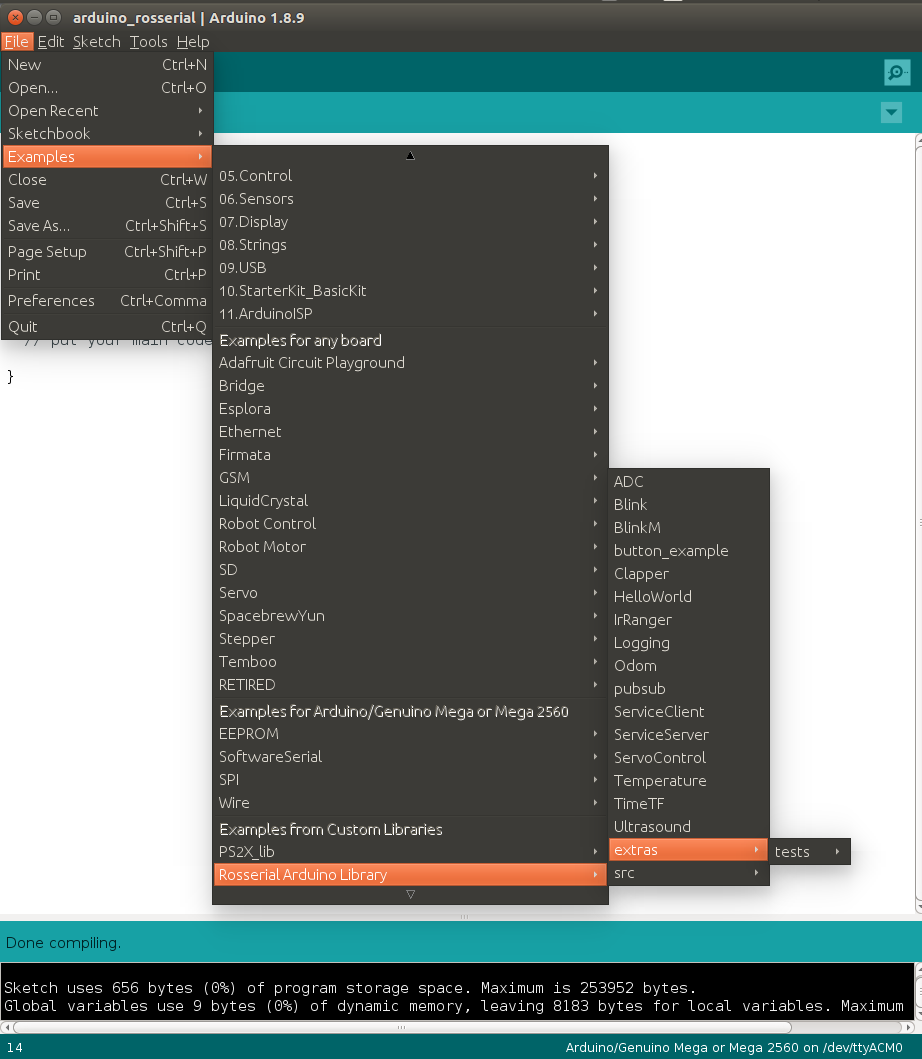
c. Once installed, the example sketches should also be visible in the IDE.
Example Sketches from available libraries
Hardware Setup
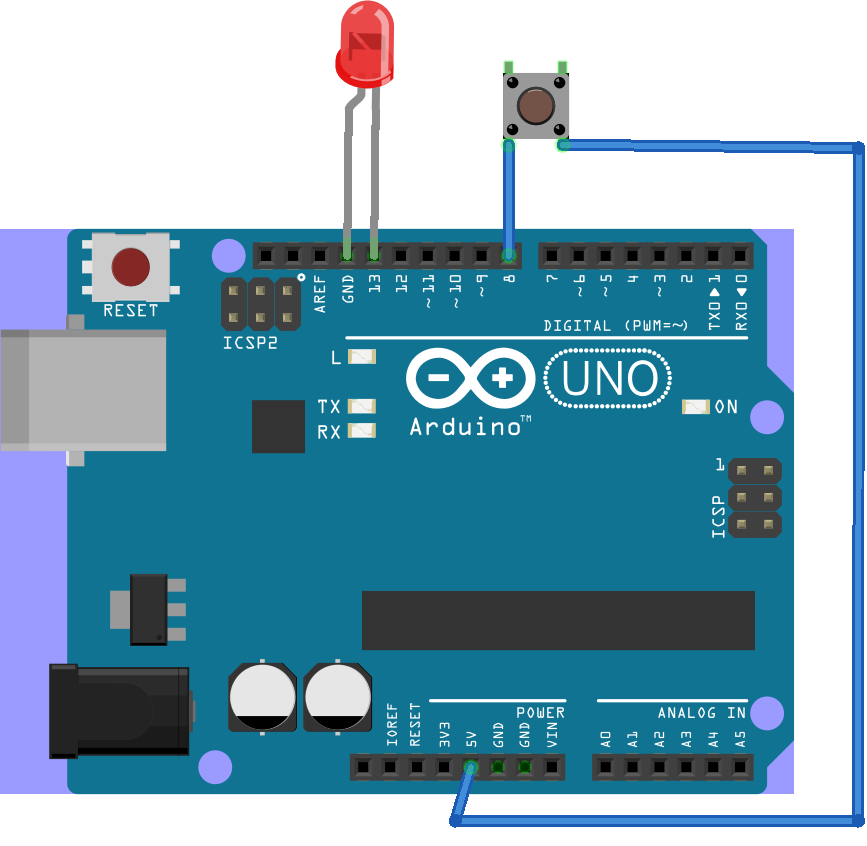
We use a simple setup to use the Arduino board as a publisher and subscriber.
1. Publisher: A push-button is connected to the Arduino board and it is toggled to send digital HIGH/LOW signals over ROS to the machine. The message is seen in the terminal on the machine.
2. Subscriber: An LED is connected to the Arduino board and is toggled ON/OFF using instructions obtained from the ROS user via the terminal.
Hardware Connections - (Image Source- Original)
Code and Explanation
Arduino Code
#include <ros.h>
#include <std_msgs/String.h>
#include <std_msgs/UInt16.h>

#define BUTTON 8
#define LED 13

ros::NodeHandle node_handle;

std_msgs::String button_msg;
std_msgs::UInt16 led_msg;

void subscriberCallback(const std_msgs::UInt16& led_msg) {
  if (led_msg.data  == 1) {
    digitalWrite(LED, HIGH);
  } else {
    digitalWrite(LED, LOW);
  }
}

ros::Publisher button_publisher("button_press", &button_msg);
ros::Subscriber<std_msgs::UInt16> led_subscriber("toggle_led", &subscriberCallback);

void setup()
{
  pinMode(LED, OUTPUT);
  pinMode(BUTTON, INPUT);

  node_handle.initNode();
  node_handle.advertise(button_publisher);
  node_handle.subscribe(led_subscriber);
}

void loop()
{
  if (digitalRead(BUTTON) == HIGH) {
    button_msg.data = "Pressed";
  } else {
    button_msg.data = "NOT pressed";
  }

  button_publisher.publish( &button_msg );
  node_handle.spinOnce();

  delay(100);
}
Explanation
The code imports the ros_lib library and standard ROS messages for std_msgs::String and std_msgs::UInt16. Variables are declared for storing the ROS data types and Arduino board pins.
The code declares a publisher named button_publisher which publishes button_msg of std_msgs::String data type to the button_press topic. Similarly, a subscriber named led_subscriber subscribes to the toggle_led topic which gets an std_msgs::UInt6 data type.
A ROS node handle is declared and then initialized in the setup() method. The node handle advertises the publishers and subscribes to the topic.
The subscriberCallback() is the method called when data is received on the Arduino subscriber node. The callback method checks if the ROS topic data is HIGH or not and accordingly toggles the connected LEDs.
Finally, the loop() method runs an infinite loop and reads information from the button and publishes it to ROS. The node handle makes a call to spinOnce() to handle communication.
Program Execution
Connect the Arduino Uno board to the laptop via the USB cable and confirm that the board appears in the list of available serial ports in the Arduino IDE. Compile the code, select the board type and upload it to the board.
Once the code is uploaded, execute the following commands in the machine’s terminal.
- Start the ROS Master - roscore
- Run rosserial client on the machine - rosrun rosserial_python serial_node.py /dev/tty<USB# or ACM#>
- The serial port is determined at run time for either ttyUSB or ttyACM. The exact port number can be found from the Arduino IDE or using dmesg | grep tty.
- Read published data returning if the button is pressed on the Arduino board or not - rostopic echo button_press
- Publish data to toggle the LED connected on the Arduino - rostopic pub toggle_led std_msgs/UInt16 "data: 0" The data is “0” to switch off the LED and “1” to switch on the LED.
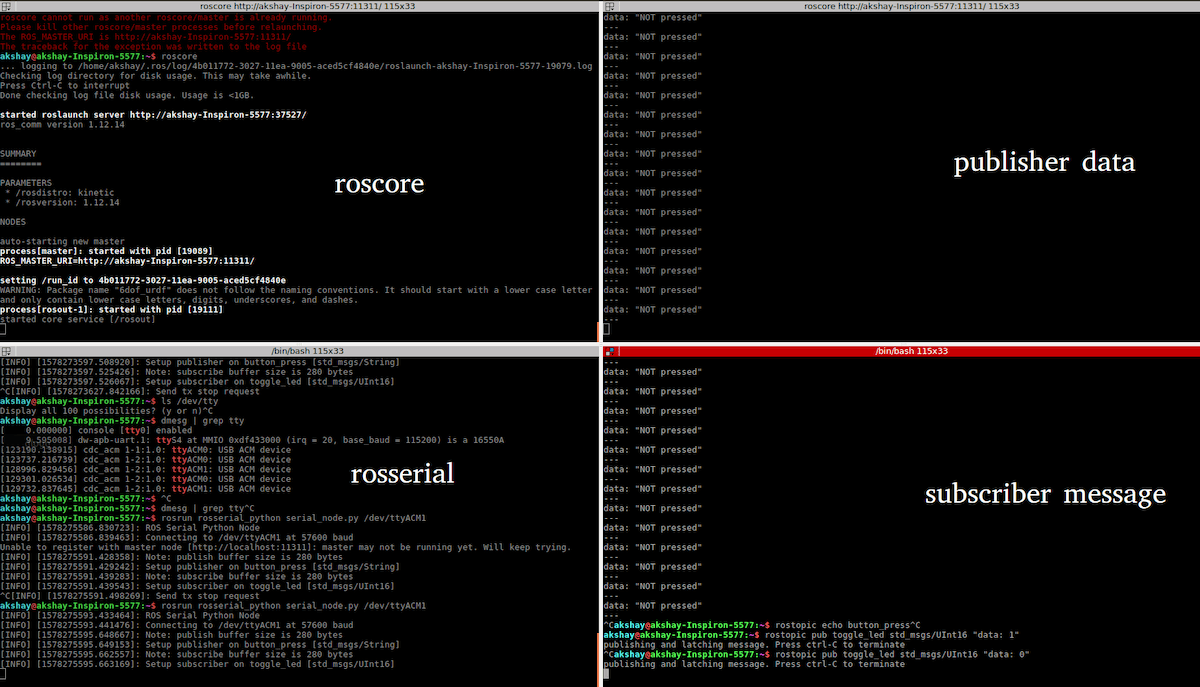
Use multiple terminal tabs to execute instructions and observe the response in the same screen
The rosserial provides a very standard platform that allows makers and developers to seamlessly interface between Arduino and ROS. It enables the use of two very famous and useful technologies to explore new opportunities in robotics. This method allows for distributed computing, centralized control, control abstraction, and several other benefits to robotic systems at a very low cost.