Learn about Arduino SD card data logging using an LM35 temperature sensor and a DS3231 module.
In this article, you are going to learn about Arduino SD card data logging. We will use the LM35 temperature sensor to get the temperature value, and the DS3231 module to get the time and date. Then we will use the SD card module to open the SD card, and we will enter the date, time, and temperature in the SD card file.
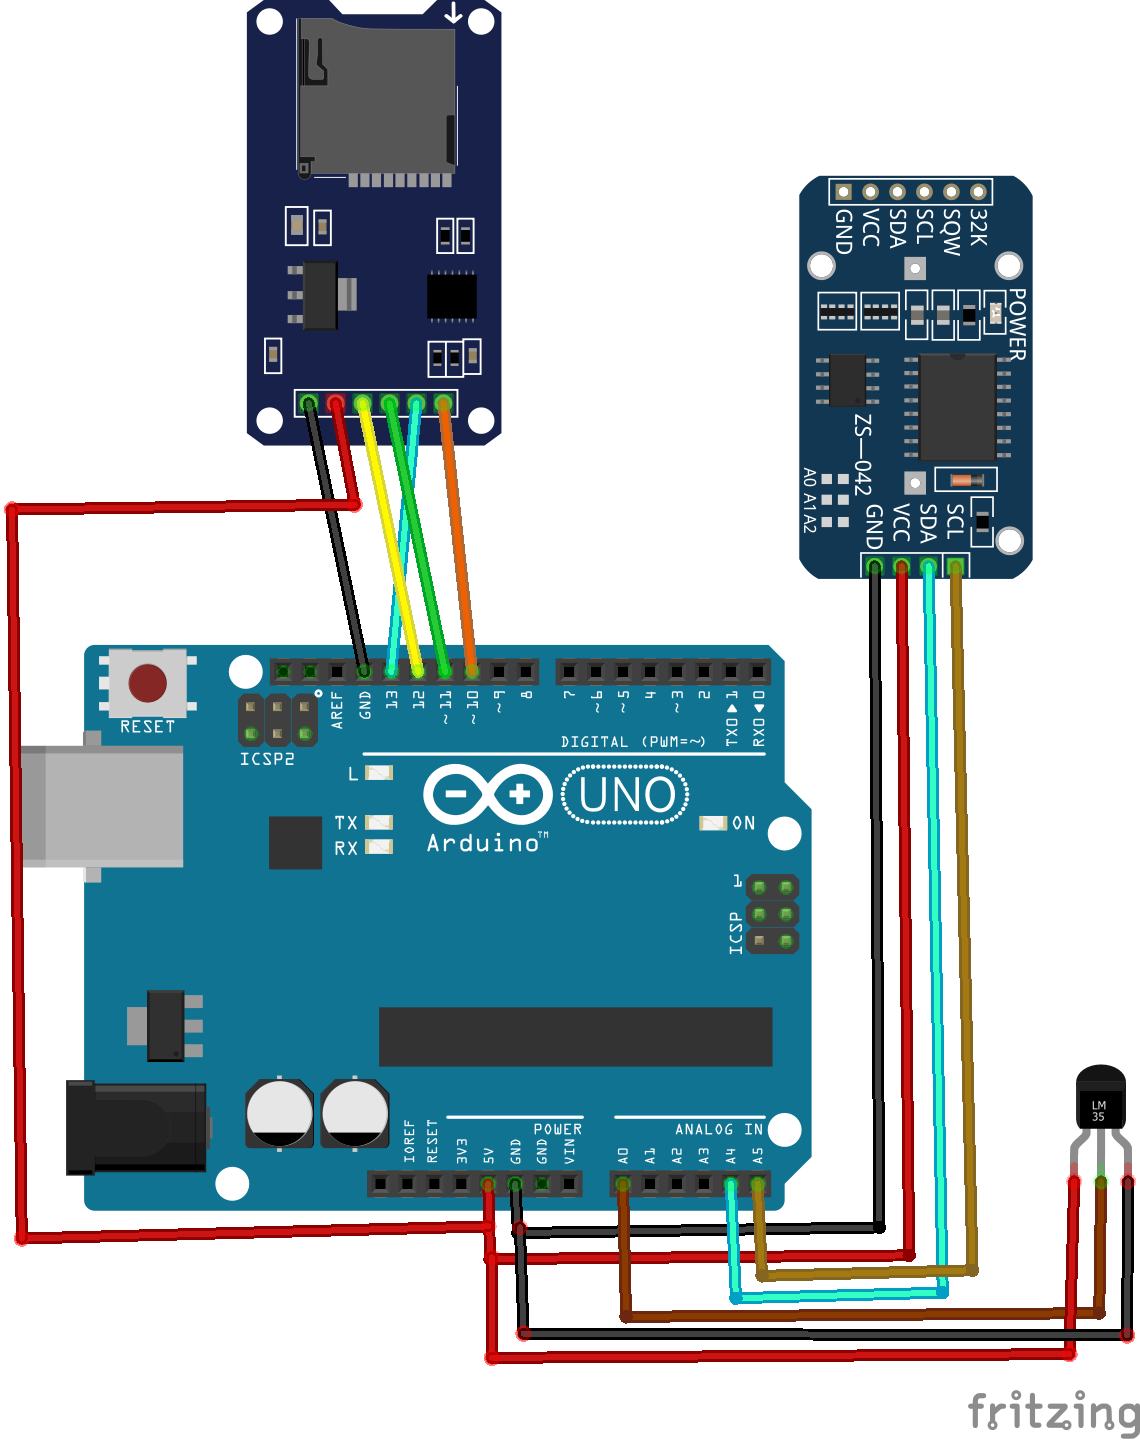
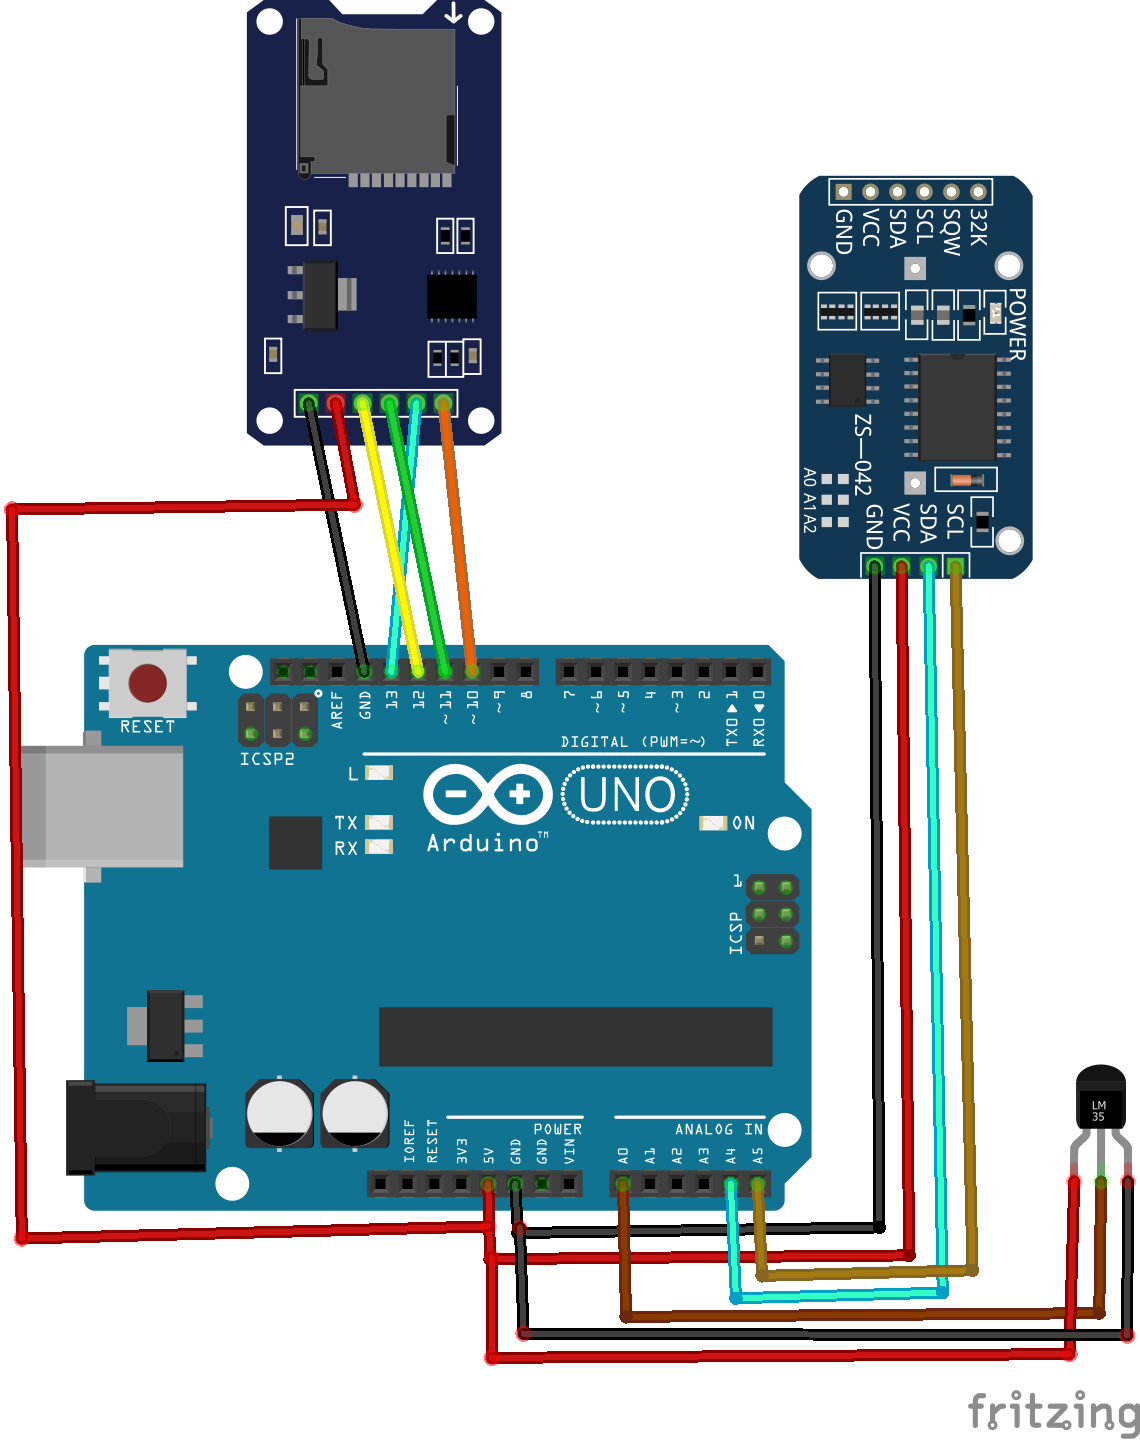
Circuit Diagram
First of all, connect the SD card module to the Arduino. The SD card module works with the Arduino through the SPI communication. The SPI pins on the Arduino are pins 10, 11, 12, and 13.
The connections of the OLED with the Arduino are as follows:
- Connect CS of SD card module to pin 10 of Arduino
- Connect MOSI of SD card module to pin 11 of Arduino
- Connect MISO of SD card module to pin 12 of Arduino
- Connect SCK of SD card module to pin 13 of Arduino
- Connect VCC of SD card module to 5V pin of Arduino
- Connect GND of SD card module to GND pin of Arduino
After that, connect the DS3231 module with the Arduino. The DS3231 module works with the Arduino through the I2C communication. The pins for I2C communication on the Arduino are SDA and SCL.
Connect the DS3231 module with the Arduino as follows:
- Connect GND of DS3231 to GND pin of Arduino
- Connect VCC of DS3231 to 5V pin of Arduino
- Connect SDA of OLED to A4 pin of Arduino
- Connect SCL of OLED to A5 pin of Arduino
In the end, connect the LM35 sensor with the Arduino. Connect the left pin of LM35 to 5V of Arduino, middle pin to A0 of Arduino, and the left pin to ground of the Arduino.
Code Explanation
First, include the libraries for the SD card and for the DS3231 RTC module. The SD card works with the Arduino through the SPI communication, so we have included the SPI library.
#include <SD.h>
#include <SPI.h>
#include <DS3231.h>
Then we initialize an object “sdcard_file” of type File, which will help us use the functions of the library.
After that, we define the pins where we have connected the CS pin of SD card module and the lm35 sensor pin.
File sdcard_file;
DS3231  rtc(SDA, SCL);
int CS_pin = 10; // Pin 10 on Arduino Uno
const int sensor_pin = A0;
float temp;
float output;
Next we declare the CS pin as output and the LM35 sensor pin as our input. Then we start the serial communication and communication with the RTC module.
After that, we check if the SD card is correctly initialized or not. If the SD card is initialized correctly, then "SD card is ready to use" is printed on the serial monitor.
pinMode(sensor_pin,INPUT);
  pinMode(CS_pin, OUTPUT);
  Serial.begin(9600);
  rtc.begin();
  // SD Card Initialization
  if (SD.begin())
  {
    Serial.println("SD card is ready to use.");
  } else
  {
    Serial.println("SD card initialization failed");
    return;
  }
Next we print the “Date”, “Time”, and “Temp” on the serial monitor. Then we open the SD card file and print the same thing there. If the file that we named is not there, it will be created there.
After printing there, we close the SD card so that the data in the file gets saved.
Serial.print("Date  ");
  Serial.print("      ");
  Serial.print("   Time  ");
  Serial.print("     ");
  Serial.print("   Temp   ");
  Serial.println("     ");
  sdcard_file = SD.open("data.txt", FILE_WRITE);
  if (sdcard_file) {
    sdcard_file.print("Date  ");
    sdcard_file.print("      ");
    sdcard_file.print("   Time  ");
    sdcard_file.print("     ");
    sdcard_file.print("   Temp   ");
    sdcard_file.println("     ");
    sdcard_file.close(); // close the file
  }
In the loop function, we read from the LM35 sensor and calculate the output. Then we print the current date, current time, and current temp on the serial monitor.
After that, we open the SD card file again and print the current date, current time, and current temp.
output = analogRead(sensor_pin);
  temp =(output*500)/1023;
  Serial.print(rtc.getDateStr());
  Serial.print("     ");
  Serial.print(rtc.getTimeStr());
  Serial.print("      ");
  Serial.println(temp);
  sdcard_file = SD.open("data.txt", FILE_WRITE);
  if (sdcard_file) {
    sdcard_file.print(rtc.getTimeStr());
    sdcard_file.print("     ");
    sdcard_file.print(rtc.getTimeStr());
    sdcard_file.print("     ");
    sdcard_file.println(temp);
    sdcard_file.close(); // close the file
  }
  // if the file didn't open, print an error:
  else {
    Serial.println("error opening test.txt");
  }
  delay(3000);
}
You should now have a functioning data logger that uses an Arduino to keep track of the time, date, and temperature around your sensor.
What would you add to this project? Fork it and develop your own version.
Full Code
#include <SD.h>
#include <SPI.h>
#include <DS3231.h>
File sdcard_file;
DS3231  rtc(SDA, SCL);
int CS_pin = 10; // Pin 10 on Arduino Uno
const int sensor_pin = A0;
float temp;
float output;

void setup() {
  Serial.begin(9600);
  pinMode(sensor_pin,INPUT);
  pinMode(CS_pin, OUTPUT);
  rtc.begin();
  // SD Card Initialization
  if (SD.begin())
  {
    Serial.println("SD card is ready to use.");
  } else
  {
    Serial.println("SD card initialization failed");
    return;
  }

  Serial.print("Date  ");
  Serial.print("      ");
  Serial.print("   Time  ");
  Serial.print("     ");
  Serial.print("   Temp   ");
  Serial.println("     ");
  sdcard_file = SD.open("data.txt", FILE_WRITE);
  if (sdcard_file) {
    sdcard_file.print("Date  ");
    sdcard_file.print("      ");
    sdcard_file.print("   Time  ");
    sdcard_file.print("     ");
    sdcard_file.print("   Temp   ");
    sdcard_file.println("     ");
    sdcard_file.close(); // close the file
  }
  // if the file didn't open, print an error:
  else {
    Serial.println("error opening test.txt");
  }
}

void loop() {
  output = analogRead(sensor_pin);
  temp =(output*500)/1023;
  Serial.print(rtc.getDateStr());
  Serial.print("     ");
  Serial.print(rtc.getTimeStr());
  Serial.print("      ");
  Serial.println(temp);

  sdcard_file = SD.open("data.txt", FILE_WRITE);
  if (sdcard_file) {
    sdcard_file.print(rtc.getTimeStr());
    sdcard_file.print("     ");
    sdcard_file.print(rtc.getTimeStr());
    sdcard_file.print("     ");
    sdcard_file.println(temp);
    sdcard_file.close(); // close the file
  }
  // if the file didn't open, print an error:
  else {
    Serial.println("error opening test.txt");
  }
  delay(3000);
}


