In this tutorial, we are making an Arduino plasma speaker.
A plasma speaker is a device that plays sounds not by using a regular speaker, but by using high-voltage plasma as the transducer. In order to make it work, we need a basic understanding of electronics, transformers, modulation, and arc dynamics, all of which I will cover.
Warning! Even though here we are talking high voltage/low current (~25kV, 15W), the voltage is high enough to make electric shock a real hazard, so I would advise anyone with heart problems/pacemakers to not try this project.
The Theory Behind a Plasma Speaker
In order to play a sound with an arc, we first need a stable arc. In order to find out how to do this, we need to know some basics around what makes a plasma speaker work.
Arc Dynamics
Arc dynamics are basically a concept we borrow from arc welders. The most important thing here to note is that an arc of a given volume has a minimum required energy in order to stay stable at a certain temperature.
When a high enough voltage across a particular dielectric is present, the molecules will ionize a path, allowing a current to flow through. The flow of current through such resistance has a power dissipation (I2R), so heat is released. The heat released is crucial, because a larger volume of plasma is less susceptible to outside disturbances.
Because of the high temperature of the arc, the arc itself causes an increase in the volume of the gas with which it started. This increase and decrease of volume over a short amount of time sends out a shockwave. The outer surface of the plasma acts as the membrane of a speaker, creating a sound by altering the pressure. This can be commonly experienced during a lightning discharge.
By this, we can conclude that the excursion of our “speaker” is caused by the volume of the arc, and because the volume of the arc is directly related to the power input, we can produce a sound from the arc if we change the power input of the high voltage arc. We can achieve this with PWM.
Basically, what we need is the Arduino reading the audio signal we want to play and outputting a PWM signal based on the output level. Turns out it’s not quite that simple! Enter the next requirement: direct port setup.
Direct Port Setup
To get a smooth and quiet arc, we need to go with either a smoothed DC output or an ultrasonic frequency. The first option is very hard and complicated, so I opted for the second one. In order to change the default frequency of the PWM register to be in the ultrasonic range, I used Arduino’s Secrets of Arduino PWM.
Arduino Code
For those that want to jump right into the code, here it is.
void setup() {
analogReference(INTERNAL);//we are measuring low values, so the internal 1.1V reference will give us better accuracy.
pinMode(5, OUTPUT);
pinMode(A0,INPUT);
TCCR0A=0;//reset the register
TCCR0B=0;//reset tthe register
TCCR0A=0b01010011;// fast pwm mode
TCCR0B=0b00001010;// prescaler 8 and WGM02 is 1
OCR0A=39;//control value
}
void loop(){
  analogWrite(5, map(analogRead(A0), 1, 300, 1, 1000));//
}
This sets the frequency at around 25kHz, plenty over the hearing range. This will give us a nice stable and quiet arc.
The code maps and prints the value read at the input. Simple as that. The real problems become apparent when we try to build the hardware.
The Hardware
The hardware should be pretty straightforward. The Arduino receives an audio input at the A0 pin, uses the measured values to control a PWM output, and that is then fed into our high voltage transformer, right? Not quite. We also need a flyback driver.
To build this project, you need:
- 1x 12V 2-5A PSU
- 1x Arduino Uno
- 1x Flyback transformer from any CRT TV/monitor. Primary wound directly on the core with 12 turns of 23AWG copper wire
- 1x IRFP250 MOSFET
- 1x TIP122 or similar Darlington transistor
- 1x 1k Ohm 1/4W resistor
- 1x 47 Ohm 1W resistor
As you probably know, the 5V at 20mA that the Arduino can supply is really really weak. We can’t expect it to drive a flyback transformer with that kind of power. Fortunately for us, MOSFETs exist! The problem is, most MOSFETs don’t get fully turned on with 5V. This is a problem because incomplete turn-on causes high resistance, which causes high losses.
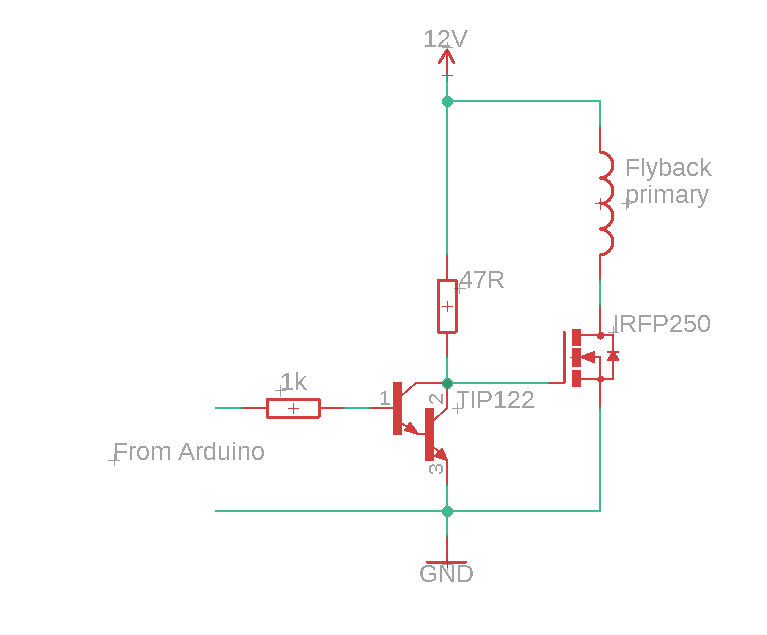
I tried anyway with an IRFP250, and it heated up quite a bit due to resistive losses. What we need is a level shifter to convert the 0-5V square wave into a 0-12V square wave. and because we don’t work with very high frequencies, this can be achieved with 4 components, like this:
Warning: This level shifter acts better the lower the frequency, I wouldn’t use it above some 50kHz.
And here is the result!