Learn how to change the pitch of the sound player using buttons with Arduino, Processing, and Wekinator.
In this article, you are going to learn about how to change the pitch of the sound played using buttons with Arduino, Processing, and Wekinator.
We will read the states of the buttons using Arduino and will send the input to Processing. Processing will get it and will forward it to the Wekinator software. Wekinator will get trained according to the samples we send through the Processing and it will give the output to Chuck where the sound pitch will change.
Wekinator is a free, open source software that allows anyone to use machine learning to build new musical instruments, gestural game controllers, computer vision, or computer listening systems. Wekinator allows users to build new interactive systems by demonstrating human actions and computer responses, instead of writing programming code.
Setting up the Arduino Board
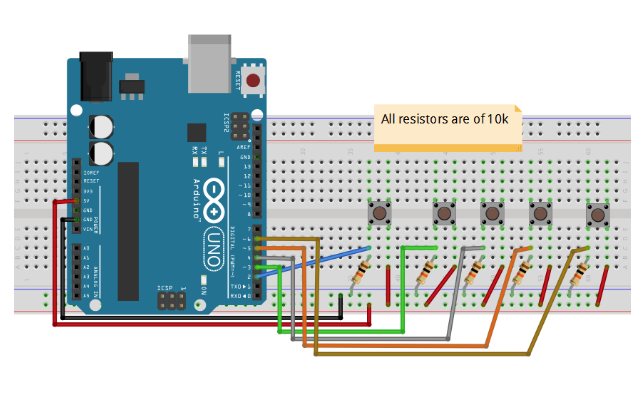
This project uses five buttons wired to an Arduino Uno. Make the connections for the buttons with the Arduino as seen in the figure below.
Project Sketches
On the input side, we will have an Arduino sketch and a Processing sketch. The Arduino sketch will read the states of the five buttons and forward it to Processing through serial communication. The Processing sketch will receive this data and will forward it to the Wekinator through the OSC (open sound control) protocol.
Arduino Sketch
#define buttonPin1 6
#define buttonPin2 5
#define buttonPin3 4
#define buttonPin4 3
#define buttonPin5 2

int inByte = 0;   // incoming serial byte

// the setup function runs once when you press reset or power the board
void setup() {
  Serial.begin(115200);
  pinMode(buttonPin1, INPUT);
  pinMode(buttonPin2, INPUT);
  pinMode(buttonPin3, INPUT);
  pinMode(buttonPin4, INPUT);
  pinMode(buttonPin5, INPUT);
  establishContact(); // send a byte to establish contact until receiver
  // responds
}

// the loop function runs over and over again forever
void loop() {
  // if we get a valid byte, read button pins:
  if (Serial.available() > 0) {
    // get incoming byte:
    inByte = Serial.read();
    // read the state of the pushbuttons:
    int buttonState1 = digitalRead(buttonPin1);
    int buttonState2 = digitalRead(buttonPin2);
    int buttonState3 = digitalRead(buttonPin3);
    int buttonState4 = digitalRead(buttonPin4);
    int buttonState5 = digitalRead(buttonPin5);

    Serial.write(buttonState1);
    Serial.write(buttonState2);
    Serial.write(buttonState3);
    Serial.write(buttonState4);
    Serial.write(buttonState5);
  }
}

void establishContact() {
  while (Serial.available() <= 0) {
    Serial.print('A'); // send a capital A
    delay(300);
  }
}
Processing Sketch
import processing.serial.*;
import oscP5.*;
import netP5.*;

OscP5 oscP5;
NetAddress dest;

Serial myPort;      // The serial port
int[] serialInArray = new int[5]; // Where we'll put what we receive
int serialCount = 0;     // A count of how many bytes we receive
int button1, button2, button3, button4, button5;
boolean firstContact = false;  // Whether we've heard from the microcontroller

void setup() {
 size(256, 256); // Stage size
 noStroke();  // No border on the next thing drawn

 // Print a list of the serial ports, for debugging purposes:
 println(Serial.list());
 // I know that the first port in the serial list on my mac
 // is always my FTDI adaptor, so I open Serial.list()[0].
 // On Windows machines, this generally opens COM1.
 // Open whatever port is the one you're using.
 String portName = Serial.list()[0];
 myPort = new Serial(this, portName, 115200);

 /* start oscP5, sending messages at port 9000 */
 oscP5 = new OscP5(this,9000);
 dest = new NetAddress("127.0.0.1",6448);
}

void draw() {
 //Send the OSC message
 sendOsc();
}

void serialEvent(Serial myPort) {
 // read a byte from the serial port:
 int inByte = myPort.read();
 // if this is the first byte received, and it's an A,
 // clear the serial buffer and note that you've
 // had first contact from the microcontroller.
 // Otherwise, add the incoming byte to the array:
 if (firstContact == false) {
 if (inByte == 'A') {
  myPort.clear();   // clear the serial port buffer
  firstContact = true;  // you've had first contact from the microcontroller
  myPort.write('A');  // ask for more
 }
 }
 else {
 // Add the latest byte from the serial port to array:
 serialInArray[serialCount] = inByte;
 serialCount++;
 // If we have 3 bytes:
 if (serialCount > 4 ) {
  button1 = serialInArray[0];
  button2 = serialInArray[1];
  button3 = serialInArray[2];
  button4 = serialInArray[3];
  button5 = serialInArray[4];
  // print the values (for debugging purposes only):
  println(button1 + "&" + button2 + "&" + button3 + "&" + button4 + "&" + button5);
  // Send a capital A to request new sensor readings:
  myPort.write('A');
  // Reset serialCount:
  serialCount = 0;
 }
 }
}

void sendOsc() {
  OscMessage msg = new OscMessage("/wek/inputs");
  msg.add((float)button1);
  msg.add((float)button2);
  msg.add((float)button3);
  msg.add((float)button4);
  msg.add((float)button5);
  oscP5.send(msg, dest);
}
Setting up ChucK
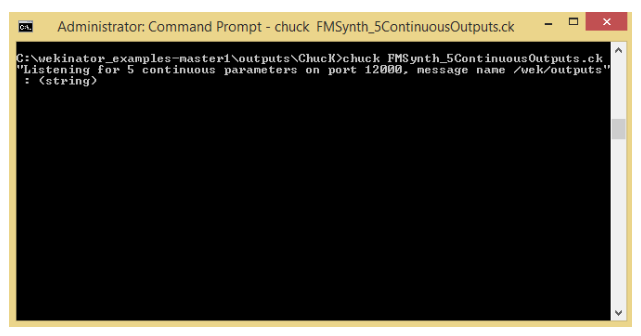
On the output side, we can use ChucK to receive five continuous outputs from Wekinator and will make the sounds according to those.
Download the FM Synthesis example for the operating system that you are using.
Now open up the terminal and go to the directory where you have placed it and type in the following line:
chuck FMSynth_5ContinousOutputs.ck
Chuck will start to listen for the output from the Wekinator and on receiving the output, it will change the pitch of a sound.
Setting up Wekinator
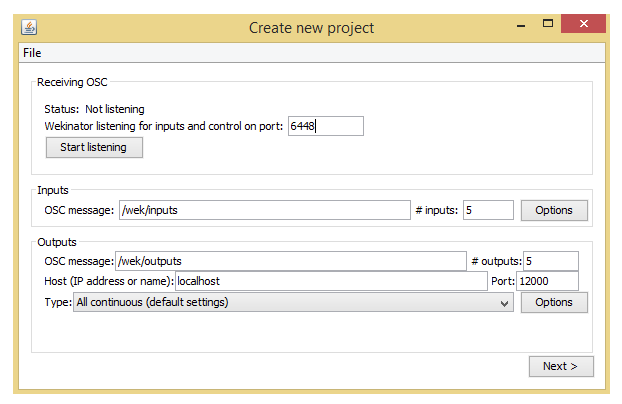
Now open Wekinator and make the following adjustments to the settings:
- Set the inputs to 5 and outputs to 5
- Select the output type to all continuous
Wekinator will receive five inputs from Processing and, after training, will send five different outputs to Chuck. From there, ChucK will produce different sounds according to the Wekinator output.
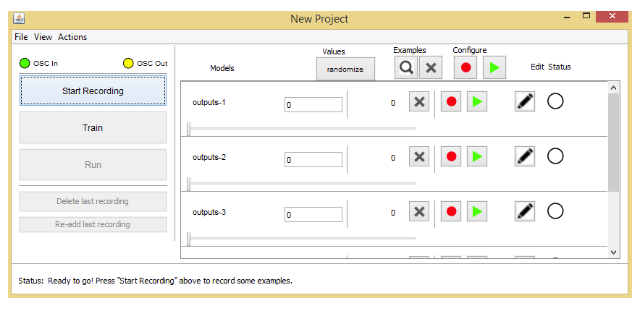
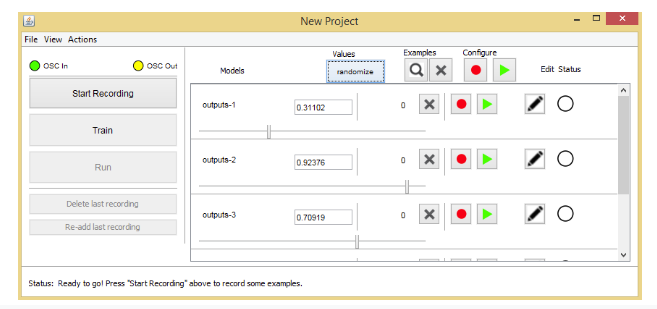
Click on the Next button and you will see this window:
Press the first button and click on randomize. Start the recording for a second and it will record some samples.
Press the second button and click on randomize. Then record for a second.
Similarly, record the samples for the other three buttons.
After recording the five samples, click on train to train Wekinator. Then click run. Now when you press the buttons, the program will make the sound according to the inputs that you give.
Related Projects