Never press the remote again.Control the TV, Set Top box or any remote controlled device through Alexa voice command.
This project uses your voice commands to Alexa and the NodeMCU board as an IR blaster to send remote infrared signals to your home TV or Set Top box.
How do we do it?
The system interface of our project is as below:
The project has three steps:
- Make the remote
- Add voice control to the remote
- Throw away all your remotes (Optional)
STEP 1: Make the remote
When we press a button on the remote, it sends some code through the infrared led to the device we control. A unique code is send for each button we press on the remote.
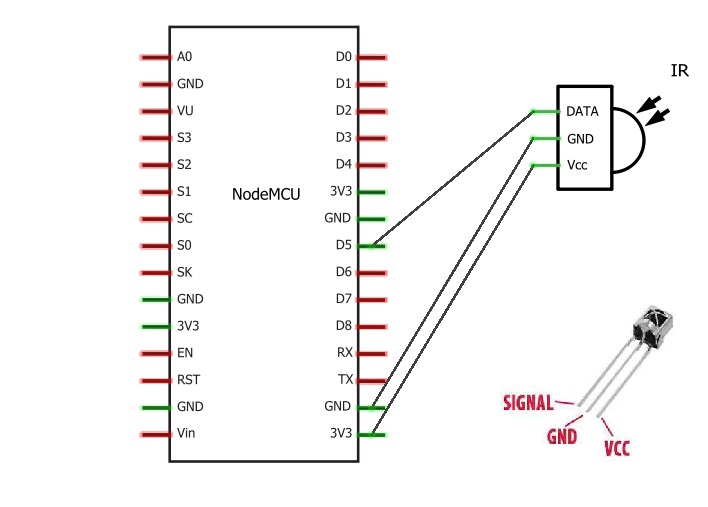
To make a remote we have to send the specific code of the remote through our IR blaster circuit and for that, we need to know the signal our TV and STB remotes send for different buttons.So we are going to first assemble an IR receiver using NodeMCU board and an IR revceiver LED.
The IR receiver circuit:
IR Receiver LED such as the VS1838B will do the job as well.
Figure: 2 IR Receiver Circuit
Programming the IR receiver:
There is a library for Arduino Sketch IRremote8266 to send and receive infrared signals with multiple protocols using an ESP8266 based board like NodeMCU. You can find the installation instruction in the above link.
Now, Open Arduino software and open “IRrecvDemo” sketch under File>Examples>IRremote8266
Upload the code to the board and now we are ready to get signals from any remote.
Once the sketch is uploaded to our NodeMCU board,
Go to Tools > Serial Monitor and press any button on your remote (TV or set top box) pointing towards the IR receiver.
This way you get the Hex codes for all the buttons on your remote and write it down somewhere.
You can repeat the same process to decode the signals from as many remote you want.
I have decoded the IR signal of my TV remote and my STB (Tata sky) remote.
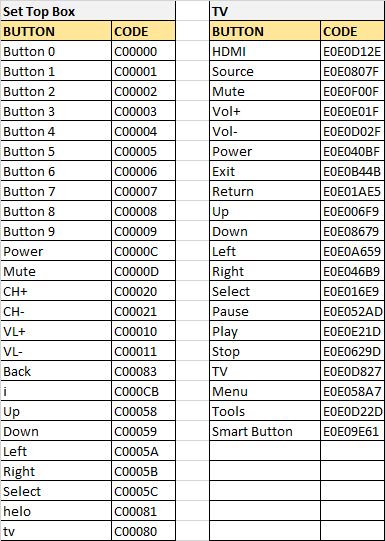
Here is a list of codes I received from TV and STB remotes using the IR receiver.
Figure: 3 Infrared signals from TV and STB remotes
Note: I have only mentioned codes for important functions here.
Now we have the signal codes we are ready to send the signals to out TV or STB through NodeMCU.
With the IRremote8266 library, it is easy to send IR signal. To see how easy it is, Open Arduino software and open “IRsendDemo” sketch under File>Examples>IRremote8266
If you go through the Sketch code, you will find that there are different modes or protocols of sending the IR signal code. Most remotes support NEC protocol. To know about different IR protocols refer this link. For my Set Top Box (Tata Sky) I will use RC6 protocol and for the TV (Samsung) I will use the built-in “SAMSUNG” protocol.
For example:
irsend.sendRC6(0xC0000C,24); // Sends power on/off signal to Set Top box
irsend.sendSAMSUNG(0xE0E0F00F,32) // Sends power on/off signal to TV
The IR transmitter circuit:
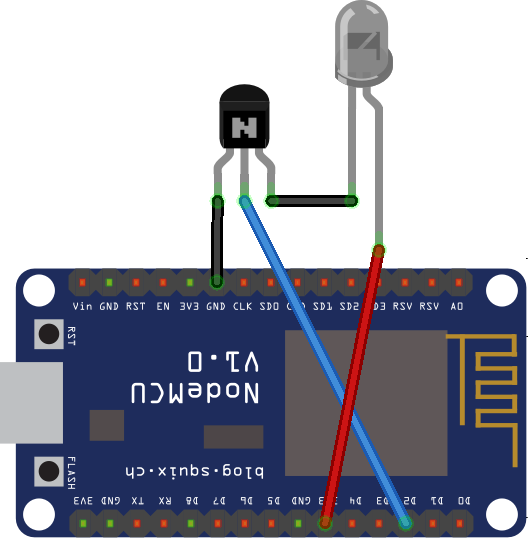
Now we configure our NodeMCU board to act as an IR blaster and the circuit is below.
Figure: 4 IR Transmitter Circuit
I have used an IR transmitter LED from an old remote but you can use any standard 940nm IR LED and NPN transistor (2N3904)
STEP 2: Add voice control
Through sinric we can connect our ESP8266 or Arduino boards to Amazon Alexa or Google Home for free.
Here is the link to github page to find some examples to connect our ESP8266 NodeMCU board to Alexa through sinric.com
To enable Alexa recognize our controllable devices we need to create our devices at sinric.com
When we create a controllable device at sinric.com and include the device ID in our code in ESP8266 board, we can access those devices through Alexa Smart home option. Once added, we can say something like “Alexa, Switch on Light 1” where “Light 1” is the name of the device we created at sinric.com and used the device ID in our Arduino code.
We are creating two devices at sinric.com as we want to control our TV and Set Top box.
Go to sinric.com
Register
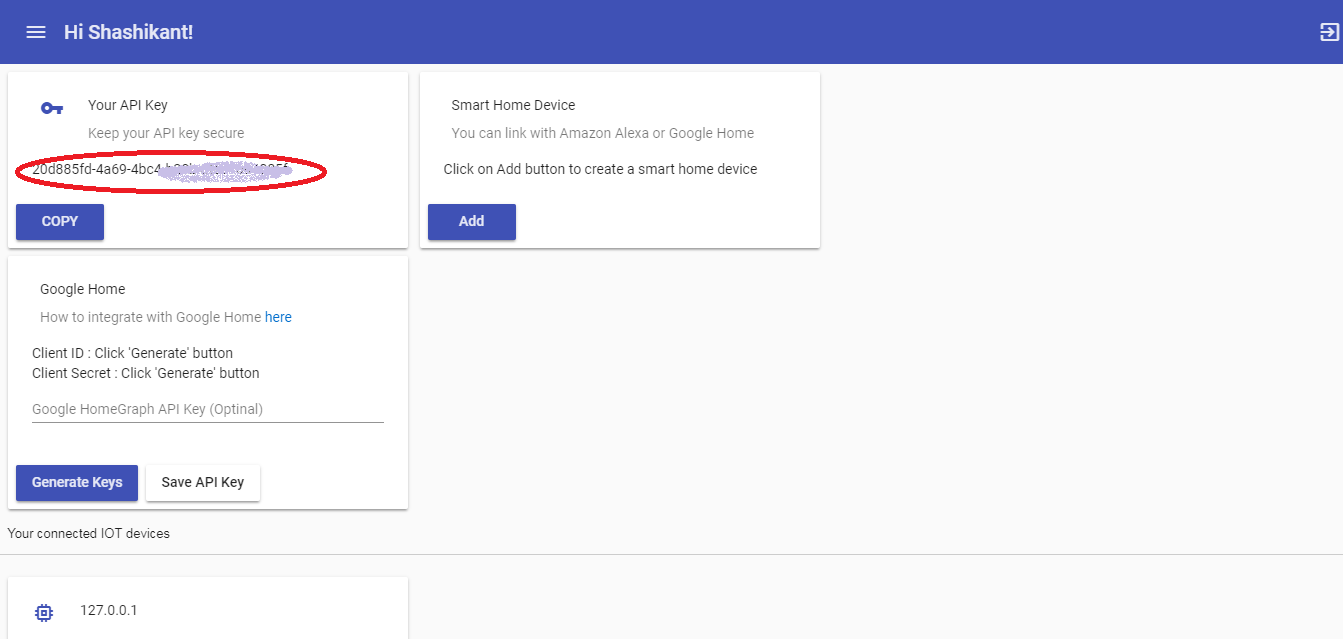
Login and you can see your dashboard something like shown below
Figure: 5 sinric.com dashboard
Copy the API key and save it somewhere for future reference.
Now click on “ADD” under “Smart Home Device”
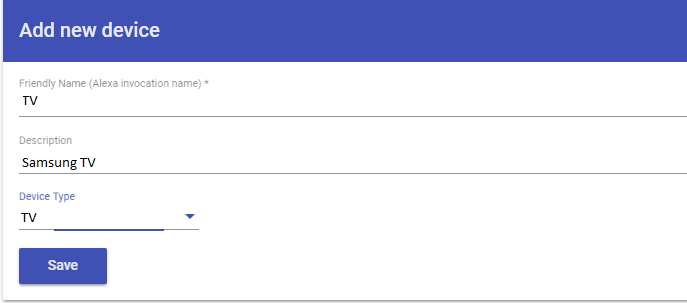
In the pop up window type a name for your entertainment device.In this example I’ve named it “TV” obviously.You can write anything in the description and finally the most important thing is to assign our device a “Type”. If we assign it the type “Switch” we can only send on/off command. So we select “TV” as “Type” so that we can give it commands like “Change Channel or Mute TV etc.
Figure: 6 Add device at sinric.com
We will repeat the above process and add another device i.e. the Set Top box. We will select “TV” as device Type since we need channel and volume control as well. Here is how the dashboard looks now.
Do not forget to copy the device ID for both the devices as we need them in our code.
Once we have done creating the devices at sinric.com we can connect Alexa and Sinric by adding “Sinric” skill to our Alexa app.
- Go to Home > Skills section in your Alexa app and search for “Sinric” skill and enable it.
- Now Go to Home > Smart Home and then click “Add Device”.
- It will show all available devices (in our case two).
Now we will program our NodeMCU board using Arduino Sketch to send IR signal.
We will tell NodeMCU to act as an IR remote, which replaces the remotes for TV and Set Top box.
If you are new to using Sketch for NodeMCU, here is a link to learn the same.
Assuming you have installed all the libraries required for IRremote8266 and sinric in Sketch referring to links given in this tutorial, we are ready to program our NodeMCU board.
Here is the sketch code for this project, which you can upload to the NodeMCU board
#include <Arduino.h>
#include <ESP8266WiFi.h>
#include <ESP8266WiFiMulti.h>
#include <WebSocketsClient.h>
#include <ArduinoJson.h>
// IR part-------------------------------------------------------------
#ifndef UNIT_TEST
#include <Arduino.h>
#endif
#include <IRremoteESP8266.h>
#include <IRsend.h>

#define IR_LED 4  // ESP8266 GPIO pin to use. Recommended: 4 (D2).

IRsend irsend(IR_LED);  // Set the GPIO to be used to sending the message.

ESP8266WiFiMulti WiFiMulti;
WebSocketsClient webSocket;
WiFiClient client;

#define MyApiKey "xxxxxxxxxxxxxxxxxxxxxxxxxxxxx" // TODO: Change to your sinric API Key. Your API Key is displayed on sinric.com dashboard
#define MySSID "your wifi ssid name" // TODO: Change to your Wifi network SSID
#define MyWifiPassword "your wifi password" // TODO: Change to your Wifi network password

#define API_ENDPOINT "http://sinric.com"
#define HEARTBEAT_INTERVAL 300000 // 5 Minutes


uint64_t heartbeatTimestamp = 0;
bool isConnected = false;

void TogglePower(String deviceId) {
  if (deviceId == "xxxxxxxxxxxxxxxxxxxxxx") // TODO: Change to your device Id for TV
  {
     irsend.sendSAMSUNG(0xE0E040BF,32);  // Send a power signal to Samsung TV.
     delay(500);
  }

  if (deviceId == "yyyyyyyyyyyyyyyyyyyyyyy") // TODO: Change to your device Id for Set Top Box
  {

     irsend.sendRC6(0xC0000C,24); // Send a power signal to tatasky.
     delay(500);
  }
}

void ToggleMute(String deviceId) {
  if (deviceId == "xxxxxxxxxxxxxxxxxxxxxxxxxx") // TODO: Change to your device Id for TV
  {
     irsend.sendSAMSUNG(0xE0E0F00F,32);  // Send a power signal to Samsung TV.
     delay(500);
  }

  if (deviceId == "yyyyyyyyyyyyyyyyyyyyyyyyy") // TODO: Change to your device Id for Set Top Box
  {

     irsend.sendRC6(0xC0000D,24);
     delay(500);
  }

  }


void webSocketEvent(WStype_t type, uint8_t * payload, size_t length) {
  switch(type) {
    case WStype_DISCONNECTED:
      isConnected = false;
      Serial.printf("[WSc] Webservice disconnected from sinric.com!\n");
      break;
    case WStype_CONNECTED: {
      isConnected = true;
      Serial.printf("[WSc] Service connected to sinric.com at url: %s\n", payload);
      Serial.printf("Waiting for commands from sinric.com ...\n");
      }
      break;
    case WStype_TEXT: {
        Serial.printf("[WSc] get text: %s\n", payload);

        DynamicJsonBuffer jsonBuffer;
        JsonObject& json = jsonBuffer.parseObject((char*)payload);
        String deviceId = json ["deviceId"];
        String action = json ["action"];

        if(action == "setPowerState") {
            String value = json ["value"];
            if(value == "ON" || value == "OFF" ) {
                TogglePower(deviceId);
                }
        }

        else if(action == "ChangeChannel") {
          String ChannelName=json ["value"]["channelMetadata"]["name"];
          String ChannelNumber=json ["value"]["channel"]["number"];


          if(ChannelName=="national geographic"){
            irsend.sendRC6(0xC00007,24);  // Send IR code for remote button 7
           delay(500);
           irsend.sendRC6(0xC00000,24); // Send IR code for remote button 0
           delay(500);
           irsend.sendRC6(0xC00008,24); //Send IR code for remote button 8
           delay(500);
            Serial.println("[WSc] channel: " + ChannelName);
           }
          if(ChannelName=="star movies"){
           irsend.sendRC6(0xC00003,24);  // Send IR code for remote button 3
           delay(500);
           irsend.sendRC6(0xC00005,24); // Send IR code for remote button 5
           delay(500);
           irsend.sendRC6(0xC00003,24); // Send IR code for remote button 3
           delay(500);
            Serial.println("[WSc] channel: " + ChannelName);
          }
         }


        else if (action == "SetMute") {

         bool MuteAction=json ["value"]["mute"];
          if(MuteAction==true || MuteAction==false){
             ToggleMute(deviceId);
           }

        }

        else if (action == "test") {
            Serial.println("[WSc] received test command from sinric.com");
        }

      }
      break;
    case WStype_BIN:
      Serial.printf("[WSc] get binary length: %u\n", length);
      break;
  }
}

void setup() {
  Serial.begin(115200);
    irsend.begin();

 WiFiMulti.addAP(MySSID, MyWifiPassword);
  Serial.println();
  Serial.print("Connecting to Wifi: ");
  Serial.println(MySSID);

  // Waiting for Wifi connect
  while(WiFiMulti.run() != WL_CONNECTED) {
    delay(500);
    Serial.print(".");
  }
  if(WiFiMulti.run() == WL_CONNECTED) {
    Serial.println("");
    Serial.print("WiFi connected. ");
    Serial.print("IP address: ");
    Serial.println(WiFi.localIP());
  }

  // server address, port and URL
  webSocket.begin("iot.sinric.com", 80, "/");

  // event handler
  webSocket.onEvent(webSocketEvent);
  webSocket.setAuthorization("apikey", MyApiKey);

  // try again every 5000ms if connection has failed
  webSocket.setReconnectInterval(5000);   // If you see 'class WebSocketsClient' has no member named 'setReconnectInterval' error update arduinoWebSockets
}

void loop() {
  webSocket.loop();

  if(isConnected) {
      uint64_t now = millis();

      // Send heartbeat in order to avoid disconnections during ISP resetting IPs over night. Thanks @MacSass
      if((now - heartbeatTimestamp) > HEARTBEAT_INTERVAL) {
          heartbeatTimestamp = now;
          webSocket.sendTXT("H");
      }
  }
}
Code Explanation:
When we ask Alexa to do something, Alexa processes the voice and passes response messages to our NodeMCU board through sinric.com. The message is a JSON formatted string called payload.
What we say to Alexa : Alexa, turn on TV
What Alexa replies: Ok
Message Received by our NodeMCU board (Payload):
{"deviceId":"5b2cbb1d77f4f95806b2dbd3","action":"setPowerState","value":"ON"}
So we send an IR signal (code) for switching on the device (with above device ID for example out TV) through the connected IR LED. The line of code is:
irsend.sendSAMSUNG(0xE0E040BF,32);
sendSAMSUNG() specific function provided by the IR library for Samsung TV. You can get similar functions for other TV models in the examples of IRremote8266 library.
E0E040BF is the Samsung TV remote IR code for power button
The power button of my Tata Sky remote will send the code C0000C
irsend.sendRC6(0xC0000C,24);
Here sendRC6 is the function for RC-6 IR protocol.
You can go through the sketch code and find out different signals we can send to out TV and STB.
You can even change the channel on the set Top Box by saying
Alexa, change channel to 708 on tatasky // channel number for National Geographic on my STB
Aleaxa will send the following payload to NodeMCU board through sinric.com
{"deviceId":"5b2cbb1d77f4f95806b2dbd3","action":"ChangeChannel","value":{"channel":{"number":"708"},"channelMetadata":{}}}
The code running on our NodeMCU board will read the JSON and send the channel number keys through the IR LED.
Similarly, we can say
Alexa, Change channel to national geographic on tatasky
Comment: Response received though chanel name comes under channelMetadata Payload{"deviceId":"5b2cbb1d77f4f95806b2dbd3","action":"ChangeChannel","value":{"channel":{},"channelMetadata":{"name":"national geographic"}}}
The code running on our NodeMCU board will read the JSON and send the corresponding channel number keys through the IR LED. This way we do not even have to remember the channel numbers for a channel because we have included the numbers in our code.
STEP 3: Test you new voice remote
That is it. You can now include codes for as many remote you have in your house and control them through Alexa device.
